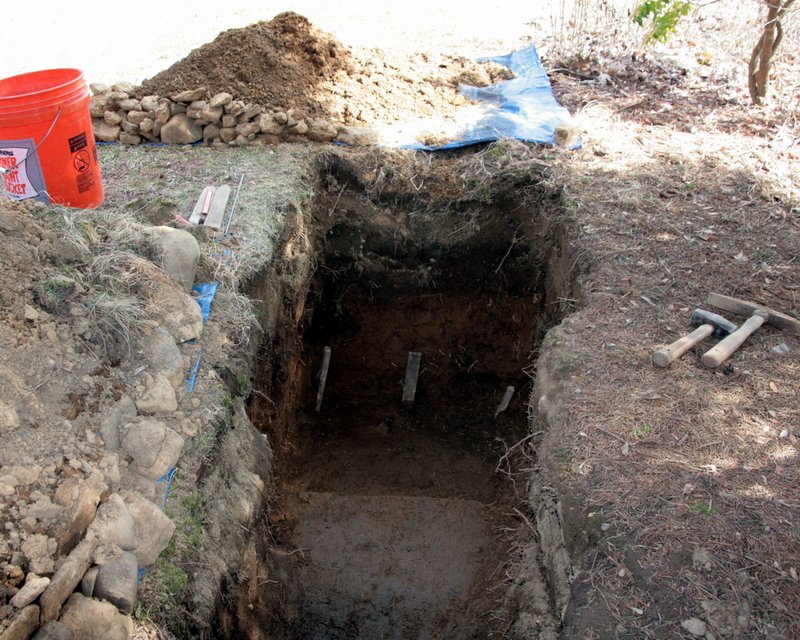
Large Scale Central

CVSRy Over-Engineering Dept. proposes to cover Deep Cut

Andy Clarke said:
Jon, if your gonna run trains into the tunnel in ““Deep cut””, I hope you don’t model the timber/ties laying across the track… :slight_smile:

Nope - They’ll be back up where they belong :slight_smile: I used Visio to scale a photo to a known size, then measured the basics with it… [url=lsc.cvsry.com/Post/WraysHillPortal-1200.JPG]

(http://lsc.cvsry.com/Post/WraysHillPortal-800.JPG)

[/url][color=blue]FF: Click to Enlarge - IE: Right Click Photo and select Open Link in New Window to Enlarge[/color]

David Russell said:
I gotta get up to the EBT this year! If you decide to make a real roll up door let me know as I can tell you how too accomplish this. ;)
I don't think I'll model an operating door since I don't have power near by. Yogi demonstrated a method using the corplast, scoring one side so it would roll around a corner. He did it more like a standard garage door on tracks since the roll would end up too fat.

A while back I talked about putting up a post on the roadbed to show the depth of the tunnel. After doing some reading today, I think that I will use a tell-tale for that function.

Very cool picture. I have yet to see that in person. A little weathering on your finished product and you could achieve that weathered look of this picture.

Jon Radder said:
Yogi demonstrated a method using the corplast, scoring one side so it would roll around a corner.
Yogi did this already? Damnation!!!!!!! Here I thought I had a slick idea.

Someone once told me “There are no original ideas”. That’s why I don’t worry about copying folks :slight_smile:

I drew out the basic shape of the portal and printed it in 1:20.3 scale to check dimensions, and I think it’s going to need to be enlarged. Scaling the picture the way I did, the opening is only 7 inches above the rail head by 6 inches wide. Width is OK, but I think I should add height before I cast this in concrete.

Oh yeah, I’d go for 12 inches in height.

I built my tunnel too low and may have to tear down the hill and rebuild the tunnel this year. Make SURE you tunnels are tall enough and wide enough.

Ric Golding said:
Oh yeah, I'd go for 12 inches in height.
At least that, especially if you ever want to run 1:20.3.

I build for 1:20.3. I have a gauge that I use, but have misplaced it. It is somewhere around 7" wide by 10" high (12x17 Scale Feet). I will upscale the opening to that as a minimum. I use the Backman Dizzie as a rolling clearance gauge - it gets under a 10 inch opening with hairs to spare :slight_smile:

Good weather today and I got home in time to get in over 90 minutes outside before it started getting dark. Deep cut is now a little deeper and a little longer as I excavate for the tunnel end / access hatch area. Of course, right where I want the corner of my blocks to go there is a big rock. I failed trying to dig it out, so tomorrow I’ll try and break it with a cold chisel and see if I can just remove the part that’s in the way.

Sounds like real railroad troubles. Black powder or dynamite sometimes has to be used.

A rock drill, a little “Nitro”", and you could live in a whole new zip code… :slight_smile:

Across the street they are remodeling. The contractor/owner has one of those 4WD long boom fork lifts he uses for almost everything. He said if I could get a chain around it he could lift it out. Fine idea, but at 32 inches down with only the corner of the rock showing, that’s more digging than I want to do in my lifetime :slight_smile: Andy’s Nitro idea sounds a lot closer to what I had in mind.

The rock looks to be decomposing granite because when I try to get under it with the shovel, it crumbles a bit. So I’m hopeful that with my big hammer and rock chisels I can bust it up quickly. Weather is sunny and warm again today, so I should know by sundown.

I think the key word here is “quickly”. In a lifetime, a week is pretty quick. Remember it is a hobby and you are doing this for fun. I say that to the sailers all the time, when they are sanding the bottom. Sometimes you get pretty dirty looks. :wink:

Jon Radder said:
Across the street they are remodeling. The contractor/owner has one of those 4WD long boom fork lifts he uses for almost everything. He said if I could get a chain around it he could lift it out. Fine idea, but at 32 inches down with only the corner of the rock showing, that's more digging than I want to do in my lifetime :) Andy's Nitro idea sounds a lot closer to what I had in mind.

The rock looks to be decomposing granite because when I try to get under it with the shovel, it crumbles a bit. So I’m hopeful that with my big hammer and rock chisels I can bust it up quickly. Weather is sunny and warm again today, so I should know by sundown.


Sun is almost down.
Is the rock gone?

Score: RR 1 - Rock 0 !!!

It was granite, and because it’s soft, the cold chisel didn’t work as good as I thought, but after a while it started to disintegrate by just hitting it with the hammer. After about a third was busted loose it had moved enough that I was able to coax the rest out in one piece.

Tomorrow the survey crew will be called out to determine what, if any, additional excavation needs to be done and Friday the forms will go in for the base. I’ve decided to pour a slab foundation set at roadbed level for the end first, then build the end box with block on top of that. Once that’s built I can determine the final excavation level for the pipe and get that place. The portal box will follow, and last the actual portal will be a face on that.

Sunday I need to take a college kid back to Keene, NH, so I probably won’t get any block set this weekend.

The CVSRy Purchasing Manager made a stop at Lowes today. The company truck is currently over-loaded with 14 cinder blocks, 14 bricks, a 16x16 paving stone and 7 bags of concrete / mortar mix. Moving that from the shelf in Lowes to the car was enough work for one day. The college kid is home. I’ll see if I can con him into helping me unload tonight :slight_smile:

Jon Radder said:
The college kid is home. I'll see if I can con him into helping me unload tonight :)
I'm sure helping Dad move construction material was high on Matt's list of what to do this weekend. Did you use the bad back and getting old routine saying "I don't know why this makes me so out of breath"? Probably best to just leave the stuff in the vehicle until ready to drive back and then hit him with the fact there was no room for his stuff. ;-)

Ric - You sure got that right :slight_smile: With a beautiful 70+ degree 1st official day of Spring yesterday, I did manage to get caught up to the schedule. Once again Ric called it - there was a boat load of excavation work to do in order to fit my design in the cut. At the East End Deep cut is now 38 inches deep and 24 inches wide !! When originally dug was about 12 inches wide and 28 inches deep at the East end. I’ll have plenty of dirt to back-fill and cover the tunnel. [url=lsc.cvsry.com/Post/DeepCutTunnel-3-1200.JPG]

(http://lsc.cvsry.com/Post/DeepCutTunnel-3-800.JPG)

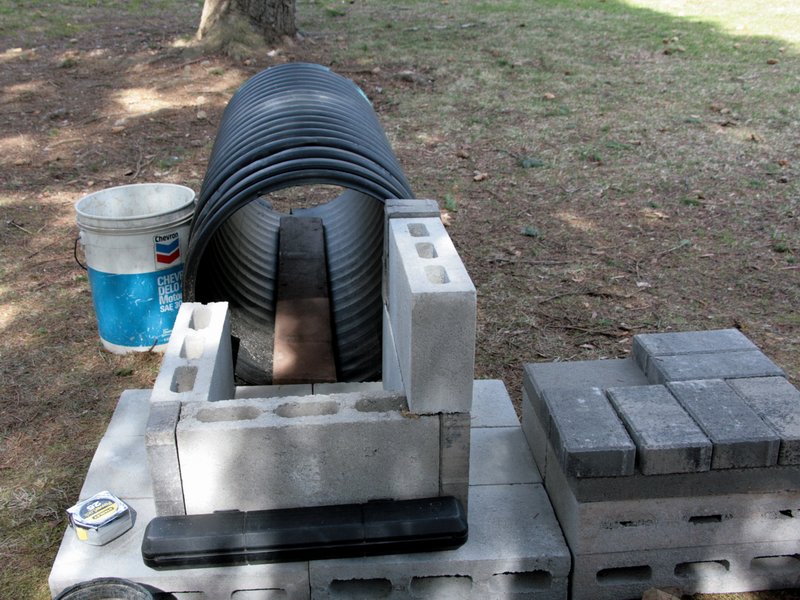
[/url][color=blue]Ready for forms - FF: Click to Enlarge - IE: Right Click Photo and select Open Link in New Window to Enlarge[/color] I did a test fit-up of the components to be sure my CAD calculations were accurate… [url=lsc.cvsry.com/Post/DeepCutTunnel-4-1200.JPG]

(http://lsc.cvsry.com/Post/DeepCutTunnel-4-800.JPG)

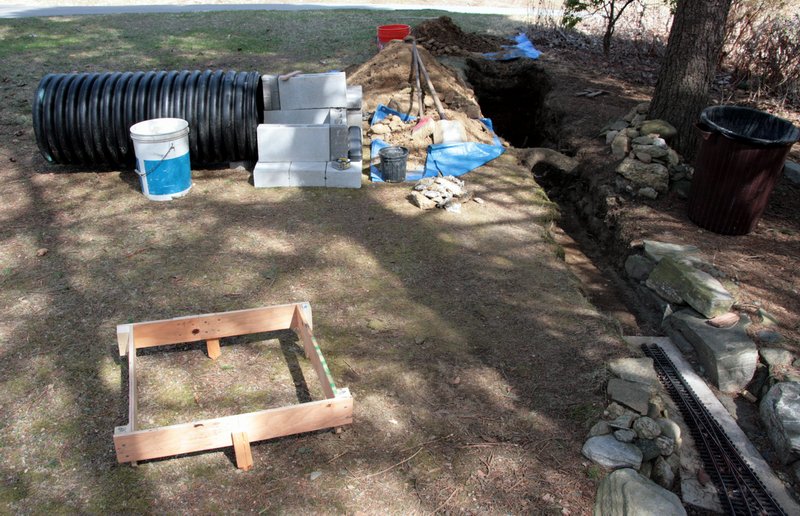
[/url][color=blue]Tunnel Test Fit-Up - FF: Click to Enlarge - IE: Right Click Photo and select Open Link in New Window to Enlarge[/color] The test fit used a block base, but in practice it will be a poured reinforced concrete foundation. With the measurements verified, I built up a form for the foundation using my outside frame box design… [url=lsc.cvsry.com/Post/DeepCutTunnel-5-1200.JPG]

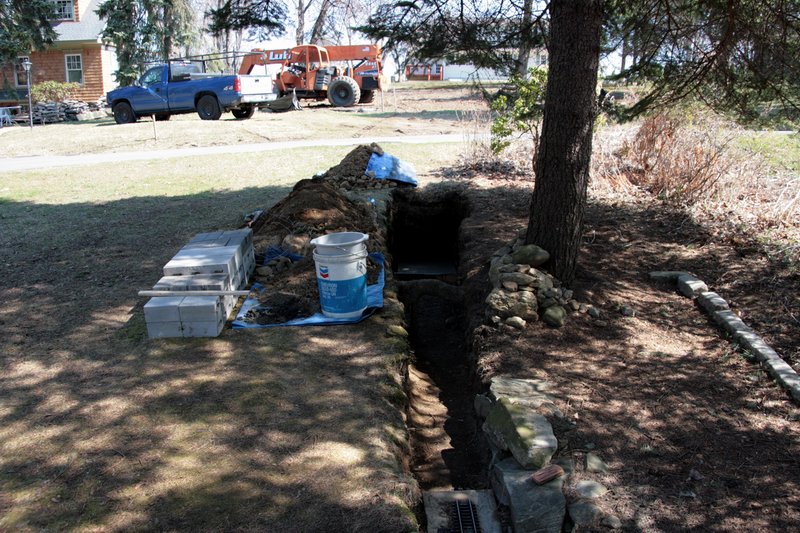
(http://lsc.cvsry.com/Post/DeepCutTunnel-5-800.JPG)

[/url][color=blue]Form and wide view of project site - FF: Click to Enlarge - IE: Right Click Photo and select Open Link in New Window to Enlarge[/color] In the picture you can see all of the dirt that needed to be excavated in order to make room for “the box”. My plan is to set the form for the end box just slightly higher than the switch pad at Pine Summit (in the right foreground), then use these two reference points to position the pipe and finally the portal sub-structure. Before the day was done, the forms were set and 240 lbs. of concrete was mixed and poured. The mixer I bought last Spring sure did save my back. Today I need to head North with the college kid, so no time for anything but clean-up. Heavy rain is predicted for tonight so it may be a few days before I can get back to it.

Had a little time after clean-up this morning to snap a few photos… [url=lsc.cvsry.com/Post/DeepCutTunnel-6-1200.JPG]

(http://lsc.cvsry.com/Post/DeepCutTunnel-6-800.JPG)

[/url][color=blue]Construction area - Mine and His :slight_smile: - FF: Click to Enlarge - IE: Right Click Photo and select Open Link in New Window to Enlarge[/color] Close up of yesterday’s work… [url=lsc.cvsry.com/Post/DeepCutTunnel-7-1200.JPG]

(http://lsc.cvsry.com/Post/DeepCutTunnel-7-800.JPG)

[/url][color=blue]Form filled and curing- - FF: Click to Enlarge - IE: Right Click Photo and select Open Link in New Window to Enlarge[/color]

Lot of work there Jon looks good. 38" deep you’ll need steps out, even Ken’s arms aren’t that long. :slight_smile: ;0