Thanks for your comments. Once back filled, it won’t look quite so massive - the plan is for the wings to appear about 2 feet thick and the top might have about the same exposed. I need to see now how the dirt grades out on top.
Jon,
Great work! Will the patch and original concrete weather at the same rate or will the patch stand out as the concrete matures? Thanks.
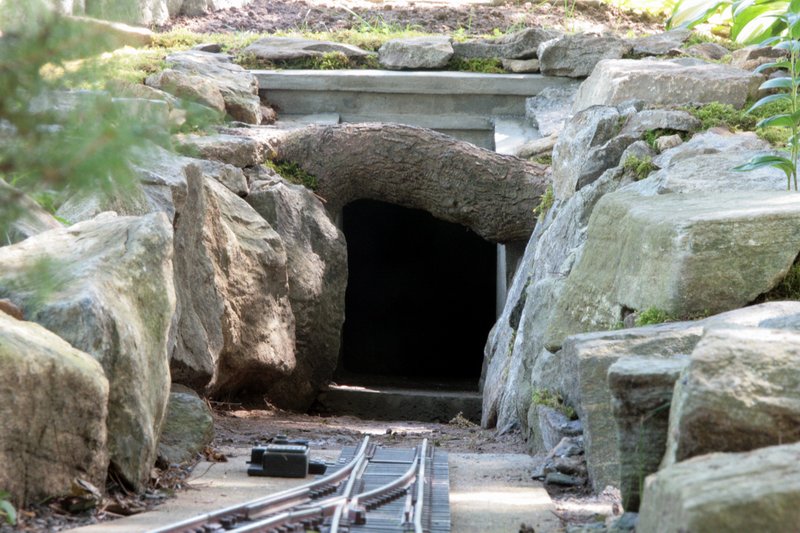
Thanks Mario. I think that the patch will most likely stand out, but that’s OK. In the 1:1 world lots of concrete structures get repaired and the repairs show. The entire top and sides were covered, kind of like a smooth stucco, so they will weather evenly. The front face has a bit of the original concrete, and if you look close you can see where the patch is.
Dave Marconi said:Dave, you missed the point about the corrugated pipe being "free". His labor, concrete, wire and beer were all just hobby expenses.
One hell of a save Jon :) that tunnel portal looks good. Awful lot of work though, just to hide a piece of corrugated pipe to keep from going to the land fill.:) :)
You got me there Ric :):)
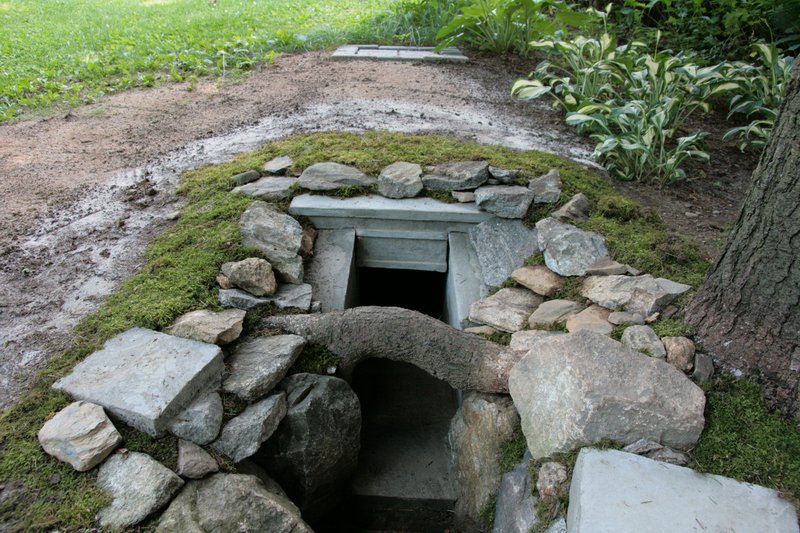
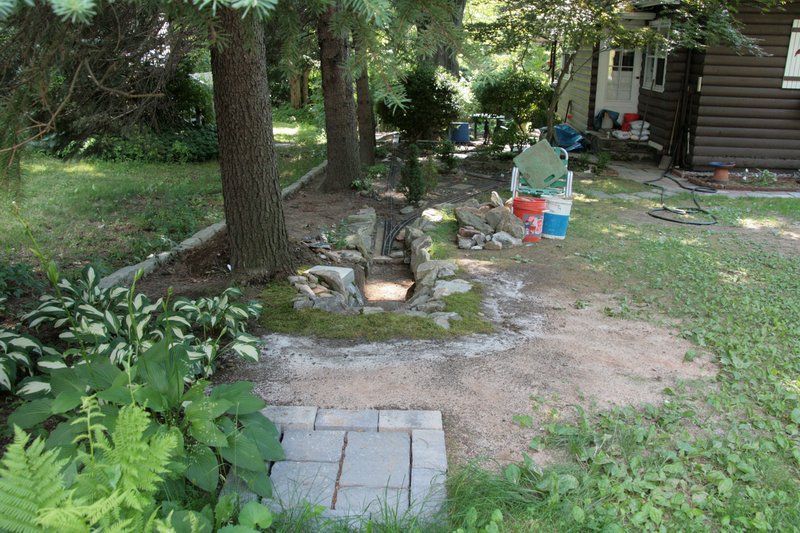
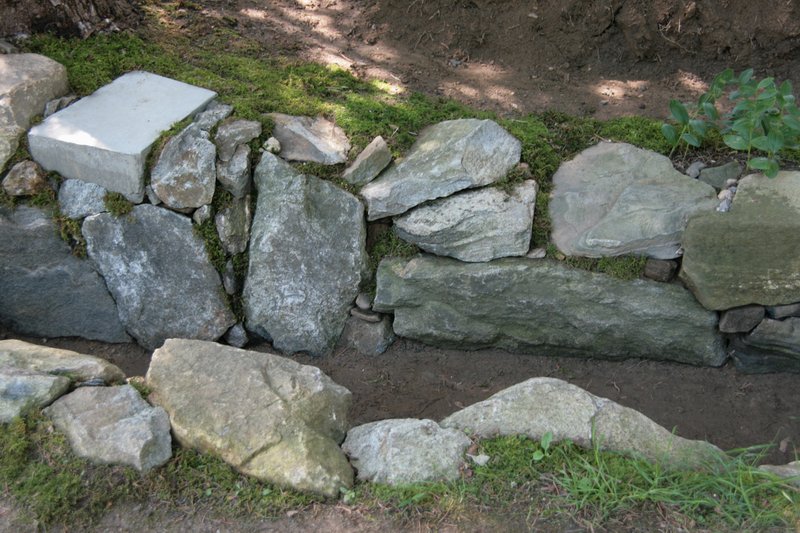
I had planned to apply some Qucicrete crack filler today before taking pictures, but the tube I had was too old and had gone bad, so you will just have to deal with the cracks that shouldn’t be there Here is a long shot view from Pine Summit. The back filling is complete and I’ve landscaped the edges with rocks and moss that was transplanted here in hopes it will grow… [url=lsc.cvsry.com/Post/DeepCutTunnel-66-1200.JPG]
(http://lsc.cvsry.com/Post/DeepCutTunnel-66-800.JPG)
[/url][color=blue]FF: Click to Enlarge - IE: Right Click Photo and select Open Link in New Window to Enlarge[/color] Closer in you can notice on the right where the squirrels took issue with me planting moss. The white stuff is pellatized lime that I spread over the graded soil too help neutralize the acid from the pine droppings… [url=lsc.cvsry.com/Post/DeepCutTunnel-67-1200.JPG]
(http://lsc.cvsry.com/Post/DeepCutTunnel-67-800.JPG)
[/url][color=blue]FF: Click to Enlarge - IE: Right Click Photo and select Open Link in New Window to Enlarge[/color] As viewed from the street… [url=lsc.cvsry.com/Post/DeepCutTunnel-68-1200.JPG]
(http://lsc.cvsry.com/Post/DeepCutTunnel-68-800.JPG)
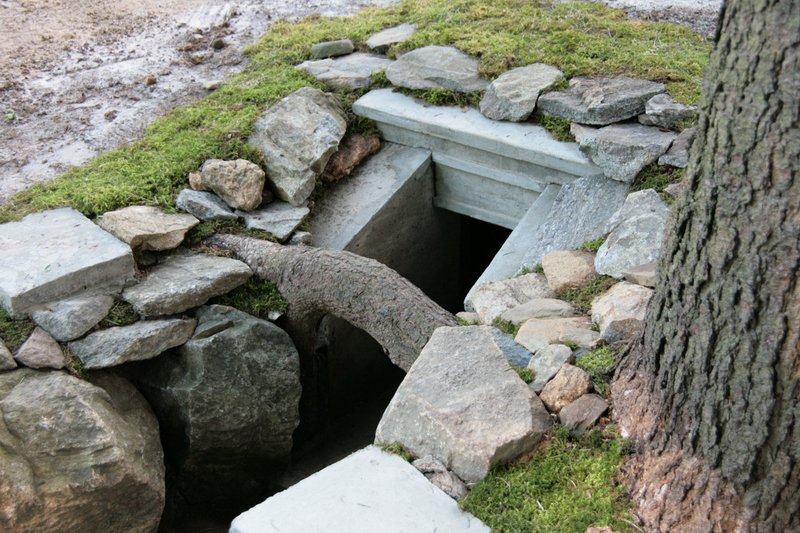
[/url][color=blue]FF: Click to Enlarge - IE: Right Click Photo and select Open Link in New Window to Enlarge[/color] In the above photo, The area to the right of the old cut will be seeded with grass, and the area over the tunnel will get another Hosta, or maybe some annuals. Close in look at the right-hand wing… [url=lsc.cvsry.com/Post/DeepCutTunnel-69-1200.JPG]
(http://lsc.cvsry.com/Post/DeepCutTunnel-69-800.JPG)
[/url][color=blue]FF: Click to Enlarge - IE: Right Click Photo and select Open Link in New Window to Enlarge[/color] And the left… [url=lsc.cvsry.com/Post/DeepCutTunnel-70-1200.JPG]
(http://lsc.cvsry.com/Post/DeepCutTunnel-70-800.JPG)
[/url][color=blue]FF: Click to Enlarge - IE: Right Click Photo and select Open Link in New Window to Enlarge[/color] A few more feet to go adding rock to the cut wall and I’ll be ready for the last pour - roadbed to connect the portal structure to the Pine Summit switch pad.
Looks great Jon. Nice to see ‘Natural Bridge’ has survived. 
looks real good, Jon…
Is the storage area for the “Urn Car” ready ? It will reqire at least 2 feet of siding space and one WR switch…I hope you built that into the tunnel…
Fred Mills said:Tracks not laid yet, but the interior is wide enough for a second track. I think I have plenty of time :D
Is the storage area for the "Urn Car" ready ? It will require at least 2 feet of siding space and one WR switch....I hope you built that into the tunnel.....
Today Marilyn was looking at it as said it looked like a tomb. I told her of your plan for perpetual parking. She laughed.
What’s the per diem charge for that?
Now you should build one on the other side of the house.
And let people think you have a tunnel running under the house 
Ralph
Bob McCown said:Not per diem, Ad Infinitum :D $1000/Scale Ton
What's the per diem charge for that?
Well, that wouldn’t quite work since the track leading into the tunnel is headed away from the house, but I do have a retaining wall, far on the other side of the yard that could be the other end of a very long curving tunnel
That will be phase 236. In about 14 years.
Sooner than that. Just 12 years!
That looks great. You should put a small solar light at the entrance and maybe at the end as well.
Shawn said:Somewhere around 200 posts ago, Ric suggested something similar and I agreed to install a light inside the tube to make it easy to check the tunnel for obstructions. Once I got the tube firmly in placer, I remembered that. A little late for placement at the center :(
That looks great. You should put a small solar light at the entrance and maybe at the end as well.
I did get a really cool LED flashlight for Father’s day that might be easily modified to run off a solar cell. Pointed down from the access portal it might light up the end enough to see in from the portal.
It’s only a few days short of 5 months since this project began. Today I declare landscape work on the cut and tunnel is complete, With only placement of roadbed and track waiting to be done, I cleaned up the area and took some pictures. In this long shot at the upper left there is some Belgian block used as a garden edge. I decided that it is too heavy so it will be pulled today and replaced with either plastic edging or some half pavers. [url=lsc.cvsry.com/Post/DeepCutTunnel-71-1200.JPG]
(http://lsc.cvsry.com/Post/DeepCutTunnel-71-800.JPG)
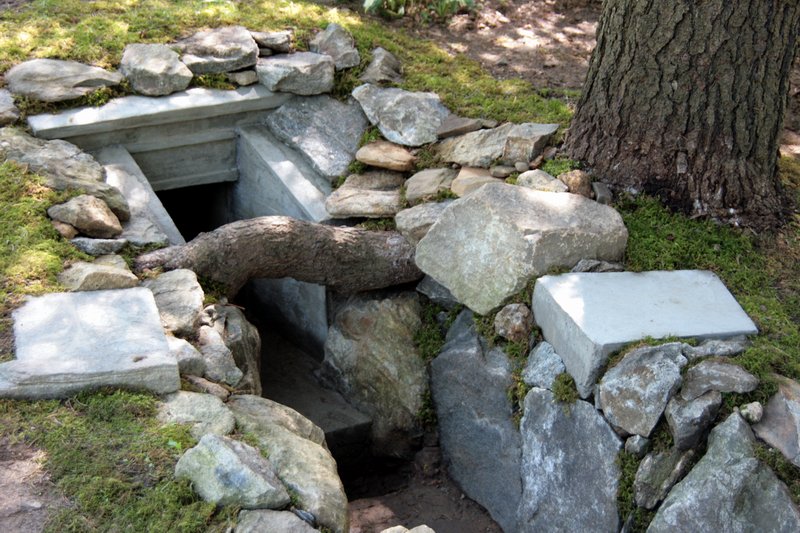
[/url][color=blue]FF: Click to Enlarge - IE: Right Click Photo and select Open Link in New Window to Enlarge[/color] Landscaping around the portal and future bridge abutments is complete… [url=lsc.cvsry.com/Post/DeepCutTunnel-72-1200.JPG]
(http://lsc.cvsry.com/Post/DeepCutTunnel-72-800.JPG)
[/url][color=blue]FF: Click to Enlarge - IE: Right Click Photo and select Open Link in New Window to Enlarge[/color] A few of the BFR’s that line the cut wall… [url=lsc.cvsry.com/Post/DeepCutTunnel-73-1200.JPG]
(http://lsc.cvsry.com/Post/DeepCutTunnel-73-800.JPG)
[/url][color=blue]FF: Click to Enlarge - IE: Right Click Photo and select Open Link in New Window to Enlarge[/color] An wider shot… [url=lsc.cvsry.com/Post/DeepCutTunnel-74-1200.JPG]
(http://lsc.cvsry.com/Post/DeepCutTunnel-74-800.JPG)
[/url][color=blue]FF: Click to Enlarge - IE: Right Click Photo and select Open Link in New Window to Enlarge[/color] And finally, a telephoto shot from track level… [url=lsc.cvsry.com/Post/DeepCutTunnel-75-1200.JPG]
(http://lsc.cvsry.com/Post/DeepCutTunnel-75-800.JPG)
[/url][color=blue]FF: Click to Enlarge - IE: Right Click Photo and select Open Link in New Window to Enlarge[/color] I hope to finish the roadbed this weekend. I’m torn between concrete and ladder. I have materials for both in stock. For a short below-grade section like this, concrete may actually be easier, but I’m concerned about drainage because I have a slightly low spot where the tunnel roadbed ends now. If I end up with concrete I’m considering a leaving a 2-3 inch space to fill with gravel for drainage.
Nearly ready for trains! Congratulations!
Where do you guy’s go to steal whoops I mean collect yer rocks??? Regal Out here they’ll cite ya for trespassing, and or harboring stolen property!! Yikes!