Large Scale Central

CVSRy Indoor Division Phase IV

It started three weeks ago with moving all of my empty boxes to the attic (see thread boxes), then sale of a full drum set that was taking up space for years and finally the donation of a LazyBoy recliner to Goodwill. All of this was in preparation to remove a built-in liquor cabinet the previous owner thought was a good idea. We never use our basement for entertaining so it was just a catch-all for junk and it took up valuable real estate that kept my indoor expansion plans at bay.

Saturday and Sunday I did battle with the liquor cabinet and it is now stored outside under a tarp waiting to be re-purposed in the garage. This week I have been emptying storage shelves and moving what has not been sent to the land-fill into the space recently vacated by boxes, drums and chairs. Last night I disassembled Phase III. It’s been a while so I’ll re-post these Phase III completion pictures…

The track curving to the right is the main, track on the left and ahead are the Phase III expansion adding the town and industries of Willow Hill. This was always planned to be temporary using existing storage shelves as bench work…

Phase III served well, adding some indoor switching opportunities outside the yard, but I have always wanted more. This is the current indoor schematic with WILO being the expansion on the shelves…

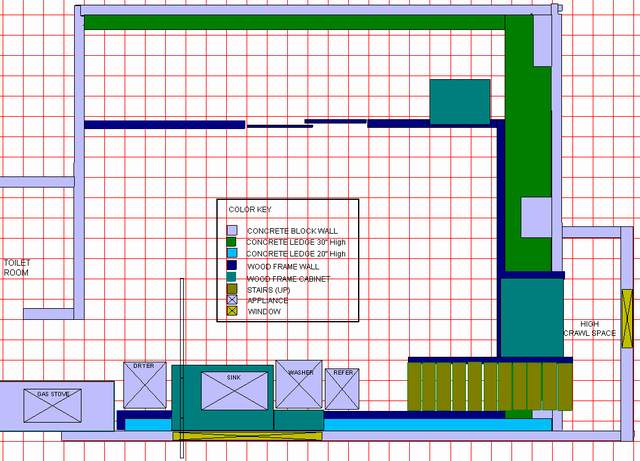
Tonight I will remove those shelving units and make way for construction of permanent bench work extending what exists in the first picture against the East wall. I have about 15 feet of wall too work with and, if I decide to take down some poorly built walls, even more along the South wall. This is a scale drawing of our basement I did when Phase II was being planned…

And the top left with the Phase II track plan over-laid…

Not all of the plan above was built. The stub yard at left was never added - only the outside track which became the NOOK Trans-Load facility.

Once the last of the shelving is out I’ll get accurate measurements of the available space and start working on bench / track plans. One initial idea is to add a switch at the top right side of the schematic (near NOOK) and connect the outside track (against the wall) to the main making it a subdivision main serving the town(s) in the expansion and possibly creating a run-around using the existing switch inside WILO.

Back to work!
Nice to see the indoor division being expanded. It will help with that cabin fever come February.

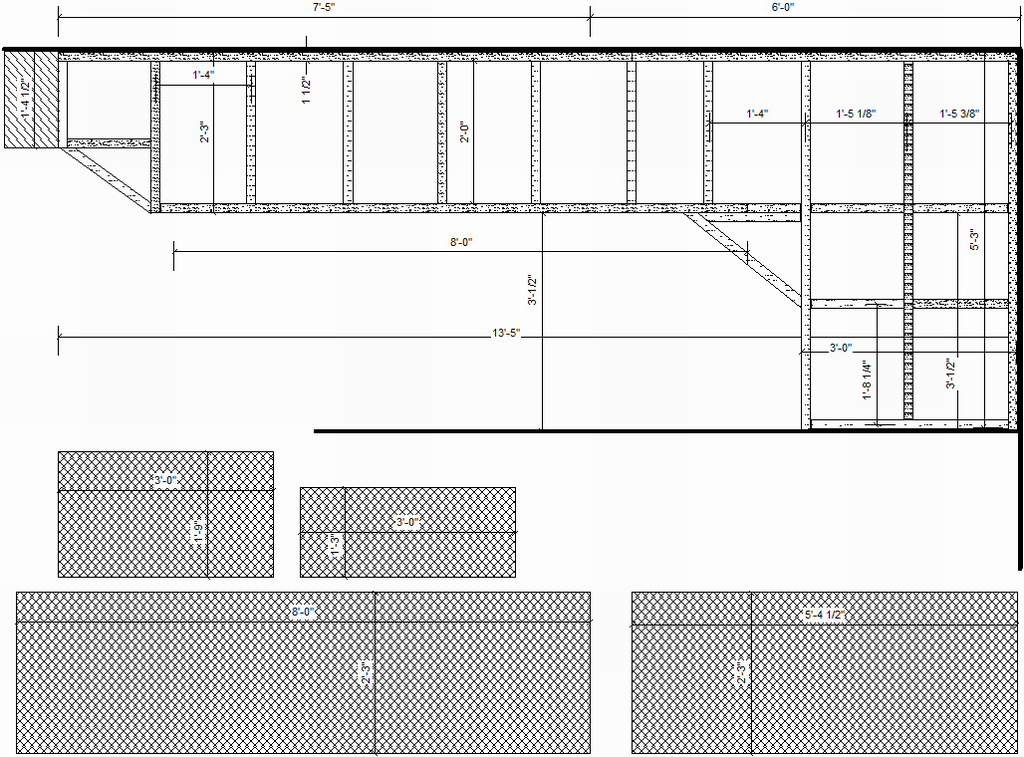
Last evening I got the last of the shelves dissembled and moved out. Tonight I worked out the bench work plan…

The outside edges will be attached to the cement block walls using Ramset masonary nails (set with explosive charge). There will be legs on isle side and if I’m lucky, I can use the bottom half of some of my shelving units underneath to recover some of the storage I just eliminated (http://www.largescalecentral.com/externals/tinymce/plugins/emoticons/img/smiley-undecided.gif)

Now that I have the bench size; I can start working on track plans.

using a Hilti Gun? .22 or .45?

Great Winter project. Ive always wanted to play with one of those nailers. Just something about those explosions.(http://www.largescalecentral.com/externals/tinymce/plugins/emoticons/img/smiley-sealed.gif)

Is this smaller than phase II ? Will it reside in the same corner? Looking for ward to seeing the new track plan.

Pete Lassen said:

using a Hilti Gun? .22 or .45?

Ramset .22 caliber. I have the cheapie that you hit with a hammer. A little scary to use. I tried it on rock once; not a smart idea. Very lucky the ricochet missed me.

Randy Lehrian Jr. said:

Great Winter project. Ive always wanted to play with one of those nailers. Just something about those explosions.(http://www.largescalecentral.com/externals/tinymce/plugins/emoticons/img/smiley-sealed.gif)

Is this smaller than phase II ? Will it reside in the same corner? Looking for ward to seeing the new track plan.

This is an expansion to Phase II, extending along the back wall of the basement, making Phase III more permanent and continuing to the right hand corner.

I did some more junk moving tonight and found about 10 more square feet available for bench. Need to update the framing plan. Plus if I takine down about 3 foot of wall that the previous owner put up I can gain even more real estate (http://www.largescalecentral.com/externals/tinymce/plugins/emoticons/img/smiley-cool.gif)

I guess some current pictures are in order. My P&S camera is in the car and it’s too cold to go get it. Maybe tomorrow evening.

John I think you will be better off using

This will allow you to really tighten up the supports, or remove them later . You do have a hammer drill?

Thanks Sean - I used the Ramset nails to hold up the first set of benches in this area. I have the tool and it’s fast. They aren’t all that permanent so long as you use the minimum needed to do the job. And no, I don’t have a hammer drill. I have used the Tapcon screws before and they are a lot more work with the pilot holes.

Why fasten to the wall at all? Freestanding is all the rage these days!

Finally got the “before” pictures. There is still a bit of stuff in the area that I haven’t decided on yet, but the floor is open. Looking South from the existing Phase II benchwork…

At the right, just beyond the shelves is the opening where the built-in cabinet came out of the wall…

In the picture above you can see that I have laid in a supply of studs to keep me busy while it snows outside today. This is looking around the corner to the right at the space that could be gained by opening up another 4 feet of lightly built wall…

This is looking back at the existing bench from where the previous picture was taken…

And finally the giant pile if stuff that came out of the shelving and now taking up the space vacated in the finished portion of our basement. Most of this will need to go back under the new bench work…

I need to do a accurate survey then update the framing plan so I can get to nailing 2x4s (http://www.largescalecentral.com/externals/tinymce/plugins/emoticons/img/smiley-sealed.gif)

And to address Rooster’s suggestion - Free standing is OK, but would take more engineering to get as stable as this bench is. This system requires a minimum number of legs interfering with storage below and it is simple to build.

Looking good John. It also looks like you have plenty of Aristo switches in those yellow boxes on top of the shelf’s. Isn’t it funny that us train guys always get the dungy unfinished basement or garage areas to play trains in. I just don’t understand. LOL

Chuck, I wish I had a space like that. But my house has no basement, and my garage is just storage at this point. Except for the part I walled off into a not big enough work space.

@Chuck - Yup, it’s a bit dodgy at the moment, but if I stay inspired there will be wall covering backgrounds and valence to dress it up a bit. I looked at a dri-floor systsem at lowes yesterday. Great idea, but pricey and it’s just sub-floor. We will occasionally get 2-4 inches of water so I don’t want to do much with the floor that could be water damaged. Maybe that new fangled concrete finish would dress it up some.

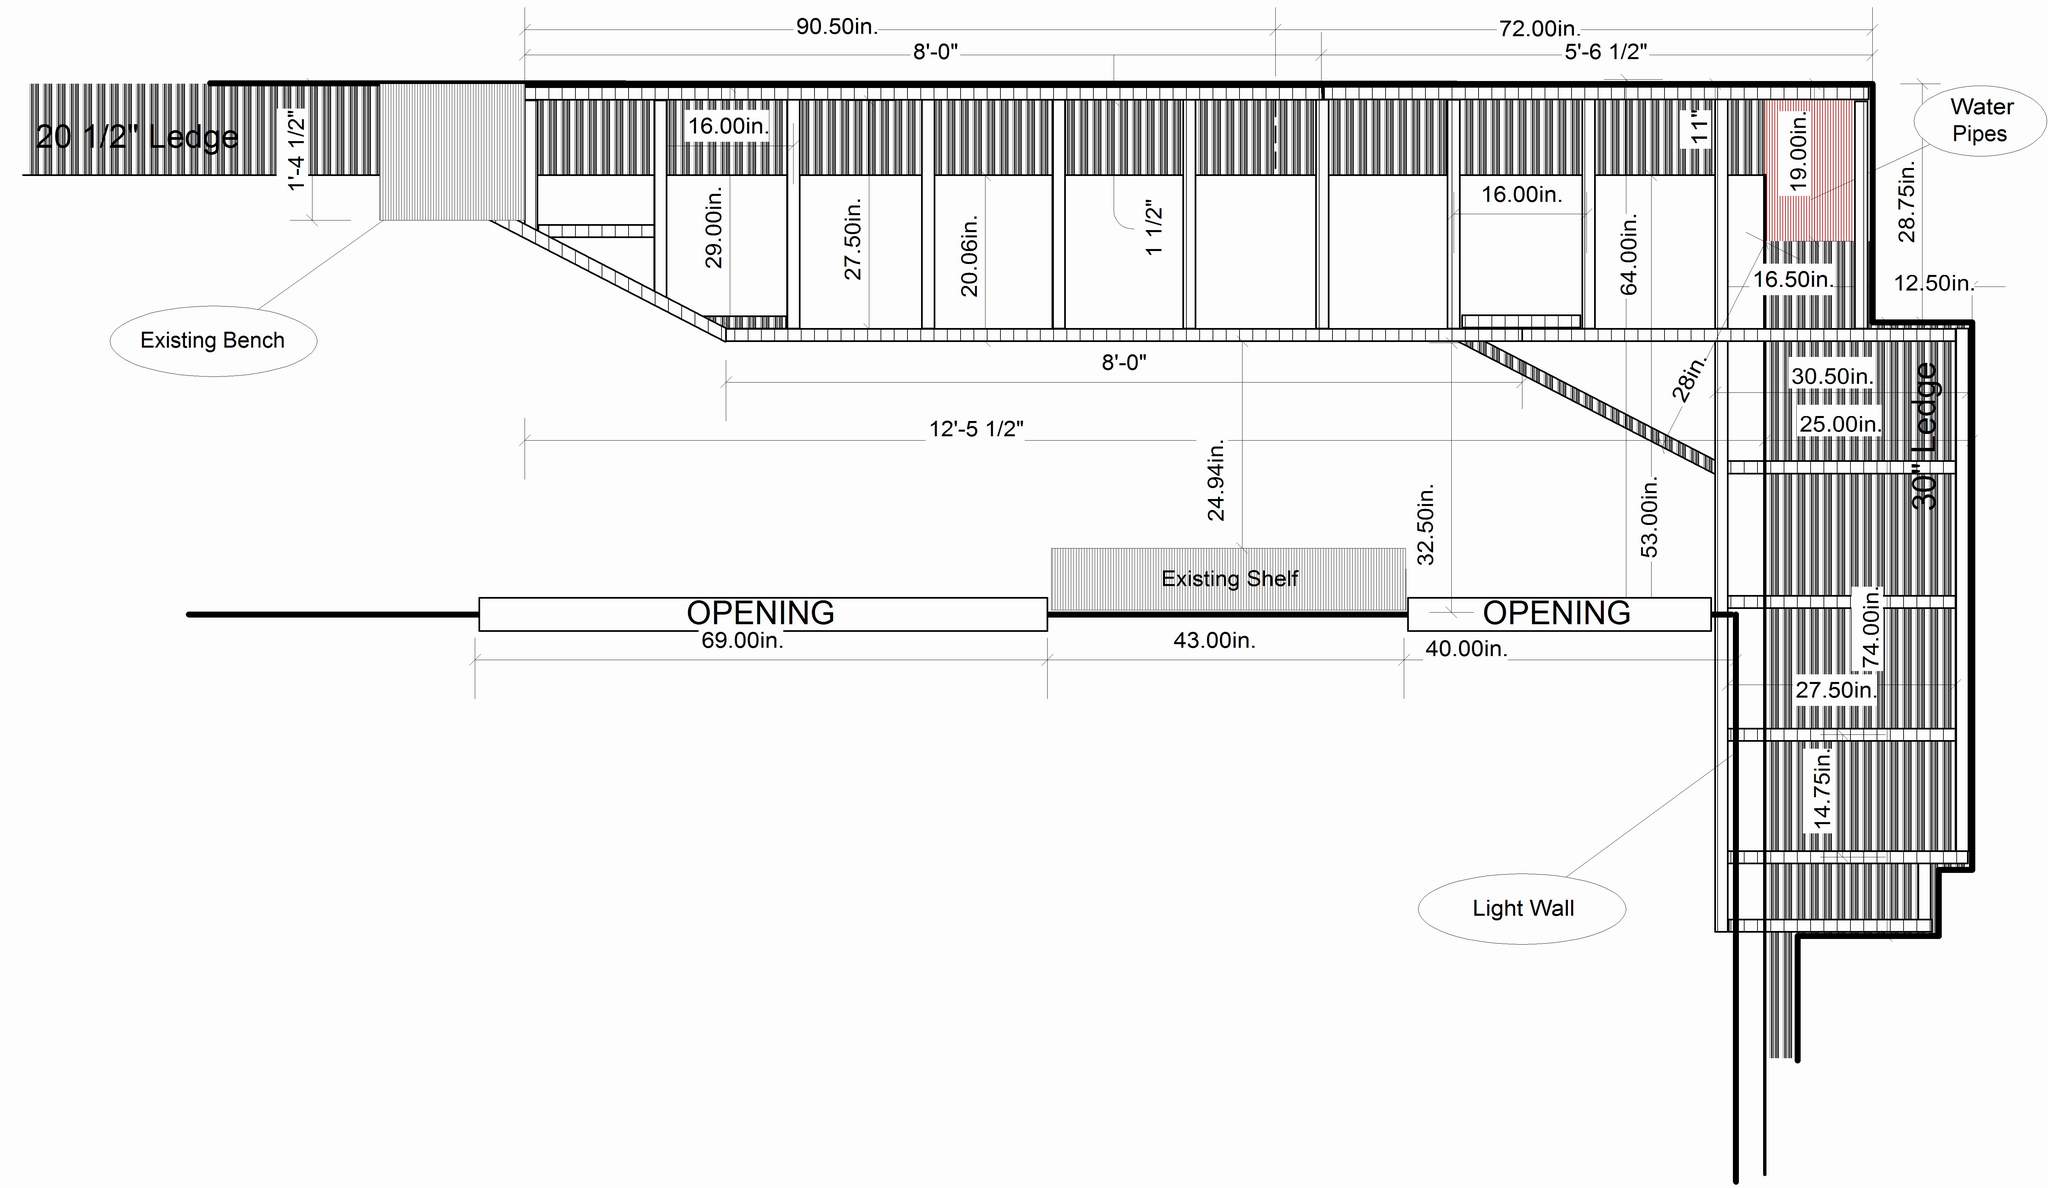
I did an accurate survey this morning and between digging out from the snow and cleaning up from where our new dog knocked over my tool shelves I did manage to get an updated bench plan done…

Edit to add that the above drawing is hi-res, just use your browser’s View Image function to see it full size (Firefox Right Click View Image)

keep them coming Looks good, I wish we here int the southwest had basements.

and big back yards

but we have nice winters with none of that white stuff.

Here is the preliminary track plan. Darker bench is existing. Red area is where the water pipes will interfere. I started by duplicating what I just disassembled of Phase III, then tweaking that. The left (outside) track on the old bench might be able to be connected with a new switch as shown just above the wall line. That could allow for a run-around; something my layout has always lacked. Not looking to create a puzzle, but this looks a little too basic so far…

Like the bench plan, this is a high-res image that can be seen full size with View Image.

One weird thing; I am using RR Track and I can’t duplicate on the computer what I can build on the bench, so like any track plan this is just to get an idea of what will work. In practice, the track will go where it flows best.

Looking forward to the progress pics (http://www.largescalecentral.com/externals/tinymce/plugins/emoticons/img/smiley-cool.gif)

Hum, If you wanted to get real adventurous you could work in a wye on the right side of the existing loop. Looks like the wall wouldn’t interfere. Like where it’s going so far.

Construction has begun. Didn’t get done as much as I planned, but the back support is attached to the wall and I’ve worked out that tricky angle section at the left. Me and angles don’t get along well, but it only took two adjustments to get where I wanted to be (http://www.largescalecentral.com/externals/tinymce/plugins/emoticons/img/smiley-cool.gif)It got late and I didn’t grab any photos. Maybe later today.

I had to puppy sit while Marilyn did grocery shopping. Completely re-worked the track plan making it much more challenging to switch. I don’t think I have enough switches to execute this, but it kept me busy…

I’d consider a Wye, but it isn’t needed as my balloon track allows for turning trains, plus that section of the loop is on a bridge, so splitting of a Wye would be more technically challenge than I am up to (http://www.largescalecentral.com/externals/tinymce/plugins/emoticons/img/smiley-surprised.gif)In the above I eliminated the switch at the left side of the loop killing the run-around. Still working on ideas. My limiting factor is available switches unless I decide on another small locomotive / short car zone with R1 switches and curves.