Large Scale Central

Crane Car for the Triple O

Gents,

Thanks for the tips and humor (or humour, if so inclined!). Here’s where this project stands going into the weekend…

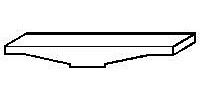
I got the frame filled and sanded. It’ll do, even if not entirely square. I’ll use my commercial strip wood for the two needle beams (new term for me!), and I have some larger commercial strips to serve as bolsters for the trucks.

The bolsters are
the next engineering hurdle. While Kid-zilla and senior members of the 1:24 gang inspected a battered LGB combine from the tub-o-trains (likely our next project), the rest of us headed out to the rails to do some pre-cutting testing. The trucks have to swing enough to pass through the R1 curves. Mounting them to the frame won’t work, and, as testing showed, mounting a bolster that would run all the way across the frame was equally over-constricting. The answer will be a bolster the width of the LGB trucks:

I plan to glue the bolsters to the frame, tack the trucks in place for testing, then, if that works, use wood screws to hold the trucks fast. If that doesn’t work, I’ll pry off the bolsters, glue them to the trucks, and let the bolsters pivot with the trucks. Goofy-looking is preferable to non-functioning!

Speaking of goof-looking, this flat car will ride rather high, courtesy of my choice of dimensions for the timbers.

I’ll get over it, and simply term it “robust.”

If all goes well, we’ll convert craft sticks to decking, and have a working, if cetainly unique, flat car by the end of the weekend. If all goes as it has to date, the frame will get another flight test…

Eric

1 Like

Eric, bolsters are usually tapered at each end to clear the wheels.

Not sure how you can do that on your ‘table saw’. I might use the finish sander - just a question of mounting the bolster on an angled support so it stays the same alignment/angle as you sand each side.

1 Like

And even easier to accomplish Eric is a bolster, your pictured piece of wood, cut just short enough to fit between the inside faces of the wheels. Not prototypical but many I’ve seen who have used this method on scratch builds. Seem even some of the GR plans used the rectangle block for bolsters
JMHO YMMV :sunglasses:

Marked the blocks in such a way as to try a taper and cut back if required. Full update later…

Nobody’s going to see it in normal operation. You can make one without a taper by just centering a short block on top of a longer block of wood.

1 Like

Eric. There is a fine line between prototypical accuracy and what works. I second Bruce’s comments. Don’t get to hung up on the taper. A straight piece of wood that runs the width of the car with a piece at the attachment point that is thick enough to give clearance and close to right ride height works

Thanks everyone. I have learned to prioritize function followed by fun then adherence to prototype, and, taking the advice above, I tried to split the difference. I took my wood blocks and mounted them in my vise…


…and sanded them down to a triangular taper.

Kid-zilla and I then used thumbtacks and masking tape to temporarily mount everything…


…and took it out to the track for a test run.


I, for one, think the bolsters took away some of the ungainliness.

Diesel Dan took our contraption through our curves (Video: Diesel Dan Taking Our Contraption Through Our Curves) then decided “he’d” like a spin on the Track of Perpetual Puttering. Guess I know what my next project will be…

Then, just because I’ve never used it before, I used the brad nailer and nailed the bolsters and needle beams in place.


That was easy! As long as you don’t care that the brads are not in straight lines, at least.

The washing machine broke, so that set us back a couple hours. While this is still not square, it is at least functional. I’ll take that as a victory and move on to priming and painting the frame and mounting the trucks.

Updates as required! Enjoy the rest of your weekend!

Eric

I thought you’d find that finish sander useful. :grin:

Quite the understatement! It literally saved this project.

No more progress today (though I isolated and cleared the fault in Diesel Dan; there was a short across a four port screw terminal). I found some thick wire from a previous failed project that will become truss rods. I will pick up some cotter pins to serve as queen pins this week. I am going to forgo getting turnbuckles for this project.

While at the hardware store, I am also going to see what options I have to mount the trucks to the bolsters. I had planned to use some woodscrews and washers, but I saw this cool thing on p. 25 of the 2022 “Garden Trains Annual.” It is some sort of socket that bites into the wood with a machine screw that threads into it. Overkill?

Kid-zilla selected black for the train car. I have black primer in abundance (He has dictated the crane be black and yellow to match Diesel Dan. I am not sure what he is envisioning for this crane!). We’ll paint it when we’ve got the truss rods mounted.

I have to start thinking about the crane, too. I do want it to be able to swivel, so I am going to have to figure out some sort of socket so it can rotate. I was originally not going to make it so the boom can elevate, but maybe I’ll take a crack at it.

Have a Great Week!

Just a quick note that Ozark sells turnbuckles that are open on one side and just slip over a wire - cheating, but very effective!

That’s what I usually use. Threaded inserts (the socket the bites in the wood) are OK, but overkill, perhaps. Unless you have some shouldered bolts the right size for your trucks.
On that subject, I often cut a short length of brass tube as a sleeve, to go over the woodscrew. Quite apart from the fact that the truck may have a big hole as a pivot, it stops the screw threads chewing up the truck.

Final thought, as you are making this from scratch - the truck pivot needs to be loose at one end so the truck can rotate and rock both forwards and backwards and sideways. I use a small nylon washer to let it rock.
The other truck needs to rotate and rock fore/back but not so much sideways, so I use a bigger washer. If you check out a Bachmann truck, it as pads at the side of the pivot that rest on bumps under the car body.

@PeterT , Thanks for the tips! I made a hardware store run today, so we have what we need to proceed. I also wrote Ozark to get a sense on shipping. If they can stick turnbuckles in first class envelope, great! If not, I have to do an inventory of needs to make the shipping worthwhile.

Eric

We’d all be very interested to hear if you get a reply. Ozark is having difficulties, and although you can order and they ship items on the website, they don’t (didn’t) answer the phone or email.

Honestly you don’t need Ozark turn buckles. Just use metal coat hanger with 1/8" plastic tubing glued in the middle of the truss rods. It’s all about the illusion not the details.
As for mounting the trucks …just mount them with screws into the wood loosely allowing for rock/rocking/sway and you will be fine.
However this is only my opinion but it works well for the 3’ long cars I prefer to model.
Hope you and the family have a good Easter weekend!

Happy Easter to You, too, @Rooster !

As it turned out, I sort of split the difference, technique-wise. As @PeterT thought, I had not heard from Ozark. This gave me reason to hold on the order. I am not going to spend $10 on shipping for $2 of parts!

As for the project, the picture below is illustrative of the issues I had squaring this thing:


Note how much shorter it is than the LGB low-sided gondola that provided the original measurements! I had eyeballed the location of the needlebeams based on aesthetics rather than this gondola, which, of course will make the truss rods a tight fit if I want the trucks to actually pivot.
The not-quite-perpendicular center beam also precludes any inner truss rods. To get the truck to line up, that centerbeam will be right over a couple wheels, as demonstrated below:

That need-to-develop-skills thing rearing its ugly head again!

Given that, I looked at my next two projects, a shattered combine and a busted stock car from that tub-o-trains:


The truss rods on the combine, if “wrong” for a crane car, are consistent with other rolling stock on the Triple O. Two truss rods will work.

I was not sure if I could get my wire of choice to straighten out enough, so I bought some thin brass rods as a hedge (and as fodder for the Mik!) when I bought the stuff to mount the trucks. I need this for handrail material, anyway, so it was a good purchase. I tapped a couple holes in the needlebeams, trimmed some cotter pins, set them in place with TiteBond III and let the whole thing dry. The last picture gives an indication of how tightly I’ll have to bend those rods to clear the wheels:


I did consider prying off the needlbeams and going with a single one in the center, but I figured there should be ONE part of this project I didn’t redo!

Tomorrow, I’ll mark the rods, but a 45 degree bend in both ends, thread them through the cotter pins, tack the trucks in place, and see how this rolls. If it tracks, then I’ll solder the rods in place and glue the bitter ends to the inside of the frame and give it a coat of flat black primer. I forgot, I did get that Minwax sealer @David_Marconi_FOGCH mentioned. The frame has a nice coat of that on it and is ready to recieve the paint!

Thanks to all for the continued rudder orders. We are moving forward.

Eric

P.S. The boys were occupied today. They asked to bring their PLAYMOBIL to the railroad, and as one recreated the Battle of New Orleans on one part another had his own Jurassic Park adventure going on elsewhere. The trains didn’t see a whole lot of action, but the railroad did!

I was going to say that the needle beams could be anywhere between the trucks, but you beat me to it. :grin:

Interesting idea, Rooster.

You triggered another idea in my brain (though I’ve not tried it), FWIW.

Put a piece of plastic or brass tubing over the truss rod, like you said. CA glue it in place. Slide on a piece of heat shrink tube, heat it and trim the ends. If more detail is wanted, Dremel away the center portion of the heat shrink and underlying tube, on the side facing outward.

Update:

Not much progress beyond bending the brass to shape due to Easter obligations and the near death of our washing machine. I did put 30 degree bends into the truss rods using a plastic 30-60-90 triangle (Much easier to work with this brass rather than piano wire I used for Diesel Dan’s handrails last year!). The angle looks good and should allow the trucks to spin. We will look through other project boxes to see if we can find “turnbuckles” before soldering everything in place.

Updates as conditions merit!

Thanks again for all the tips!

Eric

Yes it is but everything has it’s use and reason. :sunglasses:

Eric;

Weed whacker line works, plus it’s easier to bend. The turnbuckles are just wood dowels with tapered ends.

Best, David Meashey

@Dave_Meashey , genius!