Large Scale Central

Craig's MIK build

Alright, alright… I’ll dive into the challenge this year. I’m not done with my napkin drawing yet/foam core mock up but I’ll spill the beans.

As many of you know I’m modeling the area of Redmond, WA. One of the distinguishing buildings that are in the area I’m modeling is the depot. The depot was originally built by the Seattle Lake Shore and Eastern. This photo is around 1890-1900.
]

The depot was open and in use in 1970, closed and windows boarded up by 1971 and torn down by 1972.

The depot is a 18’ by 79’ structure with board and batten siding. It should be a fairly straightforward build using 1/8" styrene as the core. I’m first going to mock one up in foam core to make sure I get the dimensions right, like windows and doors. I probably won’t do any interior details but that’s still up for grabs ( this might for me to pick 70 or 71 as a modeling year finally with the window issue).

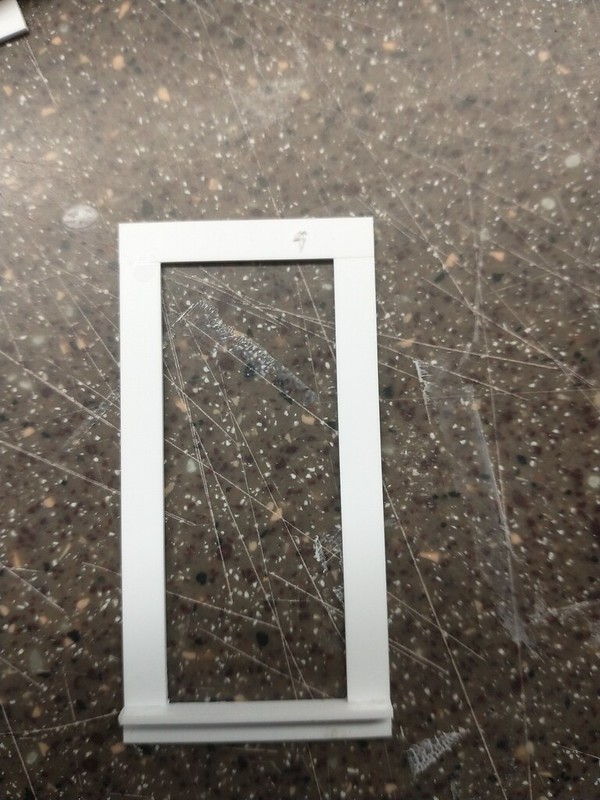
The windows look to be standard 4x4 double hung, that I’m guessing are 12" square glass ( based off the batten spacing).

I was trying to go low tech this time around and build a mockup out of foam core vs making a CAD model. Well after a 3 attempts of a mockup, I’ve returned to the CAD modeling method of creating a drawing.

I have the basic building footprint from the tax assessors office, so I thought that it would be ‘easy’ to mock up in foam core.

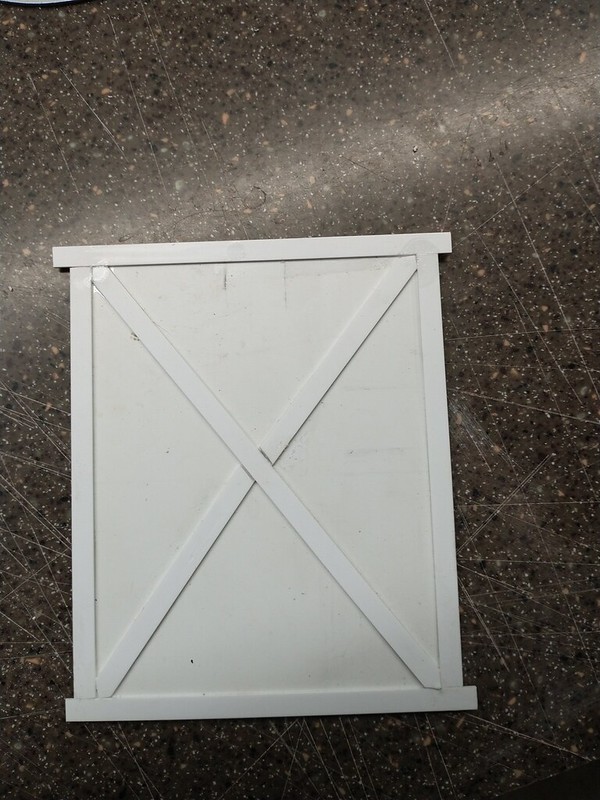
This was mockup #1. The wall heights were completely wrong, and the end walls were even more wrong…


Attempt #2 on wall ends…

Attempt #3

Getting closer but something wasn’t clicking right. I discovered that I was basing the wall height off the wrong width of the building (22’ vs the correct 26’). The 4’ bump out on both ends was messing with my design, and I couldn’t get it to look right. Attempt #3 was closer, but it still looked off.

Last night, I opened up Sketchup and started playing around with the photo matching tool.


It’s getting closer and I’ve also confirmed a few measurements that I thought were correct.

  1. I drew some board and battens. They are ~1’ 11" or so apart. Pretty darn close to the 2’ that you would expect with a 12" board.
  2. The base of the freight door is a little over 4’ above the ground, and it squares out to about 6’ x 6’. This was kinda of my initial guess as well.
  3. The wall height is about 10’ 9" vs the 10’ 6" I can up with on the foam core.
  4. The window, smaller than the 3x6 like Scott suggested, but almost 2’ wide.
  5. The window is centered along the centerline of the roof.

I hope to get the CAD model done today, and then quickly cut up some foam core for an official ‘napkin’ drawing.

2 Likes

wait, how did a foam core mockup become a napkin drawing? I missed something

I don’t think I’ve ever done a proper “napkin” drawing.

WAIT. There’s such a thing as a proper “napkin” drawing? What’s up with THAT?

I think that’s the problem. I don’t ever use a napkin to draw on. The wife would be mad if I drew on her cloth napkins and cut them up. :joy:

I was attempting to try to learn a new skill in the spirit of MIK by using photos and foam core to make guestimated drawings. But we have seen how that had turned out so far!

1 Like

See…there you are making assumptions about what your wife might do…you COULD be wrong… :innocent:

1 Like

Going back to low tech methods again. Most of my estimated measurements were pretty darn close to wait I was seeing in SketchUp. Ironically, I feel like I got more confused when some folks on the ProtoLayouts group.io list suggested that the freight door was 8x8 and the windows 3x6. I has used the board and batten spacing of 12" to guesstimate a 6x6 freight door and a 24x48 window pane size.

About the only thing the SketchUp drawing was showing me so far was that I should have used a wall height of 10’ vs 9’ 6". The 9’ 6" comes from a tax assessor’s report that called the interior ceiling height out at 9’ 6". Well add 6" and it makes much more sense to cut a hunk of wood for a wall at 10’ vs 9’ 6"…

And some internet sloughing shows that the color separation on the depot was around 36-40". That’s at the framing of the window trim. I was putting the window glass at 36". I’ll bump that up to a 40" over ground and call it good.

After all, the depot is long gone!

Well last night I didn’t quite finish the foam core but I’ve got enough information to start. I figured since I suck at making windows and doors, start with those first.
One door 95% done. I sure am liking my styrene storage method. The backside of the door is .060" stock, the framing is .030 x .100 and .030 x.188. the framing is .125 ripped to 12" scale. Edit: thought it was 6" but measured to 12". Oops. I’ll see how deep it looks once framed into the wall. A lot easier to take 6" off later than add 6".
IMG_20220108_121646957 by Craig Townsend, on Flickr

I really like how you used the Sketchup photogrammetry tools Craig. I’ve played with that in years past, need to get back up to speed on it.

Great build! I love the historic elements!

The photo match tool is a handy tool but man I really like using Onshape to draw. So much easier!

Many many years ago when I was working on my feed mill I discovered this method. I remember reading an article in Model Railroader as a kid on using a photo and drawing disappearing lines to measure a model. Same method here but just with digital lines. It’s not perfect but it sure helps.

Funny how I guessed the size of certain parts and low and behold I was pretty close in my guess. I’d assume that a builder would cut a hole at say 12’ vs 11’ 10 3/4". Lol :rofl::roll_eyes:

1 Like

One door done.
IMG_20220108_180425367 by Craig Townsend, on Flickr

Framing out the other two freight doors. I forgot to measure my plans and built the first 2’ smaller than they should have been. Oops. More scrap for the pile.
IMG_20220108_180450260 by Craig Townsend, on Flickr
IMG_20220108_180442999 by Craig Townsend, on Flickr

Some light putty work and sanding and they too are ready for framing.

And starting the man doors now.
IMG_20220108_180502297 by Craig Townsend, on Flickr

Looks good Craig! This might be an on time on budget build!

Wishful thinking… :joy: I still didn’t officially finish last year’s build.

But so far zero cost. See how long that lasts. I know I need paint for sure. But that might end up being the cheap craft paints anyway.

In typical Craig fashion, I’m already making new parts again… I didn’t like the door design so I’m making new man doors. 10’ tall just seemed a bit too tall. I’m going back to a 3x7 door and I’ll add a covered transom above the doors.

Speaking of covering “glass”, I made the decision to model the depot in it’s boarded up state after a failed attempt to make windows. And it helps tell the “story” of the line as I have a building in BN white & green in the staging yard. So seeing a boarded up and abandoned building in NP colors places the layout in time.

Frame is .030x .100 and .030 x .188 stock. The opening is 24x52. Then covered with a 2’ 6" x 5’ .030 sheet for a plywood covering. Ive got one fully done and 6 more in progress. I think the bay windows are slightly taller than the rest of the building windows so I’m going to make those 24x72.

I’d say its looking good but since you are already trashing parts . . .

Last night I got started on laying the battens on one side. I cut these on the table saw. No perfect like the Evergreen strips, but close enough. And for a building that is just about to be torn down, I think it got weathered perfectly. Or at least that’s my story.

Now I am starting to like your thinking. Imperfections in construction make excellent weathering.

Nice!

I think I will be following your lead as to building condition being modeled. I love the look of in the photo of the telegraph shed I’m making, I’ll try and come close to that look complete with the bent corrugated roofing.

Craigoning?

Looking great Craig! You’re really getting a lot done in a short time for a working stiff, I guess I need to get a move on…

:grin:

Wow. I never thought I’d see those 3 words in a craig post!

:grinning_face_with_smiling_eyes:

Nice battens!