Large Scale Central

Craig's Build Challenge 2014

I’m dipping my toes into the Challenge Build for this year, but I’m not sure how far along I can get before the 30 days are up. I’ll try my best!

Without further ado here is my prototype and background that I plan to model.

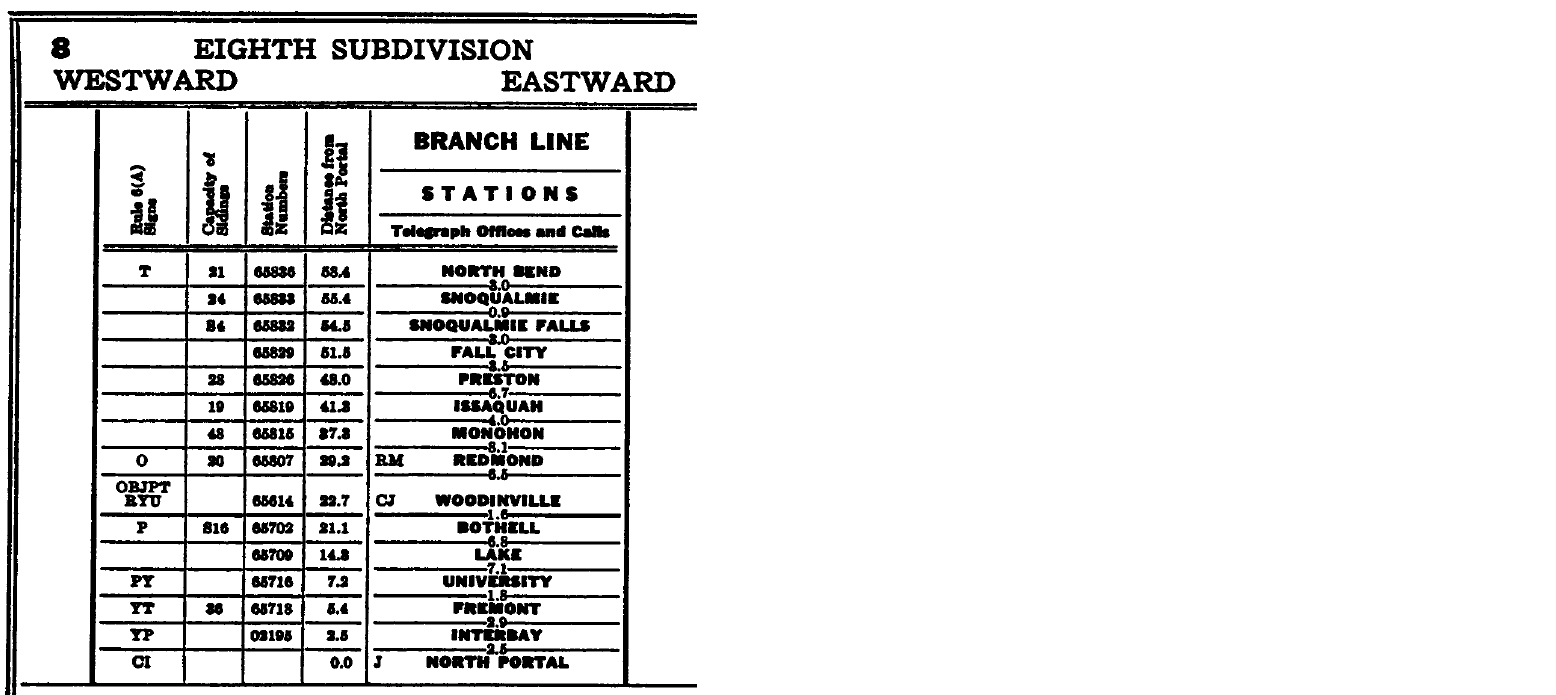
I’m focusing my modeling efforts on replicating the early BN days between 1970-1972 on the Eastside of Seattle. The two subdivisions I’m modeling are the 7th and 8th Sub. The two subdivsions are the former NP mainline north to Canada and East towards the foothills of the Cascade Mountains. On the 7th Sub, I’m partically focused on the area between Snohomish and Black River. I know I won’t be able to model every single industry or station between the two, so I’m having to pick and choose what I want, most operationally interesting, and available space.

In the middle of the Timetable for the 7th Sub, The station Woodinville provides a good signature scenic and operationally interesting station. It is hear at Woodinville that the 8th Sub crosses over the 7th Sub.

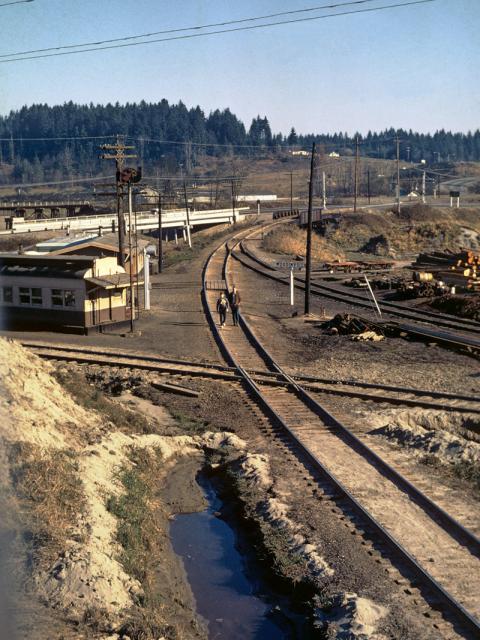
On the northside of Woodinville a 3 track yard exists, a large transloading facility. On the south end of town is where the action gets really interesting. Smack in the middle of the wye was Deyoung’s Feed Mill (the building was torn down around 2000), Woodinville Station (a old Coach converted into a station, and a MOW shack.

The two tails at the far right of the photo head toward Kirkland, and Redmond. The leg on the far left heads towards Interbay.

Here’s a historic photo of the same area.

The building I want to build for the Build challenge is the MOW shack located behind the depot.

Here’s a couple more views of the building.

http://www.flickr.com/photos/kdavidclark/4356460836/sizes/l/in/photostream/

http://scenicsubblog.qstation.org/?p=71#

To build this building I had a couple of options. One I could free hand the drawing based on the photos and draw up a plan in Sketchup (similar to what I did for another building), or I could see if drawings existed on the GN/NP archive site. Luckily I found a complete set of drawings.

Link to the full sized GIF

http://www.gn-npjointarchive.org/BNStructures06000/Struc005419.gif

http://www.gn-npjointarchive.org/BNStructures06000/Struc005417.gif

http://www.gn-npjointarchive.org/BNStructures06000/Struc005418.gif

The structure was a prefrabricated wall panel structure that was assembled on site. My initial plans and thoughts for the build challenge are to use sheet styrene to assemble the structure. I’m also thinking about making the roof removeable to access a detailed interior as building a simple 4 wall prefab. building would be much of a challenge!

Craig, Love the GN and Pumpkin Power. Build the outside first and then, If there is time left, work on the interior.

MALWARE ALERT!!!

Craig, my AVG antivirus program told me there is a virus in senicsubblog, Something called Blackhat SEO

Off to a great start Craig!!..Looks like a pretty cool Building too… Travis

Good luck with your build, Craig. I hope you are able to “Get 'er done.” Cheers!

Steve Featherkile said:

MALWARE ALERT!!!

Craig, my AVG antivirus program told me there is a virus in senicsubblog, Something called Blackhat SEO

Nothing detected now. It must have been a transient.

Black Hat SEO

In search engine optimization (SEO) terminology, Black Hat SEO refers to the use of aggressive SEO strategies, techniques and tactics that focus only on search engines and not a human audience, and usually does not obey search engines rules. Some examples of Black Hat SEO techniques include keyword stuffing, invisible text and doorway pages. Black Hat SEO is more frequently used by those who are looking for a quick financial return on their Web site, rather than a long-term investment on their Web site. Black Hat SEO can possibly result in your Web site being banned from a search engine, however since the focus is usually on quick high return business models, most experts who use Black Hat SEO tactics consider being banned from search engines a somewhat irrelevant risk. Black Hat SEO may also be referred to as Unethical SEO or just spamdexing, as spamdexing is a typical frequently used Black Hat SEO practice.

Dave Taylor said:

Craig, Love the GN and Pumpkin Power. Build the outside first and then, If there is time left, work on the interior.

I have to build some of the interior as that’s where the required door is going. Either for the foreman’s office, or the bathroom… I’m thinking a foreman would appreciate a nice solid, paneled door! :wink:

Although I couldn’t find an unobstructed view of this building (and I already had drawings) I initially thought that I would skip drawing the building in Sketchup. However I figured this might be a good introduction to those who haven’t ever used Sketchup. One of the really neat features of Sketchup is that you can import pictures and draw from those pictures. I won’t go into detail about the steps about how to match photos, etc as there are lots of good online tutorials and books about how to use Sketchup. I’m by no means any expert, so if someone sees a simple mistake let me know.

Part One. I could either start my drawing with a plan view, or I could use the match photo feature to import the drawing into Sketchup at the correct size. Here’s a screen shot of the initial photo match with the drawing.

The different axis (X,Y,Z) are represented by blue, green, and red. Pretty simple. Once the photo is matched I started drawing from a known point simply drawing over the picture. This resulted in a wall that was 7’ 7/16" high, and 39’ 7" long. The drawing shows 7’ 8" and 40’. Not bad. So either you can further adjust the scaling of the photo to make it correct, or round up. Since I’ve drawn other, much more complex buildings before I decided to rescale the photo slightly to get to the correct measurements.

The second step was to form the other 3 walls. It now looks like this.

If you look closely I’ve used another feature of Sketchup to retain the photo on the correct wall. This is called photo texture. Because I wanted to show how to use multiple photos to match photos (say one picture is of the East wall, the other picture is of the West wall) I figured I would take this photo and match it as well. Again not the best picture for this type of drawing, but it will work.

Here’s a screen shot.

In this picture you can clearly see the X,Y, Z axis along with a the building model imposed over the photo. Size the photo to match the model.

Here’s a view of the structure drawing with the roof and side walls removed hidden from view.

With Sketchup you can make the drawings as detailed or as simple as you like. I tend to error on the simpler side and rely on photos and other information for details.

As a warning- Sketchup is a graphics heavy program that may cause your computer to lag while running. I’m assuming any other 3D or CAD software would do the same.

Wow Chris you are reallt good with the sketchup program…looks pretty cool!

Wow, I’m impressed. Those are some great tips on using Sketchup - thanks for sharing those ideas. I know I have to spend some more time with it as I struggle every time I try to use it. Very inspirational - I REALLY like the ones after “Here’s a screen shot.”

You know, I’m starting to really like LSC. :wink:

Bruce,

I learned a lot from just playing around and trying various things out. And reading “Sketchup for Dummies” The thing to remember with Sketchup is that it is really easy to draw off axis. When attempting to sketch over a photo like this it is really easy to accidentally draw on the wrong axis, or on a completely different plane. I check my work often to make sure the lines I’ve been drawing are correct and on the correct axis.

I should add too that any ‘lines’ have 0 depth. Ie; if you want to draw a wall built from 2x4 the line drawing in Sketchup has to been 2"x4". I tend to draw single lines instead of drawing a complete ‘full’ model since I’m using the model for basic dimensions.

Since Bruce liked the screen shots I figured I should include a few more showing some easy mistakes (that can be corrected) when you use the match photo feature.

I photo matched the top view drawing that I had into the drawing along with the side view that I had previously matched. I used that then to draw out locations of various features not shown in the side profile. Windows, doors, rails for rail equipment, etc.

As you can see in this screen shot if your not perfect with matching/drawing you can get some crazy drawings that don’t help.

As you can see the large doors don’t quite match up from the top view and the side view. Nor does the front door, or the small window in the foremans office. And again measurements are off. I’m sure someone better with Sketchup has a workaround for my mistakes, but with enough information you can edit the drawings.

Blue circle shows the error in the freight doors, green shows I drew a line on the top of the building instead of on the foundation, and red shows the mistakes in locating the door and small window.

It would be a better plan if you drew it on a napkin…
Just kidding, it looks great. What are you building it out of?

Terry

Terry,

I happened to have on hand some scrap .060" styrene. I have enough for the two long walls, and maybe half the roof depending on how I end up cutting it. I’m planning on spending some of my budget on acquiring the rest of the styrene I need. No local hobby stores in town, but the MSU bookstore sells a few sheets of styrene. It’s overpriced ($2-3) for a single sheet, when Evergreen is $2-3 for a pack of 3-5… But it’s the only option so I’m going to have to bite the bullet.

Craig Townsend said:

Since Bruce liked the screen shots I figured I should include a few more showing some easy mistakes (that can be corrected) when you use the match photo feature.

I photo matched the top view drawing that I had into the drawing along with the side view that I had previously matched. I used that then to draw out locations of various features not shown in the side profile. Windows, doors, rails for rail equipment, etc.

As you can see in this screen shot if your not perfect with matching/drawing you can get some crazy drawings that don’t help.

As you can see the large doors don’t quite match up from the top view and the side view. Nor does the front door, or the small window in the foremans office. And again measurements are off. I’m sure someone better with Sketchup has a workaround for my mistakes, but with enough information you can edit the drawings.

Blue circle shows the error in the freight doors, green shows I drew a line on the top of the building instead of on the foundation, and red shows the mistakes in locating the door and small window.

Another reason to use napkins :wink:

I hope I didn’t disqualify myself because I didn’t make my drawing on a napkin. :stuck_out_tongue:

Here’s the final screen shots of the drawing/building. Hopefully tomorrow or sometime next week I can start cutting styrene.

Sweet looking!!! I need to learn how to use this program…

Little to no progress to report. I drew out some of the wall parts yesterday and began to the traditional score and snap method. I’ll try to post some pictures on Thursday.

Now that’s some high tec napkins. I need a few of them.

I found a few minutes after work before the misses came home to score and snap the walls.

All the walls are now cut out. Windows are next.

I use a slightly different method for my score and snap. I used to use the traditional number 11 knife blade. However the #11 blade doesn’t really

cut/remove the stryene it simply makes a “V” shaped groove. Instead I tend to use an old dentist tool that I sharpened to a point.

When I use this tool with a straight edge it removes the stryene and makes the snap much cleaner. You can see in this picture the styrene that gets

removed. So ask your dentist for some old tools!