Large Scale Central

Continious run on a dogbone

Korm Kormsen said:

if you mean “manual control” literally, use the LGB nmanual switch throwers.

they will be cut open by the trains as well, when these come back out of the loop, but they switch back to the direction, they were set. so the trains will always travel the loops in the same direction.

This is exactly what I mean. This is perfectly acceptable and is what happened in HO although powering the track was a whole other nightmare that someone else did for me and didn’t really understand what was going on. I was a kid and it worked is all I know.

Devon Sinsley said:

Greg Elmassian said:

Sure, the end of a broomstick works well.

There’s tons of options, do you need remote control? Then a switch motor that does not care what position it’s in and provides low resistance to moving… I think the aristo ones do this, but they are pretty poor.

I’d make it a spring switch with the ability to reverse it manually.

Greg

Sorry I called you Craig I realized I answered the wrong person when I read your response. No I don’t need remote control so I get where your going with the broom handle. I thought the spring switch would always stay in one position but if it can be manually moved and stay in either position and then spring back when the loco goes through it in the “wrong” position then that is more than acceptable.

Devon, it all depends on how you attach the spring. If you look at the photos above, you will see two holes drilled in the tie. The hole that is offset is for the spring-back type. It will flip back to its original position after the train passes through. The hole at the center is for the “flipper.” To set the center hole, set the points halfway between tangent and diverging, then drill a hole into the tie at the center of the points.

Hmmm… I guess it doesn’t matter whether you a tie or the throwbar. I was taught to use the tie. First taught, best remembered.

Rockwall Canyon Jeff said:

Devon Sinsley said:
I get the spring switch. But is there the ability to throw that switch manually. Unless I am missing something it looks as if that is not an option.

Yes. This is the simplest way to accomplish your goal. John C’s photo shows what I’ve been using for years. I don’t use that style spring for “single direction springing through”. However, I found it works great as a “flip-flipper”. If you don’t mind the train going a different way through the reverse loop each pass this will work great. You can set the spring tighter because only the locomotive must force over the points. Once forced over, they stay there and the rest of the train has no resistance going over the points. The next time around the train will go down the path it came from and then on the way out of the reverse loop the engines will force the points to the other orientation. By hand you can manually pull the points in either direction and they will stay there.

Ok I get it know. When running continuously I wont care which direction it goes. It can alternate each pass and if anything it will looking better doing so in my opinion. During operations I have no trouble reaching down (or using a broom handle) and throwing the switch points over, I don’t mind the “hand of God” helping out.

So this is a great solution.

John I get whats going in your picture I might have to ask details when I start into my first switches. Now people have mention Aristo and LGB switches for solutions. Is there some hidden reason this won’t be possible with Llagas switches. I intend to buy one of their kits and then build my own from there. But I assume this would work for any switch.

Steve Featherkile said:

Devon, it all depends on how you attach the spring. If you look at the photos above, you will see two holes drilled in the tie. The hole that is offset is for the spring-back type. It will flip back to its original position after the train passes through. The hole at the center is for the “flipper.” To set the center hole, set the points halfway between tangent and diverging, then drill a hole into the tie at the center of the points.

OK I think I missed something that you just clarified. So to dumb it down with the above pictures like John’s with the two holes you have operations mode and continuous mode? When I want to run I would move the switch to the off set hole allowing the switch to spring back each time. And then when I want operations mode I move it to the center hole which allows manual operation? If so that is doable. In my layout I would need three of these. One on the two switches on the mainline and one on the mainline of the inner (third Reversing loop).

Devon,

On my pike I use the centered hole (move throw bar to center of throw) and use the track center line for both holes, for flop over. This way I can choose either route. But trains passing through from the other way, will Always cause the flop over.

The slide by isn’t as fussy as long as it’s off center.

For my stand up, no bend, uncoupler, I use a length of 3/4" plastic pipe with a 1" dry wall screw in 1/4", the head will throw the points with a twist of the wrist.

I can chose which way the train goes going into the switch (into to me means the points side, the frog side is the pass through side, no choice.) The automation sets up the following train by hole choice.

It’s easy to move the spring, it’s a friction fit in a big hole, the spring under compression holds it in. The parallel jaw pliers in the pic have right angle corners which makes it easy to bend the ends with sharp corners, you want the spring laying on the ties… a curved bend will cause more friction at the hole’s edge.

I can tell by looking at the points to see the direction set. It might cause too much drag to have it power a signal.

Simple and uncomplicated, it’s pretty good for what it is.

John

For continuous ops you could have it either way. The only downside to having it sprung in one direction is the added risk of derailing lighter cars. The center hole position will allow the locomotive or your hand to flip it over and it will stay in that position. The offset hole will keep the points to one side and will move with each passing axel.

I was very concerned with featherweight pony trucks jumping off instead of going through.

I use very light wire and a minimal set of tension, just enough to complete the throw. There is no real force pulling the points away from the stock rail other than vibration and and gravity defects. I had friends coming to run… no derailments, the locos included were the old C-16 and the Mallet, both Aristos. I’ve added weights to mine… close tolerances were the only concerns, all switch doubts were stifled! (http://www.largescalecentral.com/externals/tinymce/plugins/emoticons/img/smiley-wink.gif)

It doesn’t take much off centering to change the action, just be careful not to balance it!(http://www.largescalecentral.com/externals/tinymce/plugins/emoticons/img/smiley-surprised.gif) Or next one back, splits the switch! Oh my! (http://www.largescalecentral.com/externals/tinymce/plugins/emoticons/img/smiley-innocent.gif)

Experiment, I did.

John

Got it. now.

This sounds very reasonable and I am not inventing the wheel. Good to know.

You don’t want to do springs. (YAWN…, boring!). With a layout such as pictured, you want the trains to go different ways at different times to increase the “WOW” factor and that is best accomplished with the turnout motors, reed switches, and magnets on the engines.

Todd Brody said:

You don’t want to do springs. (YAWN…, boring!). With a layout such as pictured, you want the trains to go different ways at different times to increase the “WOW” factor and that is best accomplished with the turnout motors, reed switches, and magnets on the engines.

I am not sure if I am supposed to take that comment seriously or not. (http://www.largescalecentral.com/externals/tinymce/plugins/emoticons/img/smiley-surprised.gif)The complete lack of electricity at the location might make that tough. The only power to the area will be a line run into the Watchman’s tower for lights to see by and charging batteries. I plan on having zero power to the layout. That could change and likely will as I decide to animate the layout with lights or other such things.

You can always haul out a 12 volt gel pack and plug it into a “trailer plug” to power the turnouts. The LGB turnout motors will run fine at 12 volts dc and with a bit of creative wiring, you can easily get around their use of half wave a/c and diodes to make them work.

Springs Devon, springs. (http://www.largescalecentral.com/externals/tinymce/plugins/emoticons/img/smiley-cool.gif)

Todd I do appreciate everyone’s input and I learn much from everyone. However that all seems to techy for me. I am not sure I want to overcomplicate the operational azpect . I don’t mind the idea of throwing a switch manually. All the gadgets means more to maintain and keep in working order. I want to spend that time building cars and scenery. The springs while not having that wow factor seem simpler

I did the spring switch thing, and by adjusting the force on the points to be just enough to set the points against the stock rail, I can run most anything through my spring switches. The lead truck on my Bachmann 2-4-2 would sometimes derail, until I shimmed the post the truck swivels on, with a bit of shrink tubing. That kept the lead truck from twisting and allowing just one wheel to lift up. My scratch-build cars (passenger and boxcars) are feather light, but with metal wheels they go through my spring switches without an issue.

First, some definitions so folks don’t get confused with my terminology…

Spring Switch - a switch through which a train may travel opposite the direction the switch is thrown, but whose points will return to their original position once the train passes.

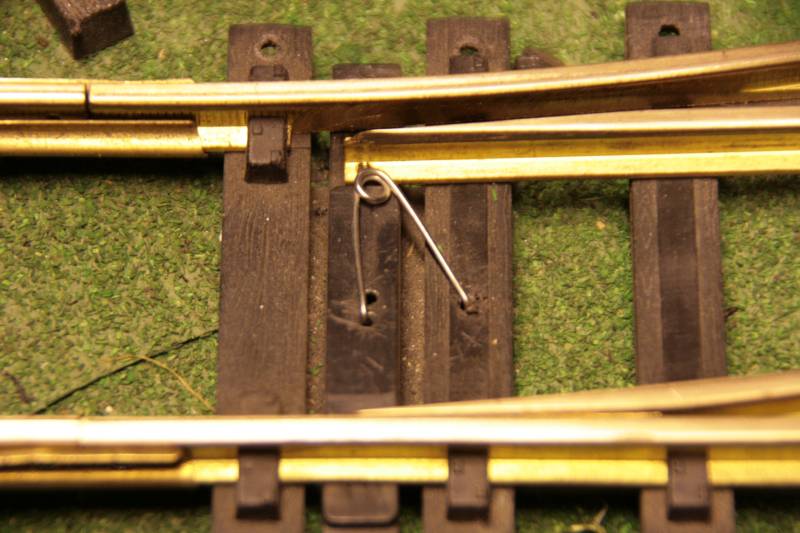
Rubber Switch - a switch through which a train may travel opposite the direction the switch is thrown, but whose points remain in the new position.

I use rubber throws (simple “V” springs as illustrated earlier) on all of my switches. I have a double reverse loop, so my trains will travel opposite directions around the loops each time they pass. It adds a great deal of visual interest, and it’s amazing how many folks ask me how I do that.

Here’s one thing to look out for. With a rubber switch, the first wheel that pushes the points over is the only wheel that needs to have sufficient weight to push the points. Once it’s through, the points hold fast against the other rail and the train can pass through just fine. Typically, you’re going to run into the most trouble with pilot wheels on steam locomotives, as they’re often rather light. Ideally you should have some sort of spring pushing down on the pilot assembly to give it sufficient weight. Relying solely on the weight of the truck and gravity isn’t reliable.

On a spring switch, the points always want to return to their original position, so they’re always pressing against all the wheels that are passing through the switch. This requires a little more thought as to the weight of the cars you’re running, as they all have to be heavy enough to move the points. Flat cars are notorious for being lightweight offenders and derailing on spring switches.

I’ve spent a great deal of time engineering front pilots to not derail on rubber or spring switches, as both my dad’s and my railroad make extensive use of these types of throws. The other half of the equation is the spring itself. It’s got to be loose enough to allow the cars to pass through, but rigid enough to where it holds the points firmly against the stock rails. That’s easier said than done in some cases.

Later,

K

Now if I am understanding this all, I can have and either/or but not both situation Like John mentions based on which hole is used. An offset hole will mean the turnout will operate as a spring switch with the points always to one side meaning the trains always travels the reverse loop the same way. The centered hole means that the turnout will always works as a flop/rubber switch where the points are thrown in the opposite position with each pass meaning the train travels the loop in an alternating fashion.

I would assume at this point that in “spring” mode manual operation of the switch is not possible because it wants to be to one side only? or is there a break point where the train only pushes it far enough pass through and does not reach the break point. But if you throw it manually you over come the break point and it stays? I can see where in “flop/rubber” mode manual operation would just be a matter off pushing it over and it will stay. Having both options seems easy enough but likely when I am running it would be in “flop/rubber” mode for visual interest.

This might have been said but I started to get information overload.

Can a manual throw be added to the throw bar to operate the switch manually on a spring/flop/rubber turnout? Or would that lock it into position and override the spring action? I wouldn’t need a throw, I am more or less just asking. A non functional switch stand would be fine and look better and the broom handle would be fine. But I ask the question anyway.

Devon Sinsley said:

This might have been said but I started to get information overload.

Can a manual throw be added to the throw bar to operate the switch manually on a spring/flop/rubber turnout? Or would that lock it into position and override the spring action? I wouldn’t need a throw, I am more or less just asking. A non functional switch stand would be fine and look better and the broom handle would be fine. But I ask the question anyway.

Yes, of course. Often, the rubber spring is added to assist the manual throw. For either spring or rubber, the manual throw will override the “spring” force.

Steve,

Do you use this system on your Railroad? If so on the 20th you can show me. Or at the very least we can discuss it.

So when you use a throw it pushes the throw bar to one side or the other. So am I assuming correctly that by placing the throw in a center position it would line the holes that are drilled into the throw bar in such position that it would then allow the spring/rubber switch to work automatically then? Seems that would work.

You’ve got it.

I’m planning to add the rubber springs to the turnouts that I’m building. Planning is the operative word.