Large Scale Central

Challenge Accepted - Large Scale Fantasy Locomotive

Update:

Oldest Son and I mounted both motors and the after coupler. All good. I was going to try to use heat shrink tubing to thicken up the axels to mount the wheels, but I could not locate any of the ladies’ hair dryers. Go figure…usually I am tripping over the things. Still, this effectively divides the project into two parts we can tackle in parallel. The first is getting power to the motors. The second is putting cosmetic details on the external shell.

I had an opportunity to address the latter, adding forest-green boiler bands. Both Nisei participated. This means that there is about a 90 year spread between youngest and oldest contributors to this project! I have some brass paint on hand for visible handwheels and the steam relief. I am curious if the simulated “dogs” (naval term) holding shut the smokebox should be brass as well. I am also seriously contemplating dry erase or decals for this project. We’ll see.

I also spoke at length with “Auntie.” Unfortunately, my book “Plantation Railways on Kauai and the Remaining Islands” gives only passing coverage to the Maui sugar haulers. Her family worked the Hawaiian Commercial & Sugar Co., which had a pair of 0-4-0 Baldwin, 5x 0-6-0 Porters, and 2x 25 ton diesels as of 1946. Unfortunately, she worked fields serviced by trucks. She did remember seeing the “grabs” filling the small cane cars, though, and, when she saw a picture of a rival company’s 0-4-2T, she said it was pretty representative of what she remembers…little steam engines with bells, whistles, and headlamps. She did say, “Eh! Never once seen one that clean!” I have the little steam engine, so I am ahead! Auntie promised to dig for photos and to refresh her memory on the topic, as she had not thought about it for a long time. Interestingly, she did have memory of riding the Kahalui RR to the fair. As for Uncle, he sat and watched North Star pull its Christmas consist, but his journey through yesterday remained internal as it always does whenever he watches the Triple O or leafs through my Hawaii railroad books. There is a story in there somewhere…One day, I hope to get it.

Back to the project…

  1. Missing bits. It seems Little Thomas will need a bell, whistle, and headlamp.
  2. Missing marks. Loco number, name, and company were common on locos. With luck, the local craft shop will have dry transfer letters.
  3. Missing paint. I could use some help here, as all of my photos are black and white. Clearly, the steam relief - or at least the springs - and the visible handwheels should be brass, and the wheel flanges, hand holds, and foot holds, should get some silvering. What else should I be looking for? Also, should I use gloss black for the simulated coal load, or sprinkle in some crushed charcoal form the grill? Finally, should I just leave the old boy solid black? I have a color print of a plantation train in green paint, and most seem to have had silver smoke boxes. The latter would look contrived, but I was dickering with the idea of painting the roof green. Then again, maybe by the time this is touched up, detailed, and weathered it will look fine.
    1. Drive train. A geared loco remains the easiest way to get some motion on the lower hull. Everything would be static, except for “chains” running up from the driver wheels around idlers free spinning around a dummy drive sprocket. I still have to iron out how to make the cylinders look like they drive that drive sprocket. I’ve spent some time looking at pictures of geared locomotives, and it seems some of the “guts” were not always visible, so I am wondering if “less is more” may be the way to go.

And that’s a wrap! Little Thomas will go back on the shelf in one piece, waiting only for me to figure out the wiring to bring his new motors to life. After that push to get him running, it’ll be all about finishing his transformation from broken toy to operating model!

Happy New Year and Have a Great Week!

Eric
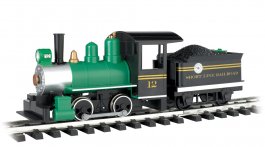
Gloss black works great but not sure about the charcoal, I’ve used rear coal before but not charcoal it would probably be ok if you coated it with some gloss clear. As far as color I like the green idea but I would use a dark green like hunters green I enclosed a picture of 1 of Bachmann’s lil haulers in green, but would like a darker version. Yes to the less is more, I await your pictures, Bill

Locomotives

Bill,

I’ll go with gloss black for the coal, thanks. Real coal is nowhere to be found out here! The green I used for the boiler bands is TAMIYA’s XF-26 Deep Green. I was thinking of just doing the cab roof, but that would get all schmutzig from smoke and cinders, so I am not sure…

Here’s the lower hull with the motors mounted, end beam attached, and loop coupler installed:

The gear boxes and / or motors may still require me to shave or cut the “deck” that fits over the lower hull.

Below, Kid-zilla set Little Thomas out on the line in its new paint for the first time:

You can just make out the green boiler bands.

A “360” tour follows:

Even left like this, this is a far cry from the starting point and worthy of a static display in an out of the way part of the Triple O…if there WERE out of the way places on the Triple O and if I wanted a static display! The goal was to get Little Thomas underway and making way, and it remains the same. Lots of potential for detail painting and weathering to make the old boy look better, too.

Aloha,

Eric

love little locos. cool build.

Found two color pictures:

Oahu Sugar Co.'s Waikakalaua circa 1946:

I like the gold on green of the water tank. I think I can make a template to do that and possibly the cab. I am less sure I want to bother with the trim paint on the domes and cylinders.

And there is a contemporary shot of Paulo on Kaua’i:

I like the simplicity, and I suppose I could paint the smokebox door silver. In that case, I will not paint the side tanks. We’ll see.

A general search against sugar cane engines showed colors were as varied as the companies that ran them. I will stick to the more subdued black base that seems to have predominated here.

Eric

I see no headlight or bell on Paulo which is a side tank like Little Thomas …just saying …# 5 is a saddle tank and much larger …keep up the work as I’m following and the original offer still stands but the bell and headlight I have would be very large on little thomas. The progress made so far is fantastic!

Why a headlight? I don’t think they harvest at night, and the thing is captive on its own railroad. Being as the thing will not interchange with another railroad, certain railroad regulations don’t apply.

They may not harvest at night, but they may run at nite, moving cars and going through road crossings and such. It would help to see what they’re doing.

Rooster, David, and Ken:

Well, back to the books for me…I did a bit of digging on Paulo. “He” is a 30" gage locomotive, which was the common gage on Kaua’i. You can find the history of Paulo and his serving Kaua’i cane haulers here https://grovefarm.org/hawaii-trains/ which links you here for the tech-specs: https://grovefarm.org/files/2011/09/GroveFarmLocomotives1.pdf. In contrast, with all but one exception, the plantations of O’ahu ran 36" gage trains to match the common carrier Oahu Rail and Land Co. Oahu Sugar Co.'s Waikakalaua would thus be a 36" gage loco, so bigger all around than Paulo. As our Triple O is “taking the guide” off the OR&L and its 36" gage and connecting plantations, would this inform the decision about what signal devices to put on Little Thomas?

From the pictures I have (“Next Stop Honolulu,” Chiddix and Simpson and “…Plantation Railways on Kauai…”, Treiber) everything had a bell and lights seemed to be the norm. I am not sure of the legality of scanning and posting photos, but Oahu Sugar Co. #2 Waipio, a little 0-4-2T saddle tanker, had a lamp perched forward of the stack, a big bell over the sandbox, and a steam whistle over the steam dome.

All that being said, I put power to the motors on Saturday, rigging them to a battery of expedience, and this may inform the “correct decision.” In short, these motors are a bit cantankerous, and the little bolt holding the axel came loose, requiring me to disassemble the gear box. To boot, I am not sure if the slowest gear ratio will be the best gear ratio, so dickering with the gears may be in the future. Finally, the hull “settled by the stern,” so I may have to dicker with ballasting to get the rebuilt loco to sit nicely on the rails. I also imagine some tweaking to keep the wheels true on the rails. All this means that “being authentic to the spirit” may not be appropriate if I have to be able to easily open and dicker with the drive. To boot, the upper hull sits pretty lightly on the lower hull, and I will need to remove it to recharge the battery anyway unless I add a pigtail to allow charging in situ, which will place “him” in reach of Kid-zilla between runs. I am just wondering if adding details that will be large and spindly by nature may ultimately detract from the finished project.

Two last issues:

  1. Lettering. Dry hole at the craft store for dry transfers. Is there a good place to get nice letters for the company name loco names?
  2. Hull seems. The upper and lower half of the lower hull no longer marry up flush. I am not sure if the plastic is warped or something is simply pushing on it. I am OK with a visible seem on the side, as it is out of sight when Little Thomas sits on the tracks. The gap up front troubles me visually, and I am hunting for ideas that might hide the gap, possibly serve as a latch to hold the superstructure (boiler and cabh to the hull, and not interfere with the anticipated need for tinkering.

New Progress, New Problems. Thanks for your continued patience and, Rooster, for the continue offer of parts.

Aloha,

Eric

Aloha!

I indulged in a couple hours of kid-free modeling after I cleared out a shelf and found my old collection of Model Masters paints and sable hair brushes. 20+ years in the box, and they were still good! A bit of brass on the relief valve and some steam valves here and there, some steel on obvious “rub” surfaces, and some green trim as appropriate. The results are below:

This is the first time I’ve put brush to model since the '90-s. I used to build 1/32 armor, and I always enjoyed that phase when I could sit back and let the model speak to me. I thoroughly enjoyed rediscovering that moment through this project! Weathering will wait until after I get some decals or dry transfers to mark Mueller & Koito Sugar Co. #7, Komaka Iki. More thoughts to follow after dinner.

Well done. Very tidy… until you weather it of course!

…dinner’s done. Shrimp in chilis over a bed of cauliflower rice.

One quick cosmetic detail to consider is the gap you can see in the front just above the coupler:

OK, I can fix the red plastic showing through later…As for the gap, I was thinking about simulating the wooden end beams that seem to have been standard, but just using a plank to make sure the hooks will engage with the loop. See below:

Thoughts?

This brings me back to last week’s points about details. As I was working the loco, I heard rattling inside the hull. Sure enough, both motors had dismounted, and this let loose the pins that hold in place all the gears. Oooops… I reassembled everything and put on some masking tape, but this confirmed access to these motors needs to remain easy, a consideration for others considering using them in their own projects. Ease of access probably also means details like bells, lights, and whistles are out of the question, as it they would inevitable fall to thumbs and fingers as I dicker with motors, gear boxes, and batteries. Too bad… It also makes me wonder about the efficacy of trying to put rods or gears on the lower hull. Is there a way to simulate either with the reality this may be a finicky loco when it is done?

As I ponder that, FYI, I have my hours in and will get to the electronic store on Friday. I had thought about snipping, soldering, and making do, but I really think I’ve put too much thought into this project to simply make do. I may as well get the right connectors. With luck, I’ll have Little Thomas wired up and operating on his own power for the first time in almost four decades in a week or so. In the meantime, we have a double-hulled sailing locomotive to figure out for the Mik’s challenge.

Have a great week!

Eric

Update:

All relevant connectors and electronic bits are on hand. The battery lacked sufficient charge for a test yesterday, but today might be the day Little Thomas is underway, making way on his own power for the first time since 1979! Fingers are crossed…

He lives…He LIVES!!! Photos and (hopefully) video proof to follow…

Eric Mueller said:

He lives…He LIVES!!! Photos and (hopefully) video proof to follow…

[Edit]: I had to remove the vide of the first run. For reasons unclear to me, it kept auto-opening the video. I can try to reinstall the link later…Anyway…[end edit]

The old boy bucked and rolled a bit, but that was fixed by squeezing on the wheels to bring everything into gage. After that, all went pretty well. I should mention the thing sounds like a food processor, and it is LOUD!

Still photos of the old fellow pulling all but one of the cars that came with him from the 1970s follow. First, Oldest Daughter observe him leaving Pu’u’oma’o:

This train proved a bit heavy, but a sting of “minis” proved doable. This is the type of load he will usually pull:

Alas, victory proved short lived. The after motor is already burnt out, and I noticed a lot of brass dust in the hull. I am not sure if this is a case of the two motors working just enough against each other to stress one or the other, the motors are intended for smaller models (Oldest Son has a Tamiya car kit with the same motor/gear box combo), the motors are intended for short bursts like robot movements, or I tubed something. I will take out the after motor and gear box, replace it with a wheel set, and see how that works. If it happily pulls a short train like the one above, I’ll leave it that way. Otherwise, it’ll be back to the drawing board. The dry transfers I picked up will have to wait for now.

Beyond power, the other issue was one of the power switch. I hadn’t realized how stiff a DPDT switch is! I am not sure how I will mount this to make using it actually practical. I could bore a hole through the wall, but that might stress the plastic, and the engine would come off the track with each manipulation anyway. Epoxying it to the upper hull and manipulating it through the window is an idea, too, but that would still not address the fact every throw of the DPDT will derail the train unless you are really thinking about it.

This proved a somewhat anticlimactic conclusion to an eventful day on a weekend that marks five years since the Triple O came to life.

One step forward, one step back, but at least Little Thomas looks good on the shelf.

Eric

Update:

Down with the 'flu, but, while taking garden therapy yesterday with Kid-zilla, I did pull Little Thomas apart to cut out the after motor. I also noticed grooves from the after drive wheels cut into the hull, which cannot have been the result of on hour of semi-triumph last week. It makes me wonder if the axels came out of alignment long ago. I also noted that the axels probably sat a bit higher in the “axel slots” slots in the hull due to the gear box. I suspect this might have caused some alignment issues that may have contributed to motor failure. The very cramped nature of the interior and the fact I had to bend the gear box mounting “ears” to fit may have contributed to this.

I did get it all back together, and, of course, now the weighting is off just enough that the powered forward drivers cannot grip the rails. I have some lead fishing weights I recovered while diving I can use to fix this, but I will need to be careful, I suspect, if I do not want to burn out this motor, too.

I am going to shelve this project for a bit to get cracking on the Mik’s 2019 challenge. This is good, because I need to really ponder my next step. The project has been a success in terms of gaining confidence with tools and paint as well a experimenting with wiring an materials. It has been at best a partial success in terms of getting a shattered loco moving again. At a minimum, I plan to get the weight distribution right to see if he’ll pull “as is.” Part of me wants to keep going and tinkering, using this as a running “learning project” (fit a motor block; powered tedder; different motor/gear box combo; etc.). Part of me wants to declare “success” and use the old boy as a dummy that looks like a helper engine. Either way, I still have to apply dry transfers and take a crack at weathering.

  • Eric

Eric Mueller said:

Update:

Down with the 'flu, but, while taking garden therapy yesterday with Kid-zilla, I did pull Little Thomas apart to cut out the after motor. I also noticed grooves from the after drive wheels cut into the hull, which cannot have been the result of on hour of semi-triumph last week. It makes me wonder if the axels came out of alignment long ago. I also noted that the axels probably sat a bit higher in the “axel slots” slots in the hull due to the gear box. I suspect this might have caused some alignment issues that may have contributed to motor failure. The very cramped nature of the interior and the fact I had to bend the gear box mounting “ears” to fit may have contributed to this.

I did get it all back together, and, of course, now the weighting is off just enough that the powered forward drivers cannot grip the rails. I have some lead fishing weights I recovered while diving I can use to fix this, but I will need to be careful, I suspect, if I do not want to burn out this motor, too.

I am going to shelve this project for a bit to get cracking on the Mik’s 2019 challenge. This is good, because I need to really ponder my next step. The project has been a success in terms of gaining confidence with tools and paint as well a experimenting with wiring an materials. It has been at best a partial success in terms of getting a shattered loco moving again. At a minimum, I plan to get the weight distribution right to see if he’ll pull “as is.” Part of me wants to keep going and tinkering, using this as a running “learning project” (fit a motor block; powered tedder; different motor/gear box combo; etc.). Part of me wants to declare “success” and use the old boy as a dummy that looks like a helper engine. Either way, I still have to apply dry transfers and take a crack at weathering.

  • Eric

You know the playmobil western engine wasn’t powered just the tender was, worked great, Bill

Search Results


300 × 225
Playmobil 4054 Pacific Railroad …
ebay.ie
{“clt”:“n”,“cr”:9,“id”:“lY8K9nEbORzWfM:”,“isu”:“ebay.ie”,“itg”:0,“ity”:“jpg”,“oh”:225,“ou”:“https://i.ebayimg.com/images/g/sEAAAOSwOVpXcqdu/s-l300.jpg",“ow”:300,“pt”:"Vintage 1988~Playmobil 4054 Pacific Railroad~ Western Train Steam …”,“rh”:“ebay.ie”,“rid”:“4etIjuYif7cx8M”,“rt”:0,“ru”:“https://www.ebay.ie/itm/Vintage-1988-Playmobil-4054-Pacific-Railroad-Western-Train-Steam-Engine-MINTY-/191908668951",“s”:"Image is loading Vintage-1988-Playmobil-4054-Pacific-Railroad-Western-Train-”,“st”:“eBay”,“th”:194,“tu”:“https://encrypted-tbn0.gstatic.com/images?q\u003dtbn:ANd9GcRVCWqLmcA3HmXJJziIIWh1iPnUGwsQaTL4II-9w3m2uOb3eNx1","tw”:259}


400 × 299
Playmobil Set: 4054 - Western …
klickypedia.com
{“cb”:6,“clt”:“n”,“cr”:3,“id”:“GOiM0KJfdD1DWM:”,“isu”:“klickypedia.com”,“itg”:0,“ity”:“jpg”,“oh”:299,“ou”:“https://www.klickypedia.com/wp-content/uploads/setsimages/4054.jpg",“ow”:400,“pt”:"Playmobil Set: 4054 - Western Locomotive - Klickypedia”,“rh”:“klickypedia.com”,“rid”:“jPV3pqBhGoxAvM”,“rt”:0,“ru”:“https://www.klickypedia.com/sets/4054-western-locomotive/",“s”:"Playmobil - 4054 - Western Locomotive”,“st”:“Klickypedia”,“th”:194,“tu”:“https://encrypted-tbn0.gstatic.com/images?q\u003dtbn:ANd9GcSn2GYmuljU680mUxEOsato5q6wGGMsf_Y2J2UJxC8zi1-_IB7n","tw”:260}

Bill,

Powered tender was the way I am leaning (after the Mik’s!) after I run this Tamiya motor experiment to ground. I figured I could get a motor block - ANY motor block - and even try scratch building a tender shell over it.

Off to more garden therapy with Kid-zilla!

Eric

Eric Mueller said:

Bill,

Powered tender was the way I am leaning (after the Mik’s!) after I run this Tamiya motor experiment to ground. I figured I could get a motor block - ANY motor block - and even try scratch building a tender shell over it.

Off to more garden therapy with Kid-zilla!

Eric Either that or keep eye out for used scientific toy engine, etech pretty much they are all the same, even if the remote control part is bad but the motor runs you have a complete system, over here you can pick them up at consignment stores for less than $5.00