Large Scale Central

Building the EBT's Tank #102

The East Broad Top owned only one tank car. The 6000 gallon tank was originally built by Atlantic Refining Co. and was purchase by the EBT in 1932. Under EBT ownership it was first mounted on Wood Flat Car #102 which was built as early as 1919. Sometime after 1936 the tank was moved to Flat #116 where it still survives today. The 1:22ish Bachman tank is spot on for the 6 foot diameter of the EBT’s tank, but the length is a bit short. Bart Salmons’ WV&K shops have been commissioned to lengthen the tank to scale out to 28 Feet to more accurately represent the EBT tank. I don’t have a good source of Vulcan style trucks for the steel flat 116, but I do have quite a few sets of Aristo/Delto Classic Archbar trucks available. I’ve also wanted to scratch build a wood flat ever since I bought a Grex headless pinner at ECLSTS a few years ago. Putting these two ideas together, I’ve decided to model the early version of EBT’s tank in 1:20.3. Finding plans for EBT wooden cars is next to impossible. Most were scrapped long before anyone thought they might want to be recreated. The only extant wood car is a steel framed boxcar #170 which survives in tourist service. The book East Broad Top by Rainey & Kyper does have basic dimensions of the wooden cars and basic drawings of both wood and steel framed box cars. Using these references I’ve come up with what I believe is a plausible drawing of the framework for Flat #102. The basic components are borrowed from a drawing of a D&RGW flatcar from an MLS project a few years back. I’m making assumptions that a simple car like a flat was constructed using similar techniques by different railroads. Using this information I’ve up sized the D&RGW flat frame to agree with the published dimensions of the EBT flat. The one question I’m not able to answer is location of the bolster and needle beams. For my first pass, I spaced the bolsters the same distance in from the end beam as the D&RGW car, figuring they should be as close to the ends as possible while keeping the wheels inside the frame. The needle beams pose more of a question. For my first pass I placed them the same distance from the bolster as on the D&RGW car. This opens up the space between the beams by the difference in the lengths of the two cars. Here’s my basic drawing compared to the D&RGW drawing. Disregard the scale since the drawing has been shrunk to fit your screen.
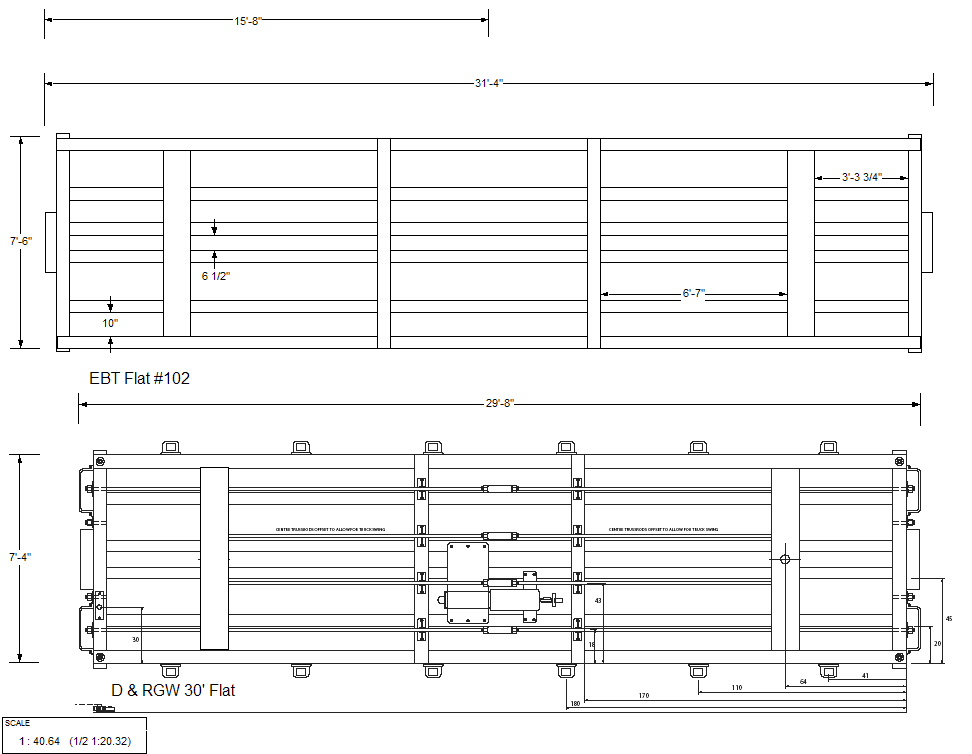
My annotated version of the EBT Tank on Steel Flat #116 plans can be found here as a PDF File I hope to start cutting wood for the frame this weekend.

Hi Jon,

In R Sloan’s book A Century+ 10 there is a drawing of Conoco #5 tanker.
The frame is 30 ft in length, 7 ft 7 inches wide, the bolsters are 4 ft 1 inch in from the end beams and the needle beams are 5 ft 9 inches apart. Hope this helps.

Chuck

Thanks Chuck.

The Conoco tanker sounds like it is very close to the EBT tank. Width is almost identical and length is between the D&RGW and EBT sizes.

Jon, when I get home, I’ll scan in the drawings I have for the EBT wood flats from Along the East Broad Top. It’s got drawings for two different EBT cars, though I forget the exact lengths. The construction is very similar to what you’ve got outlined there.

Later,

K

That would be appreciated Kevin Thanks! I didn’t expect that they existed, once again I’ve learned about references unique to that book, which I don’t own.

I spent most of the day trying to work out the discrepancies in the old building plan from MLS. I ended up having to draw actual size drawings in several views to figure out where the MLS drawings were wrong. I finally found it, but I haven’t got to cutting any wood yet.

Jon, you have mail.

K

Thanks Kevin.

Can I assume, like Lee’s drawings of wood boxcars, that these are two different versions, one early and one late?

R&K lists Flat #102 in two places, one in flat car service, the other as a tank car. In both places the length of 31’ 4" differs from most of the other flats. Since it is listed twice I’ll assume it to be correct. The drawing you sent does give me a best guess for the bolster and needle beam locations.

I was able to import the EBT Wood Flat plans that Kevin sent into Visio where I can adjust the drawing to fit a known scale. For this job I chose 1:48 or .25" = 1 Foot. Once the drawing was set to a known scale I was able to use Visio to measure the locations of the bolsters and needle beams in relation to the end beam. I also learned from this drawing that Lee Rainey measures car length from end beam to end beam, not including the end sill. Using that knowledge I lengthened my frame drawing by the thickness of both end sills. For now, until I verify the actual length of the trucks I will use, I have set the bolsters to agree with the Rainey drawing at 4’ 5" back from the outside of the end beam. For the needle beams I chose to use the distance between them from the Rainey drawing since using the distance from the end beam made them look too close together. Remember, Flat 102 is 2 feet shorter than Flat 95 in Rainey’s drawing. Here’s my measured version of the Rainey drawing of Flat #95

(http://lsc.cvsry.com/EBTTank/EBT_Long_Wood_Flat.jpg)

The CVSRy Carpentry Shop has been busy milling lumber for the replica of EBT Flat #102. A large block of red cedar has been reduced to enough timber to build two cars and enough cedar shavings to fill several hoppers. I would have preferred to use hardwood and have a large supply of small hardwood pieces, but none were long enough for the side sills. By coincidence, I had a nice block of red cedar that was exactly the right length. Here are some progress photos to date. The glued-up outer frame is shown on top of a Bachman 1:20.3 flat. The width is nearly identical and the new flat is just a little longer. The bundles of timber are the remaining parts for this frame and a sister to be built later. Since I had the wood and the saw was set up it made snse to cut enough for two. [url=lsc.cvsry.com/EBTTank/Wood_Flat_1_1200.JPG]

(http://lsc.cvsry.com/EBTTank/Wood_Flat_1_720.JPG)

[/url] [url=lsc.cvsry.com/EBTTank/Wood_Flat_2_1200.JPG]

(http://lsc.cvsry.com/EBTTank/Wood_Flat_2_720.JPG)

[/url] You can click the pictures for a larger version. One technique I’m not quite sure of is raising the grain to make it more visible when painted. The flat car class suggested using a razor saw like you would with styrene. That might be fast and easy but I’d like to use the natural grain. If anyone knows a good way to raise the natural grain I’m open to suggestions. I’m thinking some kind of solution bath, but I don’t want to unglue things either. On the tank front, the WV&K shops report that lengthening the tank using PVC pipe will work. The frameless tank car version of the bash will take a bit more work, but the flat car vesrion is pretty straight forward.

Jon,

“If anyone knows a good way to raise the natural grain I’m open to suggestions.”

I’m not sure that is not a modeler thing. I believe the car builders did their best (without spending too much extra timeor money) to try to hide the fact the car was made from wood. Good paint jobs hid a lot of grain.

Carry on, Jon… Am waiting to see the finished project…

It most definitely is a modeler thing. Wood grain is NOT visible in real life on painted surfaces, unless you’re right up close, and then its not as deep as modelers make it. Take a look at wood siding, or trim on a house, from about 20 feet away. Do you see ANY grain shadows like those on the end of the floor boards on Jon’s flatcar? In real life, if the end of a piece of lumber was that uneven, it’d be prone to rotting in short order.

Certainly a “Modeler’s Choice”.

I wouldn’t worry about it. If you don’t put too heavy a coat of paint on it, or too many coats, the paint will be absorbed at different rates in different places. That’s why my painted wood cars LOOK different than my painted plastic cars. When I did my logging caboose, I first brushed it with an India Ink/alcohol mix. Once dry, this was followed up by a thin coat of paint brushed on.

I don’t disagree. I guess my thinking is along the lines of trying to build something that looks like it was out in the woods for fifty years before someone finally threw a coat of paint on it. Like the examples of old wood cars you see now in museums. If got pictures home I’ll try and dig up tonight.

Actually fake wood grain is something that usually bothers me. Go to any home improvement store and look at the vinyl interior doors. Lots of fake grain. But if you go into a fine home and look at painted wood doors they are smooth as a baby’s butt.

Also, from what I read, the paint will tend to raise the grain some, so that might be all I need for the look I have in mind.

I like the look of equipment that’s currently in use…instead of sitting in the woods for 50 years…abandoned. :wink:

OK - Here’s an real world example of what I have in my head. This happens to be the truck loading door on an ex New Haven station located in Brookfield, CT.

(http://lsc.cvsry.com/StationDoor1_700.jpg)

(http://lsc.cvsry.com/StationDoor2_700.jpg)

(http://lsc.cvsry.com/StationDoor3_700.jpg)

Granted, this piece of timber has been bashed into hundreds of times over the years, but a nearly 100 year old flat car would have suffered some abuse too. So perhaps its damage and weathering I’m seeking, not just to generally open up the grain.

Bruce Chandler said:
I like the look of equipment that's currently in use...instead of sitting in the woods for 50 years...abandoned. ;)
I can understand that. You model a bygone era. My theme has from the beginning been a present day railroad museum. It allows me to have a variety wide variety of stuff in multiple road names :D So for my theme, it's perfectly logical for the railroad to pull a car out of the woods and paint it up for excursion use. The EBT has been doing that since the 60's.

The only thing my theme can’t justify is running both SG and NG equipment of the same track. For that you just have to imagine that third rail :smiley: :smiley:

BTW - I’m not sure if I came up with this museum idea before or after meeting Ric. I do recall that it was a common love of the EBT and modeling a museum / excursion railroad that brought us together on email quite a few years ago.

Ah…I see now. That’s a different story! :smiley:

Well, I’d use the razor saw, as well as the paint technique I described, plus more ink/alcohol on top of the paint. I’d “fade” the paint a bit as well. You can also use a sharp knife to distress the wood a bit more.

You’ll seldom be as close up as that top picture (except when you’re taking close-up photos ;)), so you don’t need a lot of damage.

I do like that door. I’ll have to remember that style for some future model.

Jon,

I’ve found that a paint brush with strokes going the direction of the grain provides a look I am comfortable with.

I don’t know which one of us had the original idea on the museum operating railroad. I was riding a lot of museum excursions and paying close attention at the time and you were talking about the museum with the ballon loop around it, that was near you. Mutual respect or depravity, depending on how you look at it. :wink: