I said I see track, I didn’t say it was installed. But its the first railroady post here in a while.


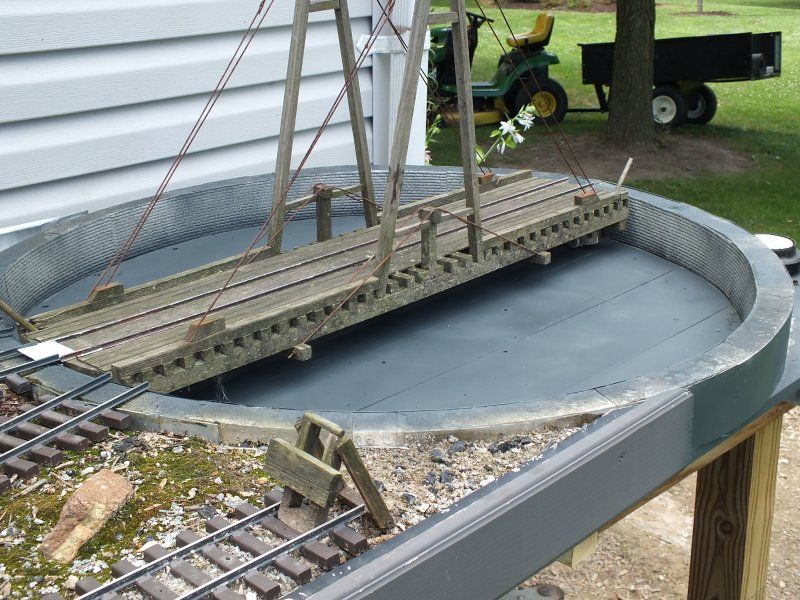
So here is the sun screen materiel in place. I think this stuff will work great. I will be using 1X6 for the track bed which will help tighten it up even more. The ballast I think looks very prototypical for my area. I have the track in there just to make it look like I am laying track(http://largescalecentral.com/externals/tinymce/plugins/emoticons/img/smiley-surprised.gif). Now to finish the 5 way switch.
congratulations on the beginning of your railroad!
We might actually start seeing a railroad come to life here…on page 29 or 30, but better late then never.

Here is the start of the 5 way. I have to route the groove for the guide block and epoxy on the side pieces. I have epoxied on a piece of PVC on each end and screwed the heck out of it. this should seal the ends. I have figured out that it can rest on the yard cabinet and through bolt it to hold it in place. It will do the same on the other end. The idea is the switch will be removable in the winter.
I am still trying to figure out a locking method to keep the rails aligned. The sliding block on Ken’s and Sean’s I am not sure I can make work and still clear flanges on wheels.
Here is an issue I face. Code 250 rail doesn’t allow a whole lot of room for flange clearance with putting a bunch of stuff between them. Ken said he used a piece of aluminum threaded for a #4 machine screw. Well the best I could do locally was a #6 way to big. I tried doing my own but the aluminum tube was weak after threading. Even then I had to put it at the very bottom of the rail requiring me to file out the foot. So the alternative was to drill a hole n each rail and thread it for a #4. I then used #4 all thread and basically bolted them into gauge and then put a #4 nut on the outside to lock it. A little blue loctite to hold it. This keeps it in gauge and clears the deepest flange I have. But now I have to figure a locking mech that won’t interfere with the flanges of the wheels. I may have an idea but need to experiment.
As a side note. I want to say thanks to Dennis for suggesting the roof idea. this worked out great. It did raise my overall height to about 34 inches instead of the 30 I was shooting for. I think with the new way I want to do the bench work this will work out better. It will be a nice elevated layout.
All the locking mechanism is is a thin piece of styrene. It was a piece of scrap from a caboose bash I did. The flanges will hit the all thread more often than the styrene.
Evergreen Scale Models
4125 V-Groove
040" thick (1.0mm)
Same stuff I used on the TT
Does it just fit between the webbing of the rail? If its thin styrene then I can see where it would clear. If it just fits between the webbing what holds it down so it clears the flanges (keeps it from climbing up to the rail head)? I love the simplicity of it for sure.
It just lays on top of the rail base, gravity keeps it from climbing. It’s not rocket science. (http://www.largescalecentral.com/externals/tinymce/plugins/emoticons/img/smiley-wink.gif)
Hey Ken,
Another question that your TT picture brings up. When landscaping and ballasting on the bench work are you taking out the ultra fines from whatever your using so it won’t plug up the screen or weed block, and thereby hold water? I am worried about creating mud on the bench work.
Ken Brunt said:
It just lays on top of the rail base, gravity keeps it from climbing. It’s not rocket science. (http://www.largescalecentral.com/externals/tinymce/plugins/emoticons/img/smiley-wink.gif)
Well it wouldn’t be proper if I didn’t over think it. That problem is solved then.
I haven’t put any ballast down yet. It’s all dirt and some ash from the woodstove. I get a lot of mud with a heavy rain, but it drains off quickly. There’s only an inch and a half (maybe 2") of dirt on top of the screening.
Ken Brunt said:
I haven’t put any ballast down yet. It’s all dirt and some ash from the woodstove. I get a lot of mud with a heavy rain, but it drains off quickly. There’s only an inch and a half (maybe 2") of dirt on top of the screening.
Great thats what I wanted to know. So even when you are getting mud it isn’t an issue. That makes me feel better. I will have about the same 1 1/2-2" with the way the yard is and the idea I have for the bench work. The sun screen I am using is a quite a bit more porous than weed block probably about the same as the window screen. So fines over time will be filtered through anyway. But knowing I can just pile dirt on it makes me happier than sifting a bunch of stuff.
In the areas where I want actual fines I can lay some weed block over it like your doing and hold the fines in.
Devon, while it may require milling out a little bit under the ends of the rails, you may want to consider just using rail joiners to hold the rails in place to the appropriate siding. I use this on my lift-out bridge. You could solder a plate across the base of both joiners so they move together as one, but I haven’t gotten that OCD on mine yet.
Ken’s idea of a styrene plate would work well also. I’d be tempted to use a small plate of .060" brass just for durability. If you go this route, however, I’d consider putting a gauge bar very near the end of the moving rails. I think you’ll find with the aluminum rail, especially on the farthest ends, there may be enough flex in that last 3 unsupported inches where things may spread just enough to where the outside rail will be lined up, but the inside one will be a few thousandths off because it wants to flex back towards the center. Mr. Murphy–that legislator of doom and gloom–has stated that such offsets will catch flanges at the most inopportune times; particularly when others are watching. 
Later
K
I am ahead of you Kevin, but thanks for the advice. The rails flex a ton on the ends even with the gauge bar I have being relatively close.
Just a bit of observations with this switch since the subject is coming up. First the aluminum isn’t the best material for this maybe because it does flex like a limp noodle. While thats nice for bending the iron it does some weird things. One, as Kevin suggests, the ends tweak out especially on the outer track positions. Holding them in gauge will be critical. Second, thing that happens on the outer two tracks is the moving rails form an slight S curve. The don’t like to travel in a pure arc. By simulating where the guide bar will be by pushing with my fingers I have observed that the closer the guide bar is to the end the less the S curve to almost non-existent on the end.
The fix to all my woes with this switch is to place the guide bar very close to the end of the moving rails. This will hold them in gauge and also help eliminate most all of the S-curve allowing a nice smooth transition to those outer tracks. An obvious observation is the need for length. At 31 total inches this switch is at its limit on those outer tracks. Longer would eliminate that S curve. If a person wanted to do more than five tracks it would need to be considerably longer.
Another thing that is probably obvious but wasn’t to me, is that the moving part of this thing wants to come apart. As you slide the rails to the outer position the movable part wants to slide away from the fixed part (like they should) but when you come back to center it does not want to go back together instead it wants to separate more. That’s the key to the guide, that will force the sliding section back together with the fixed section.
But all in all I think it will work great. Its position on my layout will be problematic. It won’t be the most convenient thing to operate from the patio side. I might have to take out a section of flower bed so you can access it better.
Devon Sinsley said:
Another thing that is probably obvious but wasn’t to me, is that the moving part of this thing wants to come apart. As you slide the rails to the outer position the movable part wants to slide away from the fixed part (like they should) but when you come back to center it does not want to go back together instead it wants to separate more. That’s the key to the guide, that will force the sliding section back together with the fixed section.
You could lube the joiners where the rails move. That may help and spread the joiner a little. It doesn’t need a tight fit.
If the rails are attached to that guide bar nice and snug and the guide bar fits snug in the slot, you shouldn’t have much of a problem.
Glue / secure slotted tubes to the outsides of your rails and push pins against the rails to lock. No worry about flanges. This thing isn’t a scale model so make it work first, then worry about looks. I’d try brass rivets through the rail web and soldered to the tubes. ( I have a hand held jack hammer to shape the heads without distorting the tubes. A snap fit on my Foredom Flex shaft so it’s also variable speed. You could use a section of drill rod to keep the tube round.)
Or you could cut slots in the rail ends and use a U shaped slider across the center, depressed for flanges and raised for fingers. The legs sliding along the out side of the rails keep it in place.
For the rails pivot; make a plate with 2 pins for each rail of the joint. Drill holes up into the bottoms of the rail foots as far apart as the pins + a nudge for clearance. You can recess the plate. They will never slide the direction you want in joiners. Most diabolical eh?
John
When I did an On3, 3 way stub switch I noticed the stock rails needed to be staggered somewhat because each rail bent at a different radii. If you go with the pivot, you’ll see it too.
As always I merely offer suggestions, your logic may vary.
John
Devon Sinsley said:
Ken Brunt said:
I haven’t put any ballast down yet. It’s all dirt and some ash from the woodstove. I get a lot of mud with a heavy rain, but it drains off quickly. There’s only an inch and a half (maybe 2") of dirt on top of the screening.
Great thats what I wanted to know. So even when you are getting mud it isn’t an issue. That makes me feel better. I will have about the same 1 1/2-2" with the way the yard is and the idea I have for the bench work. The sun screen I am using is a quite a bit more porous than weed block probably about the same as the window screen. So fines over time will be filtered through anyway. But knowing I can just pile dirt on it makes me happier than sifting a bunch of stuff.
In the areas where I want actual fines I can lay some weed block over it like your doing and hold the fines in.
These questions are answered in the pdf I sent you about the building of Richard’s POC RR. You Need to open this thing and READ IT :). Again, “over-thinking” going on again :). Just a suggestion "Quit tryin’ to “reinvent the wheel” 
Gary Armitstead said:
Devon Sinsley said:
Ken Brunt said:
I haven’t put any ballast down yet. It’s all dirt and some ash from the woodstove. I get a lot of mud with a heavy rain, but it drains off quickly. There’s only an inch and a half (maybe 2") of dirt on top of the screening.
Great thats what I wanted to know. So even when you are getting mud it isn’t an issue. That makes me feel better. I will have about the same 1 1/2-2" with the way the yard is and the idea I have for the bench work. The sun screen I am using is a quite a bit more porous than weed block probably about the same as the window screen. So fines over time will be filtered through anyway. But knowing I can just pile dirt on it makes me happier than sifting a bunch of stuff.
In the areas where I want actual fines I can lay some weed block over it like your doing and hold the fines in.
These questions are answered in the pdf I sent you about the building of Richard’s POC RR. You Need to open this thing and READ IT :). Again, “over-thinking” going on again :). Just a suggestion "Quit tryin’ to “reinvent the wheel”
It’s all in mine, too and you don’t have to open a PDF to read it…(http://www.largescalecentral.com/externals/tinymce/plugins/emoticons/img/smiley-wink.gif)
Ken Brunt said:
Devon Sinsley said:
Another thing that is probably obvious but wasn’t to me, is that the moving part of this thing wants to come apart. As you slide the rails to the outer position the movable part wants to slide away from the fixed part (like they should) but when you come back to center it does not want to go back together instead it wants to separate more. That’s the key to the guide, that will force the sliding section back together with the fixed section.
You could lube the joiners where the rails move. That may help and spread the joiner a little. It doesn’t need a tight fit.
If the rails are attached to that guide bar nice and snug and the guide bar fits snug in the slot, you shouldn’t have much of a problem.
They move free, I have them pretty loose. Its just when the thing relaxes it wants to separate and not go back together. Will just the smallest amount of persuasion it works fine. The guide should be more than enough to force it together.