Jake Smith said:That's what ya' want Jake ...if they make it "great" if not ...then no loss.......take notes as too what works and what does not.
I did get a grt deal on my Boxwoods and Blue-rug Junipers, they were 60% off at Walmart.
I picked up some Jeepers Creepers brand Creeping Jenny about 3 seasons ago. It didn’t spread at all the first season and did a little better the next. This spring with all the rain it really took off and filled the entire garden. Looks great now surrounding the trees.
Boxwoods can usually be split if there is more than one trunk. I used to like them, but the ones I planted a few years ago are no longer very attractive. I really like Arborvitaes. The can be trimmed up top look like trees.
I was thinking of planting a few Arborvitaes a trimming them up to look like pine trees.
I went to another nursary on Sat and got some ground covers for 40% off. So I planted some more stuff. My wife, the brown thumb, thinks they are all going to die. We shall see.
Just make sure they get watered regularly, even now.
Jake, this is my first post here on LSC. I am a seriously considering building a small G-scale empire in my backyard and I’ve been enjoying many posts here as I do a little research.
Curious why you picked the name Deadwood, Black Hills and Western? Are you modeling the Deadwood, SD area? I do know there was a prototype Rapid City, Black Hills and Western (the Crouch Line) in the Black Hills of SD that followed Rapid Creek up from Rapid City to Mystic, SD. I am considering modeling a small interchange with the RCBH&W at Mystic, along with CB&Q standard gauge in the Hills as well as the narrow gauge operations around the Lead/Deadwood area.
Great job, really enjoyed all the pictures of the work. Thanks again.
Welcome Paul!
Thanks David! Probably not the best way to introduce myself, but I always seem to try the hard way first…
Jake, I just saw on another forum where you live. That would explain your RR’s name/locale! We have a cabin up in your neck of the Hills…
Welcome aboard Paul. You’ll find a great group here!
Welcome, David…drop into the chat and meet some of the guys…
Welcome David. As you sort of answered your question I am from the area. I actually live closer to Keystone or the outside world would call Mt Rushmore. I came up with the name by combining a few others. The backstory is as follows:
The Deadwood Central and the Black Hills and Fort Pierre were both owned by the CB&Q at the turn of the century. Both narrow gauge lines served the mines in and around the Deadwood and Lead areas. (all true, btw)
My offshoot is if a few investors came along and bought both lines from the CB&Q. They then combined the lines to form one unified line. In that spirit they also took the names and combined them. The Deadwood from the Deadwood Central and Black Hills from the BH&FP. To form the Deadwood, Black Hills and Western. I added the Western to the end in the spirit of the Denver, Rio Grande and Western. Name a city, Name a region and finally name a compass direction.
I model around the 1920’s, historically at this time the gold claims had mostly dried up except for the Homestake and a few others. But this is my railroad and that is what I wanted to do. I took that time frame because I wanted to have a plausible reason for having some larger locomotives running on my railroad. I explain it as the DRG&W Mikado was sold to the DBH&W because the line needed the extra power to haul a newly opened iron Ore mine in the Nemo area (incidentally there is iron ore there, I just made the operation a little larger). The small 2-8-0s and 4-6-0s that the railroad currently had were not large enough to pull the heavy iron ore over the steep grades of the line. The K-27 added a much needed horsepower to the locomotive roster to haul larger iron ore trains. The 1920s because, by this time the DRG&W had upgraded thier fleet of locomotives and the K-27s were expendable.
Anyways that is a brief history. Stay tuned for further updates on the railraod. I have begun construction on the large trestle on the south loop. Hopefully I will have it built soon.
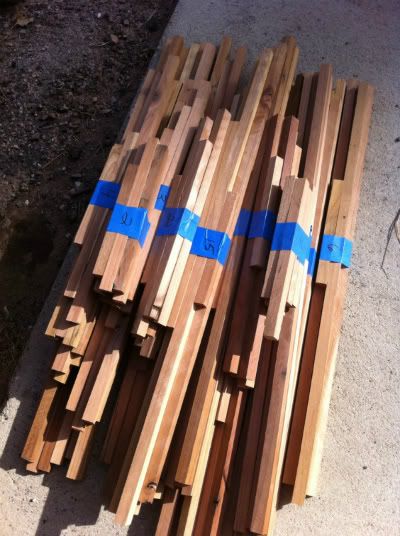
Here is a little update: I’ve started on my wood trestle. First the wood is redwood. I got it free which is the best kind plus it being old growth redwood. That makes it even better. Now, I know the question is going to be asked how the heck did I get such a great deal? Well, my dad tore out his old redwood deck. A lot of the lumber was still good. He and I just couldn’t see throwing away all that good wood. So I took a bunch of the pieces. I used my table saw to plane off the stained wood and get back to the original wood. Incidentally, I didnt have to take much off, about a 1/16" to 1/8" is all. I then cut the wood pieces up into the dimensional lumber I needed.
(http://i1128.photobucket.com/albums/m489/jake3404/71c736e1.jpg)
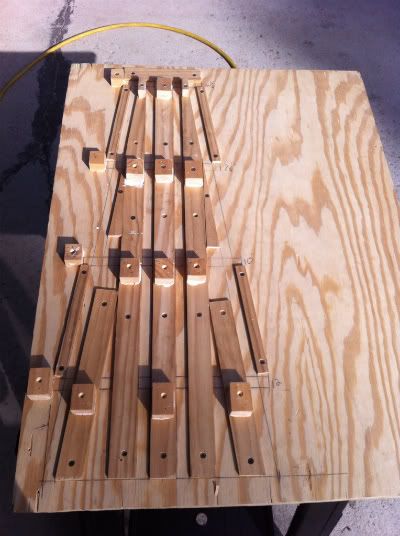
Here is a picture of all my trestle bents cut to size. Now all I need to do is put them together.
(http://i1128.photobucket.com/albums/m489/jake3404/7d50ebe6.jpg)
This is the jig I made for the bents. It actually worked pretty good.
(http://i1128.photobucket.com/albums/m489/jake3404/da7ceb7b.jpg)
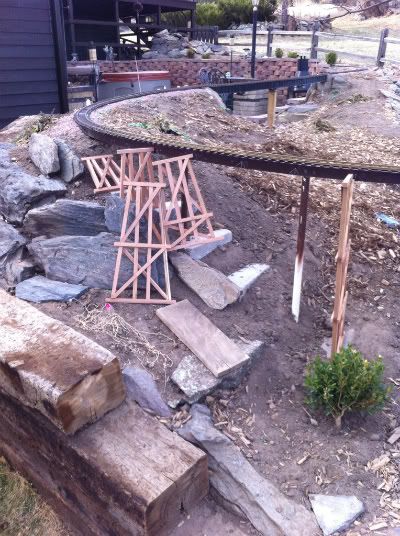
Here is a couple of bents made and standing up in the location where they will go.
(http://i1128.photobucket.com/albums/m489/jake3404/5bc31b52.jpg)
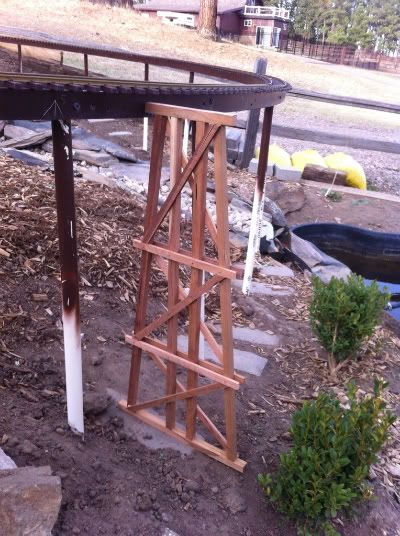
This is probably one of my tallest bents. It measures 30" I have finished all the bents and am working on getting the bridge together. I did seal the wood with a clear sealer to protect the color from the sun. I do have a question, did anyone attach their bents to the concrete base? I’m having trouble getting the bend in the sill pieces and keeping the bents in place. The wood wants to be straight and I need it to curve. I thought if I secured the bents to the concrete bases then I wont have a problem. Anyone?
Looks great Jake. This is a project I really need to get around to. I’ll need 50 or more, but it would make a huge improvement over the elevated lumber roadbed I am using now.
Here is this days work.
(http://i1128.photobucket.com/albums/m489/jake3404/9b018e2d.jpg)
I had a hard time getting the wood sills to stay bent in a curve and not push the bents off into a straight line. I finally just hilti bolted the bents to the concrete bases and that seemed to work.
(http://i1128.photobucket.com/albums/m489/jake3404/0cf4d33f.jpg)
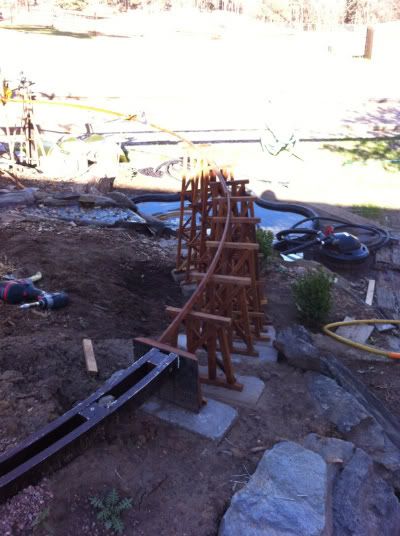
After I built the bents, I decided to take the incline out of the trestle and keep it level which made it easier to build and easier on my locomotives. Thats why you can see the concrete footings a little more because I had to raise them.
(http://i1128.photobucket.com/albums/m489/jake3404/bcae54ec.jpg)
This photo shows the sill streched around to the other side so I could get it leveled so I can move the concrete base up to fit the bents.
(http://i1128.photobucket.com/albums/m489/jake3404/8169decb.jpg)
The last photo Hopefully I’ll get a little more done tomorrow.
Jake,
Two methods you can use to make the bent stringers. One is to simply soak the wood strips overnight, form them wet and let them dry in place. This works, but will not necessarily be stable after they dry. The better method would be to build a small steamer and steam the strips first. You would be wise to have a from available and clamp the steamed stringers to the form, and allow to cool and set. These will spring very little when released from the form. Time consuming, yes, but the result will be real stable and is not dependent on mechanical retention to maintain the curvature.
Looks good so far and good luck.
Bob C.
Jake, Whats the size of your stringers? On my trestles I use 1/4" x 3/4" redwood and build a lattice just like the rest of your railroad. I attached blocks every 6" to one side then attach the other side. After that sits a little while I attach another stringer to the outside on both sides. After it dries I attach my wooden ties and my rail. Then I turn the entire assembly over and attach the bents to the bottom of the blocks with screws.
(http://freightsheds.largescalecentral.com/users/cncrr/_forumfiles/IMG_5410_1_1.JPG)
(http://freightsheds.largescalecentral.com/users/cncrr/_forumfiles/IMG_5414_1_1.JPG)
These pictures are just examples of the stringers. I also use jigs when I have a desired shape I want. Thats is what you see in the pictures.
(http://freightsheds.largescalecentral.com/users/cncrr/_forumfiles/IMG_6742_1_1.JPG)
This is the only picture I could find showing the finished product. Everything is glued and brad nailed, then the rail is all hand spiked with a gauge rail. Chuck
Thanks for the advice guys,
Bob, I thought about using a steamer, because I have one. I tried the soaking method and then straping the stringers to a “formed” curve. After letting the wood dry they did have a little curve but not enough. I also like how Chuck did it, but I chose a different route…Oh well, I got all my bents up and a couple stringers nailed down.
After looking at my descriptions of my photos, I really didnt go into too much detail, so here goes:
I started by setting concrete pavers down as a base. I then adjusted them based on my already built bents (I would suggest having your bases set then measureing and building bents, but I changed my mind after building them.) I then secured the bents to the concrete with one Hilti screw (these are those blue ones) The screw shows but I’ll paint it and should be just fine.
Next I used my Air brad nailer to nail the sill to the top of the bent. I kept adjusting for level and installing bents to the sill as I went. That is about it.
I did get the rest of my bents installed except for one and one abutment. It was pretty dark by the time I got donw so no pictures. I’ll try to take some tonight.
Chuck I also use 3/4" x 1/4" for my sills. I plan on putting 3 together under each rail. What is the dimention of your girts? They look like about the size I want. 1/4" x 1/4" ???