Large Scale Central

Build Log: The CVSRy's replica log cars

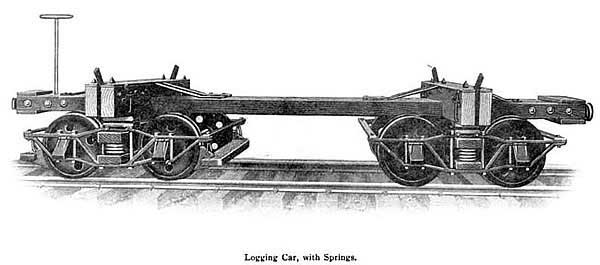
Management of the Candlewood Valley Scenic Railway decided that they needed some log cars to pull behind the 2 Cylinder Shay in order to more accurately represent how the Shay would have been used. Since it is nearly impossible to source wooden cars that are in operable condition, the CVSRy shops have been commissioned to build replica cars. The cars will not be an exact replica of any particular car, but rather a composite of the best features of several prototypes with specific design considerations to optimize operational capability on the CVSRy. Some of the photos and plans from a preliminary discussion are duplicated here. The log cars currently on display at the Cradle of Forestry are the inspiration for this project. Photos by Cale Nelson…

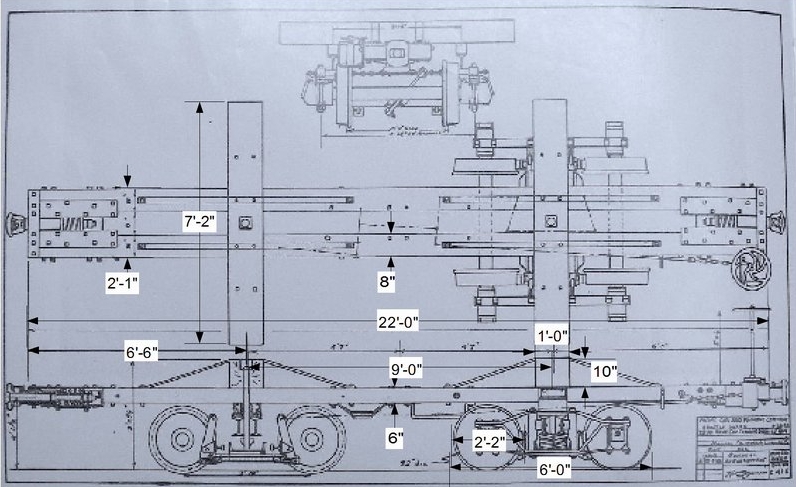
The construction plan will be derived from the Pacific Car & Foundry drawing provided by Mik…

The CVSRy shops will not be replicating brake detail shown in the above plan - these will be Operations Quality cars when done. Another prototype photo provided by Mik…

Before construction plans can be developed by the CVSRy’s Over Engineering Department, some tests needed to be performed. Because the design chosen places the sills below the tops of the wheels, clearances needed to be checked. A mock-up test car was built from composite materials for test purposes. First, trucks needed to be sourced. The CVSRy’s choice for Arch Bar trucks are the Aristo Delton Classic trucks. I remove the coupler tang for use on cars with body mounted couplers. For the log car build it was decided to also cut away the bolster pad to allow the sills to sit as low as possible giving the low-slung look of the Cradle of Forestry cars. Step one is to disassemble the trucks. Spread the side frames to allow an axle end to drop out of the journal box, then twist the side frame 90 degrees to allow them to be removed - don’t loose the springs !

A razor saw was used to remove the coupler tang and the bolster pad…

The coupler tang is retained for future use. It can be used to body mount Aristo/Delton couplers. The modified truck is then re-assembled…

Here is a comparison shot of a modified truck on the left and a stock truck on the right…

Next a bushing needs to be made to allow the truck to be mounted directly to a car with a 6-32 screw. I found that the tapered end of a PaperMate stick pen is the perfect size. I just slice a few bushings of the end of the pen with a razor saw…

Then place the bushing in the truck…

Then a 6-32 machine screw will attach the truck. I use a T-Nut in wood frame cars, or drill and tap plastic for the screw (Thanks again Bruce for tap idea)…

Here the trucks have been attached to a mock-up of the sills made from a scrap of 13mm PVC board and the mock-up placed on a section of R1 track…

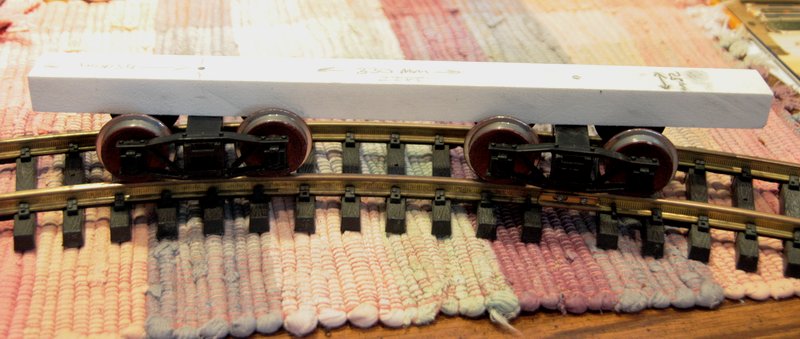
From above we can see that there is just enough clearance to get the mock-up car through an R1 curve…

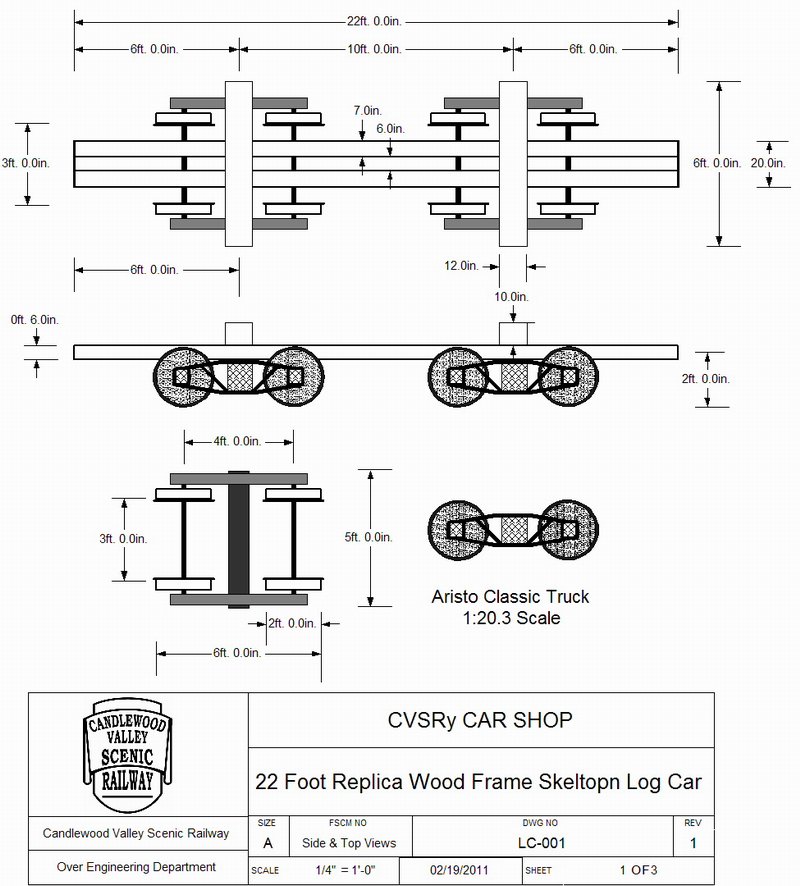
CVSRy engineers have thus determined that a total sill width of 25mm or 20 inches in 1:20.3 will allow the trucks to negotiate all trackage on the CVSRy including the yards. Keeping the cars coupled in the yards will be a different challenge :D…

Now that a functional sill width has been determined, the CVSRy engineers can now finalize the build plans and place orders for the shops to begin milling limber for the project. Next up will be the final dimensioned build plan. Stay tuned.

With mock-up tests complete, the CVSRy Over Engineering Department got busy. The first step was to bring Mik’s Pacific Car & Foundry drawing into a CAD program where it could be scaled and measured. I use Visio for this and re-size the photo until one of the known dimensions is close…

The data gleaned from the scaled prototype plan was then used to draw a scale frame plan. I made some changes based on the need to keep the width across the sills to 26mm (20"). I brought the truck centers 6 inches closer to the end beams because they looked too close together. The sills were down-sized a bit to allow for the 20" width Vs. about 24" on the prototype. The wheels on the Aristo Trucks I’ll be using are 2 inches larger in diameter but the wheelbase is pretty close. Here is the plan as it currently stands…

Looks like a plan.

FWIW the drawing I got from my rail historian buddy in Cali. I think it may have been from a Mich-Cal book - or FOR a Mich-Cal book. (but then last I heard he was still working on a history of Towle Bros Lumber.)

The other is from the Climax catalog that is reproduced online here: http://www.climaxlocomotives.com/catalog/

Great start Jon. Will be ‘stealing’ those drawing for future reference. :wink:

The shop crew put in a full 3rd shift yesterday and cranked out enough lumber to build 7 cars and enough sawdust to fill a few hoppers. The shop foreman was wondering if he could burn the sawdust like they do at that steam sawmill in Cali.

The crew took the day off to travel to Scranton, PA this morning to inspect some log cars built by others, and source some link-and-pin (or is in Lincoln Pin :smiley: ) couplers. Clem only had enough for 4 cars, so that will be the initial build. I’ll assemble a few others less trucks and couplers to be completed at some future date.
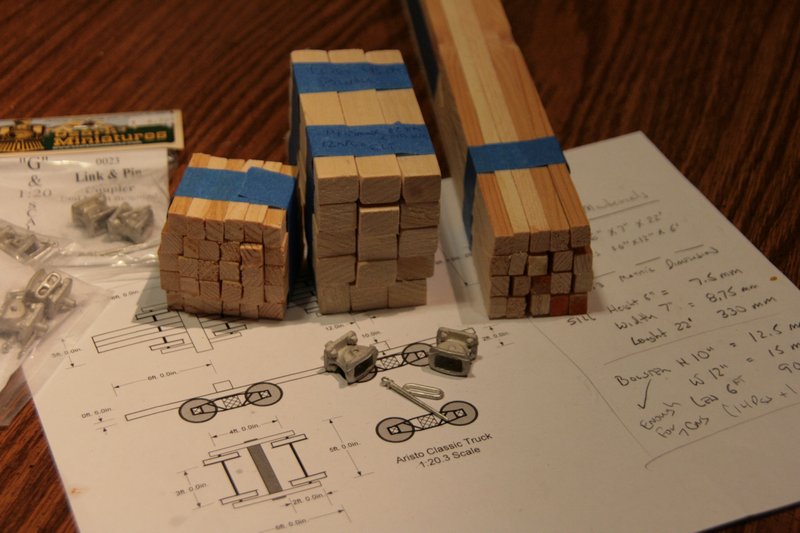
I’ll post a photo or two of the milled lumber once the camera gets done downloading the 250+ photos taken in Scranton.

Progress to date…

Nice Jon. Glad you made it back ok. Sorry I had to leave a little earlier glad I did though I ended up going to urgent care myself and have bronchitis and Pneumonia. Grrrrr. Now my poor wife has to take care of me and the little one.
It was good to see you.

Hope you both feel better soon. I left soon after you did. Was nice to be home before dark.

Jon Radder said:
Progress to date…

(http://lsc.cvsry.com/LogCars/LogCarBuild-011.JPG)

Oooooooooooooh! Sticks and spendy stuff! hehehehehe

Hey Jon,

Nice start to your build, like Randy I’ll be saving these plans for future use. BTW don’t forget to post some of those 250 pictures you took at Scranton. Those of us on the West Coast would like to see what Scranton is all about.

Chuck

Thanks Chuck - I posted some of the Scranton pictures here: http://www.largescalecentral.com/forums/topic/14399/-/view/post_id/14399 I was so caught up in the superb modeling on display that I didn’t take any overview pictures. Scranton is basically a club meet open to the public. There are three tracks; two running exclusively live steam and one running everything (track power, battery & live steam). Only one vendor, Clem’s Warrior Run Locomotive Works - Clem is also the sponsor of one of the tracks. No big crowds or buying frenzies; just a great group of guys running trains and having fun.

Thanks Jon,
The pictures are great!

I’m watching but didn’t want too jack up your build log…very nice so far.
Are they done yet?
:wink:

Progress was interrupted by a little thing called filing taxes, but I did manage to inspect and classify all of the lumber. I had to reject almost 50% of the sills because of large knots. I didn’t have any clear wood that was long enough. I did manage to find enough ‘firsts’ to build 6 cars. The original order was for 7, but 6 will have to do. I only bought enough couplers for 4; all that Clem had.

I also managed to get full-size plans printed and found my lumber cuts to be almost perfect by sight (the micrometer says they suck, but what does it know).

Tonight I’ll mill up some parts I forgot (or cut wrong) and try to get the assembly jigs made up.

Only minor thing I noticed is that you called the Aristo Classic trucks 1:20 on your drawings - The ex-Delton stuff is still 1:24 And you can get bunches of them (less couplers, springs and wheels) a lot cheaper off the NoS guy on fleabay. (username con49079) Good guy, really helpful, and will set up a custom auction, or add to the one you win if you ask nicely. His stuff has been in storage for a coon’s age (since Delton and Kalamazoo went under) so some of it might be dirty, or the finish a little off.

That’s where often I look first for project bits, anyway.

Also, there’s a guy on there from Hong Kong, or is it Shanghai? selling a plastic version of the L&P coupler pockets really cheap as well. I’m thinking of getting a mess of them - just for decoration since I use H&L.

OK - Perhaps a small bit of misunderstanding here. I do know that Aristo/Delton stuff is 1:24. But after all, the scale something is built to is irrelevant. What matters is what size they are in your chosen scale. I measured the trucks and wheels and converted the measurements to real-world dimensions using 1:20.32 as the scale. The wheels work out almost dead on to 24" in 1:20 and the wheelbase almost a perfect 48". So for my purposes they are a 4 foot / 24" wheel 3’ gauge truck in 1:20.3.

The thing I like about the Delton truck is the springs. They track very nicely over bumps. I like their couplers too, but I’m slowly moving away from them.

Thanks for the tip on the sources. I’ll check them out. I have a lot of un-needed Aristo/Delton stock that I’m stealing trucks from, but if the price is right I can always use more.

I wasn’t trying to bust your chops.
The guy with the L&P couplers is in Sri Lanka – username pasidump. 12 for $5.50, 6 links and 12 pins for the same and free shipping. They aren’t Ozark, but if you plan to equip a whole fleet of cars it might be worth looking into

No worries Mik - And thanks again for the leads on cheap parts.

Hi Jon,

I have some of the L&P’s Mic is talking about, you can mount them to the beams with bolts or lag screws. They have the corners of the mounting plate drilled out instead of the fake nbw on the Hartford L&P.
For chain I would sugest that you look on the internet for jewlry suppliers. I bought a spool of silver chain very reasonable from a company that sold parts to repair roserie’s. Also check your local hardware store for minature cotter pins to mount the chain to the bunks. While your there check to see if they have brass escutcheon pins, they make great bolt heads. Hope this help’s, keep the posts on your build comming, nice work.

chuckger

Thanks Chuck.

To those of you that put together assembly jigs to make repetitive projects simple, I tip my hat. I spent most of last night experimenting with jig designs before I came up with one that works OK for assembling the sills. I still need to make a jig for attaching the bunks, then I can get the wood parts into production.

To keep costs down I may forgo the T-Nut/Machine screw truck mount and go with a wood screw. I set a pair of jig test sills on top of the trucks to get a feel for how it will look. First impression is that the sill lumber looks to light. The bunks look right, so I just need to get used to a car with a spindly frame. Since the sills don’t carry any of the down force load, I guess they don’t need to be that beefy.