Large Scale Central

Bashing a LGB baggage into a RhB baggage

Hi all, Oh, what clamour from the side lines!? And how to stem the tide?! :wink: :slight_smile: :smiley: There seems to be some doubt, in certain quarters, as to my ability to produce a nice RhB item from a LGB product. Well, to keep the ā€œchorusā€ at bay, I will document the ā€œstep by stepā€ procedure of converting a Ballenberg Postal-Baggage to a RhB D4006-4024 series Baggage. In 2m aka LargeScale @ 1:22.5 I restrict myself to building items which will be used on our layout - not the ā€œEPLā€, but the RhB Grischun - and of course I’m always looking at ways to kitbash items that have similar, if not identical, properties into proper RhB rolling stock. The Ballenberg Postal-Baggage is an excellent start to at least two RhB cars, one of them being the D4016. That’s the number I chose because it was still running in its original livery and assigned to its accustomed duty for the era in question.

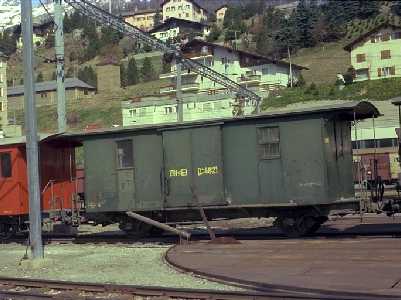
That’s what the car looked like shortly after arrival. BTW it was a US$100 bargain during the big LGB flog at RRS! Don’t worry about the relatively clean workbench, it’s my quirky Swiss upbringing. :wink: :slight_smile: But on with the bashing; the P-B is longer than required for the D4016 and as luck has it removing the two panels - left and right - in which the windows are located will give the correct length. This could either be done on the table saw or in this case I decided on doing it in the milling machine, since the car body fits in the vise and the resulting cuts will need minimal clean-up. Of course if one desires one can also do the cuts with a razor saw, clean-up with a file and so on… I did mention that I’m lazy, didn’t I? Anything that can be the done the easy way, will be done the easy way. Wearing a hairshirt has never been my choice! So anyway, to stabilize the flopping walls I cut wood spacers which are inserted between the walls. More on that later.

Ignoring your usual anti LGB hysteria is one thing , now we have to ignore the exaggeration of your plight . "from the sidelines "
I watch with interest your efforts at converting useless cheap chinese plastic into a ā€œmodelā€ .
A real critic would not touch the stuff with a barge pole .
But if you are not a man of principle , it doesn’t matter , does it ?
Oh , not all of us have machine tools , so keep your modelling hints simple , eh?
Then we can all make one .

Mike Morgan said:
Ignoring your usual anti LGB hysteria is one thing , now we have to ignore the exaggeration of your plight . "from the sidelines " I watch with interest your efforts at converting useless cheap chinese plastic into a "model" . A real critic would not touch the stuff with a barge pole . But if you are not a man of principle , it doesn't matter , does it ? Oh , not all of us have machine tools , so keep your modelling hints simple , eh? Then we can all make one .
Mike,

If the shoe fits, please feel free to wear it! :wink: :slight_smile: :smiley:

You can call me ā€œthe pragmatic criticā€, besides I’m out of barge poles. Apart from that, how could one critique an item in detail unless one has it in front of oneself to check point by point the ā€œwhat’s it all about?ā€

I’m aware that not everyone has machine tools - nor would some know how to use them, if they had them - therefore the reminder that a razor saw or trim saw, files etc . will do the job. :wink: :slight_smile:

No , Hans , YOU do it with a razor saw , just to show it can be done . THEN lecture us .Without smileys to protect you .

Mike Morgan said:
No , Hans , YOU do it with a razor saw , just to show it can be done . THEN lecture us .Without smileys to protect you .

Ui, ui Mike, You’re on a very slippery slope. :smiley: :smiley:

Do you really believe I need to prove to you what I can do in 2m, since I have been producing detailed ā€œstuffā€ in HOm??? You know, ā€œstuffā€ that we actually sell? As Dave mentioned in one of his posts yesterday, it’s there for all to read, for instance this http://www.easternmountainmodels.com/eng/html/rhb_ng.html But generally product from Z scale (1:220) to Large Scale (1:22.5) If you’re interested, read the ā€œkitbashingā€ installments! If you’re not, read whatever else you like! Doesn’t bother me in the least. :smiley: :smiley: :smiley: :smiley:

Make sure your 'puter keeps running, I’d hate to have you miss something! :wink: :wink:

Yes

HJ,
What type of mill do you have?

I’ve often thought about getting one, but the cost drives me away. Well, that and the fact I’ve never used one. I’ve been hoping to find some adult education classes that might teach a beginner, but no luck so far.

I’ll be interested in seeing what you can do with one.

Do have any pictures of what you’re trying to get to?

Hi Bruce, It is a cheap ā€œMade in Taiwanā€ model inmported by BusyBee, has 12 speeds, the spindel has an R8 taper. It doesn’t have vertical (Z axis)displacement with a leadscrew i.e. you get whatever quill travel and you rough position the head with a rack and pinion set up on the round column. The round column is nice since that allows you to swivel the head quite some distance from the squar to the longitudinal travel. I bought the extra longitudinal power feed. Since it is intended as a large table model I also bought a base and a sub-base on wheels. That means I can roll it out of the way when required, set the whole machine at odd angles if I need to etc. etc. Very good hobby machine! The following picture is from the website of a RhB Forum member

© Copyright M.Polier D2 4021 - in the '70s - Werner Hardmeier

As mentioned…

The plan is to cut out the window panel sections and splice the walls…

…also cut the frame to keep the screw mounting posts in the correct position.

Making new properly sized windows should be a piece of cake. :wink: :slight_smile: LGB provides enough material even for extra windows. :wink: :wink: :slight_smile:

Hans-Joerg Mueller said:
It is a cheap "Made in Taiwan" model inmported by BusyBee, has 12 speeds, the spindel has an R8 taper. It doesn't have vertical (Z axis)displacement with a leadscrew i.e. you get whatever quill travel and you rough position the head with a rack and pinion set up on the round column. The round column is nice since that allows you to swivel the head quite some distance from the squar to the longitudinal travel. I bought the extra longitudinal power feed. Since it is intended as a large table model I also bought a base and a sub-base on wheels. That means I can roll it out of the way when required, set the whole machine at odd angles if I need to etc. etc.
...R8 taper...quill travel...Hehe...will there be an English translation available? I guess I need some really BASIC education! I guess I'm still wondering if I can ever justify the expense. I THINK I'd like one, but I wonder if I'd really get my money's worth.

Well, I’ll be interested in watching your progress. And, if you can, some pictures of it being worked on the mill?

So, the model is too long…and windows wrong size? It looks like the panels and doors are different as well? Anything else?

Bruce, R8 is a very common taper on smaller machine tools, collets for both metric and inch size cutters are inexpensive, you can get R8 adapters for larger cutters, flycutters, boring heads and whatever else one needs/uses on a milling machine. The quill is the non-rotating part of the spindle assembly which is moved up and down with a lever on a drill press. This milling m/c is related to a drill press since it has the lever for drilling as well as a graduated handwheel for downfeed; which mode is selected by a simple, spring tensioned clutch.

I’ll try to post as many pictures as possible to illustrate ā€œhowā€ and explain in the text ā€œwhyā€. I made an apprentice ship as a tool and die mechanic in Switzerland (same as tool and die maker in NA), but since I came to Canada in ā€˜69 I worked in the precision machine tool field (service, instructions, troubleshooting, management etc. etc.). I never lost the knack of doing things by hand, but I won’t unless I have to. Not even on a taunt! Life’s too short to do things the hard way. EMM started in earnest in 1999 when I decided that 30 years of machine tools was enough, prior to that it was a sideline - all my friends’ fault who also wanted one of this and two of that and could you build me one of these, please. :wink: :slight_smile:

Bruce…you may be getting in too deep…invest in a case of Highland Park Single Malt…(Less expensive than the double quilled bunch of tapers, you are being led into)…and sit back with me and several others…and watch this great Western Canadian, do his thing…I really think he can do it…In fact I think I’ll hire him to build a good North American RPO to match my B’mann/LGB rolling stock, of open ended passenger equipment.
If he hurries, he might even get one built for me before B’mann or LGB notices the need, and finally puts one out…

Thanks Hans for opening your clean, well laid out shop to our scrutiny......your work is great......no mater what the sceptics are mumbling......in fact, I'll bet Mikey even starts to copy your clean working habits......!!!!!!!
Fred Mills said:
.....................................
Thanks Hans for opening your clean, well laid out shop to our scrutiny......your work is great......no mater what the sceptics are mumbling......in fact, I'll bet Mikey even starts to copy your clean working habits......!!!!!!!</blockquote>

Thanks Fred, :wink:

The sceptics are like Ontario mosquitoes, one hears them buzz, waits for them to land and then swats.

Where I used to live in Ont we owned 25+ acres of the ā€œfinest Class1 wetlandsā€ (Ministry certified! :smiley: :D), a lot of it covered with white cedar. Plenty of squitters!
Some of my friends were convinced that I should really forget about 1:87 modelling (the ā€œyou’ve been there, done thatā€ reasoning) and get into 7.5" live steam. My standard reply: ā€œI’m not old enough for that, yetā€ :slight_smile: :wink: :smiley:

But back to the 1:22.5 stuff.

The other thing that’s in the planning stage is an ā€œaround the officeā€ elevated loop at work, complete with a passing siding. Perfect test base for LS stuff and if any of the sceptics would ever show up I’d introduce them to our shop/office first.
ā€œCan’t see the action on the track? Too far up? Perhaps you need to grow (up) some more.ā€

On passenger equipment; presently in the works:

1 train with coaches built in the '60s (baggage, two second class coaches and one first class)

1 train with heavy weights from the 20s/30s (baggage, two second class, one first and a mixed 1./2. class)

1 train with old stock early 1900s (baggage, two second class) all of them four wheel types with open platforms.

Bashed or scratched.

Next step: shortening the body by removing the panels with the windows.

First I cut two spacer blocks to stabilize the walls. (Dimensions as noted)

They fit left and right of the window panel.

since the inside of the body has a slight draft - larger at the top - the blocks were sanded to fit really snug. Traces of sanding dust!

In order not to distort/damage the simulated floor supports (triangular pieces) I inserted a cedar tie from my Turnout supply to bridge the space.

Then the milling can start! When I mill plastics I use 2 fluted cutters, or even single-lip cutters for really small stuff. Keep the speed down so you’re cutting without melting! That gets more critical when you mill styrene since it is softer and tends to gum up the cutter. Two fluted cutters clear the chips from LGB plastics really well, no smearing and short chips. Naturally I have different cutters of the same size reserved for different materials i.e brass, plastics and steel. To be continued!

Next step::

Clean up and equalize any burrs with Wet/Dry paper.

The milled faces need minimal clean-up, for my purposes I look for approx. +/- 0.1mm (0.004") parallel tolerance. I use M-E-K to ā€œglueā€. Apply the solvent to the surfaces to be joined, let evaporate for 1 minute, repeat procedure. The floor joint gets done first, apply a bit more solvent and immediately join the pieces, apply enough pressure to squeeze small plastic bubbles out of the joint. To get things square and fair I use machinists’ parallels to assemble on. If there are no protrusions on the face the parts rest on, I use a glass plate as a assembly surface plate. Caution: M-E-K is dangerous, follow all the safety precautions that come with the product!!! To be continued!!!

That’s it for the moment! The body is trimmed to the required length and tacked back together. Far from finished, though!

Next are the sliding doors, the roof and the chassis. All the existing bosses for the screws are to be used again. Never do more work than necessary! :wink: :smiley: :wink:

The roof:

Curved roofs are always ā€œinterestingā€ to splice, a slight error when sanding will give you a nice gap when all is laying flat. For that reason I usually cut the roof with a trim saw. Of course first I mark with the height transfer gauge where the cut lines are. Leave a small amount for clean-up on the milling machine. Clamping curved roofs is also ā€œinterestingā€ and the results can be seen here.

Just as I got to the edge of the roof the tension released enough to climb along the cutter and then pull along the roof a bit. Grrrrrrrrrrrrrr. I’ll remember next time, while climb milling gives a better finish it may also play havoc when the piece is under tension. No big problem, just 10 minutes extra work fitting the plug that came out of the spare piece I cut out. And once the joints are filled and sanded it will be A-OK. Need to fill those square holes, too. To be continued.

Thanks for sharing HJ, I usually think of the mill for making things from scratch and have always utilized the table saw for putting rolling stock asunder. I have a small mill at home and access to a Bridgeport at work. The mill at home is still a virgin as I have only had time to use it as a drill press a couple times since I acquired it, I’m hoping that will change this Winter !

HJ.

That cannot possibly be a proper kitbashed model because you didn’t use a razor saw.

Nice work nonetheless.

Thank you, Gentlemen!