Large Scale Central

Basement & shop makeover

I’m not usually quiet in LSC, so I figger it’s time to explain.

A month ago, we decided to reorganize the basement over the next year, with the objective being clearing out the main part and making a decent den area. Which would require moving the laser & materials stockpiles.

For my part of the renovation, the Tetris game would involve:

  • Getting rid of the crate-shelf, with its antiques and my RR magazine collection
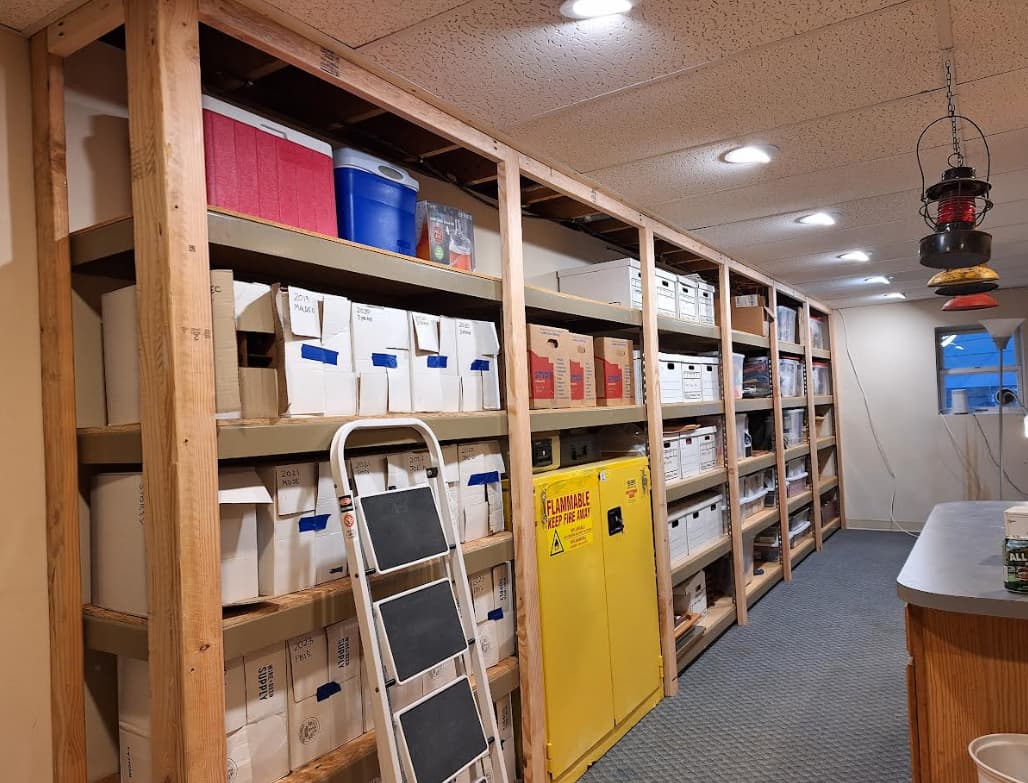
  • Building a long storage closet against the wall of the main basement (where the crate-shelf was)
  • Clearing out the unfinished storage room next to my office / model shop for the laser operation
  • Creating a ventilation system for the laser’s new location
  • Moving the 3d printing area into my office shop (away from the laser)
  • Moving the flammable storage cabinet to the new long storage closet (away from the laser)
  • Finishing the exposed wall of the new laser room with studs and plywood paneling
  • Getting rid of all kinds of stuff by way of FB Marketplace, Freecycle and the landfill
  • Moving almost everything except contents of my office-shop

I have another weekend on this, but after that my bit will be done, and later in the year we’ll have flooring, painting & etc. done.

Next post will be some progress shots.

First to go, out of the main basement. Almost a complete set of MR was taken via Freecycle.

Crates were FC’d as well.

The laser room next to my office was a storage room that needed temp clearing.

Most of those shelves got moved to where the crate shelves were.

Long way to go though!

The largest turd in the punchbowl was getting the new vent duct past the foundation. The penetration would be above the concrete, at the upper right.

Serious pucker factor here. But It’s non-load-bearing, and as I learned fairly typical for ductwork.

Meanwhile, the shelf units on the main closet got framed in and tied into the ceiling joists. this “closet” will get a bunch of doors later in the year. Notice the new locale for the flammable cabinent.

Next was finishing the metal studs in the new laser room.

And running electrical.

The vent system ducting started at the wall penetration, and teed down for the laser.

I continued it to a ceiling louver over the relocated 3d printing area.

More later…

1 Like

would it be in order to condole?

sometimes i am suspicious, that all the landgrabs, we achieve in our 50ies and 60ies, get renegotiated when we come near the 70ies. piece by piece…

Looking good! Such good lighting in your space.

So this explains why I now have a bunch of old Narrow Gauge & Short Line Gazette. Thanks again for posting them for sale. I’m very been reading through them, very enjoyable to see what guys were up to 40 years ago in the hobby.

1 Like

Ha Ha …it must of bothered you. Glad you focast on doing the work …looks like you’ve made some good progress . :grinning:

1 Like

Continuing the progress report, the blower (acting as a vacuum fan) needed a new home, and that (with its ducting and outlet box) took a weekend. I basically parked it underneath a cabinet, which shields it from rain and snow.


An anti-rodent grill has been installed. For insects, I guess I’ll have to turn the thing on once in a while. The switch is next to the laser inside.

Moving the laser was a bear, lots of disassembly to get the base off, in order to navigate thru doors.

Then I cleared everything away from the newly-studded wall, to prep for sheathing (@JRad, this was why I was asking you about that).

Last Thursday & Friday I installed the (very nasty D-F sheathing) and stained it. Had to stain to even out the appearance, which was messed up with all the sanding to remove all the ink imprints. Which Georgia-Pacific decided to print on the better side, not the “F” side.

Alsoo needed to do some wiring upgrades on the laser which took all yesterday. With that, the “laser room” is basically done.

Next things are finishing up the framing on the storage closet (it’s missing the header boards in each opening), and put in new cheap LED floods in front of each bay.

After that, hopefully cleaning up my train shelves, getting rid of these boxes and extending the shelves towards the camera.

That’ll wrap up my contributions to the basement makeover.

Thanks for looking!

3 Likes

Wait Cliff! Did you move the treadmill to the shed?

They are apparently quite useful in workshops.

https://m.youtube.com/shorts/6zrzX8UI-z8

And this one too…

No treadmill (yet) Bill, but if we ever get one those are great ideas for immediate repurposing! :grin:

The elliptical and bike machines are the only items that will stay in the “new” den / whatever space.

Still looking for a new port for the HMS Lonely Victory…

What is this thing called a basement? You mean a crawlspace you can stand up inside? My crawlspace is quite literally army crawl on your belly space.

I love living in the PNW but the number of homes that have basements that aren’t split levels is pretty much none existent.
My wife and I found one house that had a huge basement and a big 3 car garage as well. Perfect for modeling room. It wasn’t meant to be.

I hear ya Craig, I was raised in Modesto CA and don’t recall any basements other than small cellars. Even on hillsides, seems they’d put the main floor on stilts and call it a day.

Out here basements seem (to me at least) more traditional. If on a hillside (like we are), they’re fairly common. But even our neighbors on flat ground have a pit basement, just because. Not sure why that is.

1 Like

Yep, I really miss my basement too. Our crawlspace is definitely nasty. I’ve only ventured in a few feet. Had a guy lined up to empty the trash out of if, but he broke his leg on a dirt bike months ago and still can’t work.

@Cliff_Jennings That sheathing looks a whole lot better than mine, but I expect you picked the sheets yourself. Not having a way to transport them 50 miles I opted for delivery. When they pick your order they just take the ones on the top! I have some that have big knot voids on both sides. Several sheets the side opposite the GP stamp were actually better.

This weeks project for me is to inspect the remaining 10 sheets and pick the 6 best to hold for cieling panels. Luckily, the Kilz primer covers the stamps, so no sanding of the painted panels. I’ve yet to decide on how to treat the walls.

I had mine delivered as well, and yes some sheets had big knot voids, printing on the “good” side, all like you said. I spent quite a while sanding out the ink, because of the staining, so that’s probably why you think my crap might have been better or hand-selected. :grinning_face_with_smiling_eyes:

This afternoon I started into the rewiring of phase 1 of basement lighting, as part of the storage closet project. But, that requires resolving other issues, such as replacing all the cans with LED fixtures and resolving stupid decisions 30 years ago on what switch operated what lights.

Ergo…

Not fun, but I want to poop this brick and get it over with.

Cliff, just let me know where to come get HMS Loney Victory. I’ve got the perfect port she can call home, with real water and everything :grin:

On second thought, just bring her with you when you come finish the inside of my shop now that you have all this practice. New/old space is looking great. I had to rest between posts just from reading about all the work you are doing :grinning:

Well Cliff,
You could keep the cans just for ambiance cause you don’t have to go led? Also as for the wiring part. I rewired my entire house and I can tell you the biggest nightmare was the old door bell and it was one of the last items to power up.

NEVER wire the doorbell to a BASEMENT switched light junction box just because the junction box was right there and hot at the time. Once it was all wired up and tested working, I then turned off the basement lights and closed the cellar door cleaned up tools, washed my hands and was ready for dinner. Welp I’ll test it one more time before dinner now that everything is cleaned up. DOESN’T WORK…WTF !!!

SO, I open the cellar door and turn the basement lights back on. Go over to the junction box, pull the cover, test for power at the connection in the box and snug the caps …FINE…go back upstairs and test for power at the door bell…Fine…Huummm…must have have been a loose connection.

SO again I turn off the basement lights and close the cellar door, walk over to the doorbell and it does not work?? It was the 3rd time opening the cellar door and going down to the BASEMENT that it occurred to me why don’t I just leave the basement lights on this time but close the cellar door…" ALAS " …the door bell still works!

The only thing that sucks is I have to keep changing burnt out light bulbs in the basement and I have a CELLAR door that ain’t light cause it’s a Rooster rebuild of the original (well sorta).

Just sayin’
:rooster:

That’s a great story Rooster!

I did a mini version of that when I wired a light socket in the laser room for a motion detector bulb. Wired it into a box for the room lights. Then, duh, the MD bulb has to stay on all the time, and is pointless if the room lights are switched on. So it’s on an extension cord…

Nice cellar door, like everything else you built or reconstructed there, very classy.

Well thank you but I don’t care about class because I have none. As my son used to say :
“I’m a loser with no friends”.
However that ended quickly because I would always respond:
“I like being a loser with no friends, what is your excuse”?
Now I just tell him to get out of my house!

BTW …If I had your shop I would be dangerous!

Closet framing and lights are done…

…and progress is being made on the train display area.

@David_Marconi_FOGCH, you’ll recognize those hanging lights. Linda suggests electrifying them and converting them to downlights, we’ll see.

2 Likes

that looks simply lovable!

1 Like

That all looks great. Once I get to bench work there will be a section that looks similar to your storage system. I have a bunch of drawer like bins to hang on rails.