Large Scale Central

Bachmann Connie Bash Thread. Post your pictures here

Hopefully this can be turned into a sticky so everyone who has bashed their Bachmann Connie can show it off. Post a few of your pics and a brief description of the work done. Here’s mine The Lakeville Amboy & Conneaut Railroad’s #4. Typically it’s job is to haul the varnish but once in a great while it gets pressed into freight service.

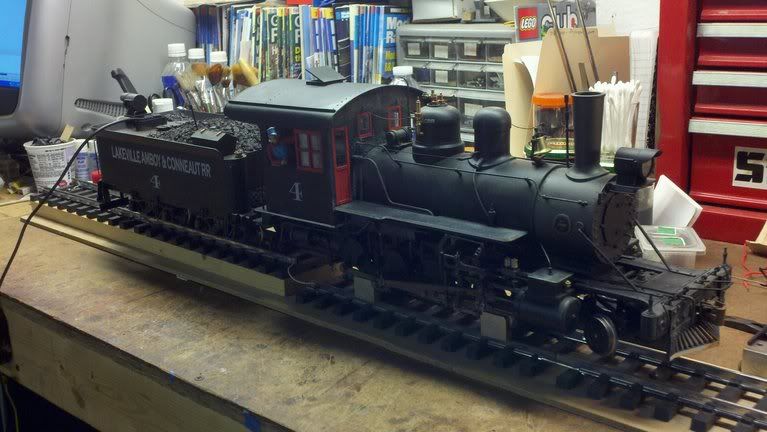
It has been fully converted to battery power with Airwire controls and a phoenix P8 sound card. The smoke unit and smoke box flicker lights have been removed and the orange LED front and rear lights were replaced with incandescent lamps. I added a real coal load, lettered it for the LA&C RR installed an engineer & fireman, detailed and weathered with paint, added a ‘rope’ to the bell and whistle, raised the headlight on a new bracket, made a new smoke box door, installed kadee couplers with chains attached to the cut levers and installed a Barry’s big train Drive. I’ll edit and post a better picture when I get it outside.

(http://www.the-ashpit.com/mik/P1010027.JPG)

(http://www.the-ashpit.com/mik/P1010028-1.jpg)

The major mods were swapping for a Big Hauler cab and tender, and shortening the domes, etc. to resize it to work in 1:24 Abbreviated build log here: http://www.the-ashpit.com/mik/connie.html Also, for those who can’t afford Barry’s great gearbox, here’s a basic primer on how to change the problematic axle gear yourself. http://www.the-ashpit.com/mik/gear.html

Here’s the one of my two that’s been physically altered. (Thanks Bruce for the photo…)

(http://freightsheds.largescalecentral.com/users/slatecreek/_forumfiles/IMG_4141.jpg)

Pilot deck, beam, smokebox plate, headlight raise, smokebox graphite treatment, all new. The tender has new steps, but that’s no big deal.

Terry, is that my new loco? Thanks!

Tuscarora Railroad #3 “easternized” 2-8-0 to 1:20.3

(http://home.comcast.net/~kcstrong/trr/pics/TRR3/firemanthreequarter.JPG)

(http://1stclass.mylargescale.com/eastbroadtop/TRROps/TRROps15.jpg)

(http://1stclass.mylargescale.com/eastbroadtop/TRROps/TRROps09.jpg)

(http://home.comcast.net/~kcstrong/trr/pics/TRR3/sideview.jpg)

Builder’s log here: http://home.comcast.net/~kcstrong/trr/Motivepower/TRR3-2.html Woodland Ry #14 “downsized” 2-8-0 to 1:22.5

(http://1stclass.mylargescale.com/eastbroadtop/WRY7/WRY717.jpg)

(http://1stclass.mylargescale.com/eastbroadtop/WRY7/WRY720.jpg)

(http://1stclass.mylargescale.com/eastbroadtop/WRY7/WRY723.jpg)

(http://1stclass.mylargescale.com/eastbroadtop/WRY7/WRY704.jpg)

Builder’s log here: http://www.mylargescale.com/Community/Forums/tabid/56/aff/8/aft/33173/afv/topic/Default.aspx D&RGW #350 “D&RGW-ized” 2-8-0 to 1:20.3

(http://1stclass.mylargescale.com/eastbroadtop/drg350/drgw35001.jpg)

(http://1stclass.mylargescale.com/eastbroadtop/drg350/drgw35018.jpg)

(http://1stclass.mylargescale.com/eastbroadtop/drg350/drgw35015.jpg)

(http://1stclass.mylargescale.com/eastbroadtop/drg350/drg350b.jpg)

Builder’s log here: http://tinyurl.com/drgw350 Later, K

OK…I know very little about steam modeling or prototype for that matter…but intrigued …what are the the levers/cams above the valve rods that are connected to the center driver? It’s the mechanic’s and the timing thing that suck me into the steam …I blame Bart for sucking me into half of this stuff…

I believe that’s the Baker valve gear.

David Russell said:
OK…I know very little about steam modeling or prototype for that matter…but intrigued …what are the the levers/cams above the valve rods that are connected to the center driver? It’s the mechanic’s and the timing thing that suck me into the steam …I blame Bart for sucking me into half of this stuff…

Gary’s right… the B’mann 2-8-0 has Baker valve gear, which was designed to be an improvement on the more common Walshaerts valve gear, by removing the sliding components in the reversing mechanism. This will help you with the basics … though the drawing is the Walshaerts.

(http://en.wikipedia.org/wiki/File:Walschaerts_motion.gif)

Compare to Baker gear (no animation, but the diagram is good) http://en.wikipedia.org/wiki/Baker_valve_gear Matthew (OV)

The other thing that should be mentioned here … this locomotive is an OUTSIDE frame design … the rods, cranks, and counterweights are outside the frame while the wheels are inside. On this one, the counterweights (the D-shaped pieces on the axle ends) balance the rods directly, while on some models (notably the C-25) the weights are integral parts of the wheels themselves, and not visible on the outside of the frame with the valve gear.

On an INSIDE frame, the wheels and gear are both outboard of the frame, and the weights are normally part of the wheels themselves (usually a solid piece on the side of the spoked wheel opposite the rod cranks) The idea is to balance the extra weight the rods, cranks, and gear add to one side of the wheel so that it turns smoothly and doesn’t jump up and down on the rails, or surge.

If I’m being overly elementary here, I apologize … but if you’re really new to steam things, that’ll get you off to a decent start.

Matthew (OV)

I shortened the pilot and front truck by about 1", raised the headlight and added class lights.

(http://rgsgardenrailroad.com/lyt07a.jpg)

(http://i253.photobucket.com/albums/hh58/rgseng/RGS00010.jpg)

(http://rgsgardenrailroad.com/lyt05a.jpg)

Also managed to fit a snow plow to it:

(http://i253.photobucket.com/albums/hh58/rgseng/42plow03.jpg)

Excellent Idea Terry. Modifying my Connie is in the works. This thread gives me some ideas.

I’ll sticky this, but if it degrades into insanity, Ill unsicky it.

Here’s my connie, recently brought into the backshop for new batteries, and some repairs. I’ve heavily modified it. Moved the cab back a couple inches, shuffled the domes and bell around, lowered the tender. Ive lost track of what Ive done to it.

(http://freightsheds.largescalecentral.com/users/bob_mccown/RollingStock/locomotives/connie1.jpg)

(http://freightsheds.largescalecentral.com/users/bob_mccown/RollingStock/locomotives/connie2.jpg)

Thanks Bob! And everyone behave!! Post ur pics and discuss the mods, I know I’ve seen some beauties out there.

The only thing I did to my two (besides a Barry’s drive) was convert the tenders to oil.

(http://freightsheds.largescalecentral.com/users/jebouck/connie1.jpg)

(http://freightsheds.largescalecentral.com/users/jebouck/connie2.jpg)

(http://freightsheds.largescalecentral.com/users/rick_marty/_forumfiles/connie1.jpg)

Hi all, Here is my Connie after many trips to the shop through the years. Some of the things that I can remember that were done are listed below. On the locomotive as a whole there is new paint and decals, AirWire, Battery, Phoenix sound And a Barry’s Drive. The details are; corrected front suspension, shortened pilot deck, lengthened smoke box, relocate headlight, remove cab back wall, add deck plate, move the cab back, added additional boiler and cab piping, add wooden pilot beams, new number boards, Pilot tool box, air lines and hoses, relocate sand dome and bell, rebuild pilot truck to outside frame, add washout plugs, and a curved front smoke box grab iron. The tender changes included; lower tender body on trucks, add oil tank, add air tank, change rear pilot beam and steps, raise rear side steps, add KD’s and cut levers, add water piping, add rear ladder, change all lights to bulbs from LED’s, add air tank piping, add oil tank piping and steam heater, add oil tank railing, add hinged water hatch lid. There are probably a few other changes but I don’t remember them just now. Thanks for this thread Rick

Thats a lot of work on your Connie Rick.

I want to shorten the pilot deck on my Connie. How much has everyone cut off and how difficult was it to do?

I cut a little over an inch off mine. Wasn’t much to it. Removed the plastic deck and cowcatcher then cut the metal frame. Then cut the deck to fit. Did the same to the pilot truck.

Ken Brunt said:
I cut a little over an inch off mine. Wasn't much to it. Removed the plastic deck and cowcatcher then cut the metal frame. Then cut the deck to fit. Did the same to the pilot truck.
How does the coupler mount change? Any issues? Id want it to be nice and solid, still.