May I suggest that instead of possibly burning up LEDS that you substitute them for a model rocket igniter. When you figure out the proper circuit configuration the rocket will let you know!

May I suggest that instead of possibly burning up LEDS that you substitute them for a model rocket igniter. When you figure out the proper circuit configuration the rocket will let you know!
Eric the head and tail lights had their own little circuit boards , tomorrow I will look and see if there are any in the ones I have, if so I will let you know and throw them in the mail. I am not hopeful because I usually keep those boards to hold the LED’s for my battery conversions and to use them I destroy them in the process. But may get lucky.
Pete,
Thanks! No worries if you cannot find the bits; this has been an interesting and unexpected step towards more sophisticated modeling. We’ll engineer something; we always do!
Eric
Eric,
If you would like to take the time and take straight on pics of your set up showing what’s plugged in and what is not, along with how you are powering the boards so WE can clearly see your configuration. Then perhaps I/we could help out a bit more if you wish?
There is always the model rocket trial and error or invest in a cheap multimeter.
Rooster,
All is pretty much on hold in the final run-up to Christmas. I am taking off for most of the next two weeks, so we will have time to work this out with the baking, music practice, pageant practice, shopping, etc. behind us!
Eric

Absolutely! Thanks! We took a few moments between coughing fits this morning to do just as you suggested. I am leaving all the photos at 100% size for clarity.
The idea is for power to pass up from the motor block…
…through the deckplate to the terminals on the main board marked “power.”
The smoke generator will take power from the terminals marked “smoke.”
We tested this before, so we know it should work once we resolder the connection. The smoke leads then go off to the smoke generator unit mounted under the roof.
Kid-zila engineered that mounting system. Pretty clever!
Moving back to the mainboard in the cab, there are a number of terminals, including one marked “B Lamp.”
We found a board with a whole slew of bulbs and LEDs attached and a fitting that matched the one “B Lamp” fitting on the main board, and we assumed that it was a match. Anyway, you can see how Kid-zilla fitted the bulbs and LEDs to serve the various lights in the cab.
I think we just need to find the right port on the mainboard, and we’ll be in there.
Thanks for the help. Back to coughing.
Eric
Eric,
You are mixing LEDs and incandescent bulbs ( which is fine ). Where the problem lies is you are trying to use them on a board which you are not even sure it worked for one and furthermore you are tying this without a voltmeter or at least a continuity tester.
Might I suggest that you google USA trains battery install and there are numerous pics and videos that show the main circuit board and where the plugs should go.
OK…I thought these things were plug-and-play. Live and learn! Thanks!
Well Eric,
They kinda are if you are “plug and play” using USA trains stuff however you are “soldering” and playing. This picture (from USA trains site) shows the cab circuit board and LED to incandescent bulb configuration.
I also went back and read Pete’s railpro install thread. He stated that he tore out all the factory electronics from the start so I’m pretty positive it’s a good board (or was).
Thanks again, Rooster. The only soldering we did was to reattach wires that had broken form our tinkering. Everything else is stock. There was some trial and error to see what plugged into what, but we did no modifications to anything. Maybe we fried something in the process?
Anyway, we discussed this whole issue, and, while it is an interesting project to pursue, Kid-zilla agreed that we should pursue it on the bench as part of a separate project and not as part of a side quest of within the current project. We can use the removable roof for access to an AA or AAA battery clip that illuminates whatever he wants to light as an interim solution.
Kid-zilla, almost fully recovered from 'flu, is happily moving on and striping AM-Critter. All is well…
Eric
Eric,
Without opening up one of my units for a look I am not sure because I haven’t had one of them open in years. Considering you have made no changes to the board have you tried the other 3 terminal port next to the one you are plugged into?
This is what I reverse engineered 20 years ago on a USA Trains 44 tonner. I don’t know if it’s the same, but it does show the relationship between all the boards and the motors / lights. I hope it helps.
Jon,
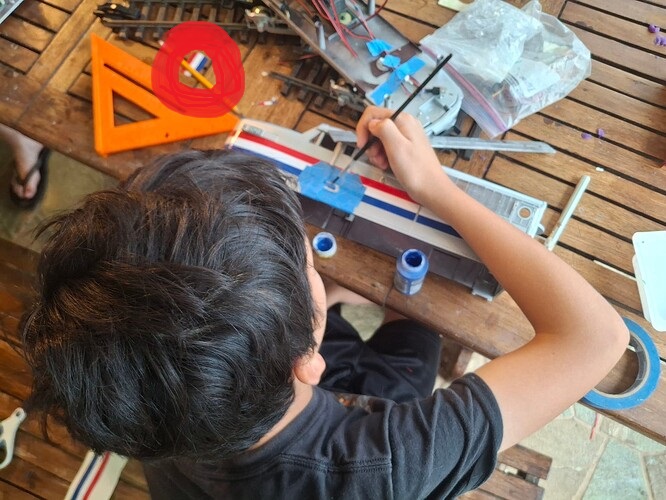
Thanks. We will explore this on the bench. As we needed a victory today, however, Kid-zilla headed for the decals…
…carefully scoring as required to get a good fit, allow doors to swing, highlight panels, etc. He used an eraser to push out bubbles and ensure you could see rivet details.
As he couldn’t quite get the sticker into the cab doors, he trimmed a bit away, masked, and painted.
A final bit of masking needs to come off, but someone is pretty proud of himself right now!
On Behalf of Kid-zilla
Eric
“Excellent Work” !!!
Just a hint …Borrow one of girls hair dyers and you can work the vinyl a bit more. Just watch the heat and don’t be afraid to press it into the rivets and edges with your CLEAN finger).
Try a practice piece first and feel the heat on the vinyl. If it’s too hot to touch with your finger then it’s TOO HOT to work it. The placement looks absolutely spot on and the "Phase III " scheme is perfect!
Mr.
Another hint…if you are not happy with the paint , remember you have a “repair piece” of blue vinyl circled in red… 
Update:
Despite the “distractions” of Christmas and 'flu (all the Mueller boys were laid low; trying playing trombone with your lungs on fire!), progress lurched along. Key events were the application of heat to the decals…
…which made a tremendous difference in both their fit over the rivets and their adhesion to the model. Thanks @Rooster for that tip!
Next was the painting, cutting, and fitting of some dowels to represent the diaphragm.
These are in the project bucket awaiting installation.
I had sort of hoped that he would want to drive for completion once our health had fully recovered, but a break in the rain gave an opportunity to dress the railroad his way (think diesels and steam-to-diesel transition rolling stock) with his PLAYMOBIL for an afternoon of train robberies, forest fires, derailments, and chemical spills. OK, I admit, that was LOTS of fun and a worthy reason for a delay!
AM-Critter is in a place where we can piece together the remaining parts (simplified lighting, windows,. handrails, horns, and fuel tank) during the MIK. This engine is really looking sharp, and I am actually a bit amazed at how well it came together. Something came across my FB page about a real-world PA-1 restoration; Kid-zilla is not far off in concept! Too bad he didn’t wait until now to start, or it would have been a worthy whimsical MIK!
On Behalf of Kid-zilla,
Eric
Awesome work, KZ! And thanks Eric!
Allow me to rephrase that!
When I stated a " clean finger" I meant don’t try and do it after you had your finger up your nose or after the girls painted your nails while you slept.
I “did not” mean that dad had to slap some gloves on you! Take them gloves off next time and you can slide your fingernail up the seams and the edges like a pro. I know there will be a next time as I know you have more vinyl and if not I know a guy that knows a guy who has more.
Q-tip works wonders 


