Large Scale Central

7/8ths Logging equipment

Looking great, Devon.

Can I make a small suggestion? Print groups of parts when you think they’re done, and print them only as throwaway check prints. For clearances between printed parts; fits with brass stock, screws, commercial products; strength; appearance; etc. As opposed to waiting until everything is “all done.”

I find it’s easier to handle the “oh poops” in a, uh, bite size format. Vs. the dinner platter deal.
:grinning_face_with_smiling_eyes:

Already ahead of you Cliff. Once I have access to a printer large enough to print the base and the boiler I will print those and make sure they fit each other. All other things are built off of that. And then the rest of the parts I can print on mine. And I will print it as I think it should be assembled. One subassembly at a time building it as I go. That way I can do exactly as you are suggesting.

Devon, your design is looking great. To further Cliff’s suggestion and your plan to print assemblies as you go, you don’t necessarily have to print the entire assembly to test the fit. For example, for the boiler and base, you can slice (split the body and either delete the split feature when done or simply don’t save the file) just the bottom of the boiler and only the area where the boiler sits on the base and print just those pieces to test the fit and you could probably do that on your printer, now. See below

Boiler_Slice Base_Slice

Dan thats a good idea

Dan, I bought an Elegoo Mars 3.

2 Likes

So if Cliff was doing this
image
His pieces would all move … :kissing:

Yes his would. And I had considered it. But as its meant to be a production piece I didn’t think it was necessarily a good thing.

Devon, for some reason I thought you were going to make an “operational” model, hence my concerns about test fits.

But static, that’s great! And in spite of my best efforts, my donkey never went operational, so is static as well… despite the computer animation, which always works, haha! Thanks Sean, you gave me a chuckle.

2 Likes

I understand Cliff. It was very tempting to model a working donkey. But that is an entirely different beast. Making something that displays well is much easier and cost effective than one that is operational.

We have to keep in mind the vast majority of people who will be buying these are going to stick them on a layout as a trackside detail.

@Pete_Lassen, @Devon_Sinsley makes a lot of good points. I have no experience with the Elagoo printers so I can’t speak to their reliability. I have both a filament and a resin printer and they both have a place in our hobby. I personally prefer the filament printer due to its simplicity (as far as 3D printers are concerned) and the large print volume available on them. There is a wide range of filament available for most any purpose you can think of from PLA to PETG to Carbon fiber. The limitation is fine detail and small parts. I purchased a resin printer to fill that void. Its an AnyCubic Photon Mono. I’ve had absolutely no issues with it from day 1. Its inexpensive at $199 and I think would be great for an entry level printer. Its build volume is adequate for my needs but I’m not sure it is capable of handling some Dan G’s prints due to their overall size. The printer Devon recommended has a larger print volume so it might work for your needs. AnyCubic also has a Mono XL with a much larger print volume. @Cliff_Jennings has an XL so he could give more details of its capabilities.

Keep in mind that resin printers use a liquid resin that is quite messy to deal with and the prints require washing in alcohol and must be cured under UV light. Then there’s the supports that must be removed which can be tedious at times and then sanding (if you choose to) and painting. I mention this not as discouragement but just want you to be informed so you don’t get a printer and then get frustrated with the multiple steps just to get a quality print. I highly encourage you to jump in with both feet. Yes, you will get frustrated at times, I did and still do, but the end products you are able to create make all the frustrations worthwhile.

Let me know if I can answer any other questions or provide any other assistance.

1 Like

Well thanks to a friend in our local club who is an excellent resource for turn of the century RR and logging in our area, he is an author and has written several books on the subject, I am taking several steps back on this steam donkey. I admittedly didn’t really understand how they operate. And I was more or less winging it to make something that looked plausible. But I never really was comfortable with that as I usually like to understand what it is I am trying to make.

Right off, Mike printed a few of the parts to start doing test fits. And the thing is gigantic. Without anything to scale against I really had no idea how large of a donkey I was making. So we have shifted gears and this will become a cable yarder (highline/skyline skidder) with a big boom off the front that could double as a loader. Something like this

image
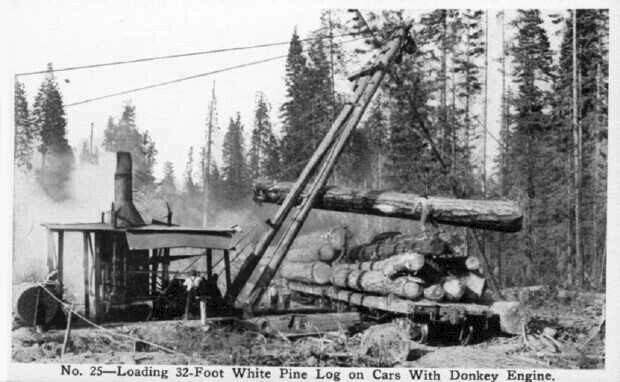
Image Courtesy of Trainweb.org

My friend Dennis provided me some nice line drawings of a double and triple drum version of a similar size donkey. I am going to keep it a double drum for the main drums but add what the drawing calls a “straw” drum or what I call a capstan winch of the side of the lower drum. According to him among other things the straw winch was used to move the steam donkey around. Also the top drum and lower drum in the drawings are not the same size diameter. I needed to extend the drive shaft clear across and add the pinion gear so by making the upper drum smaller I will be able to add that detail.

So some of the knowledge I gained was I was never really quite sure how the drum was engaged or disengaged. I never quite understood what kept both drums from running at the same time. After looking at the drawings and reading parts names I think I have gleaned some knowledge on how they work. At the end of each shaft drum is a handle/lever. The pinion gear on the drive shaft, which is attached to the flywheels and cylinders, is always engaged with the gears on the drums. When the cylinders are engaged it spins the crank/fly wheels which spins the shaft that turns the pinion gear which turns both drum shafts/gears. These are in motion the entire time the cylinders are moving. Then these handles that are labeled “friction levers” are engaged and that must push a clutch plate or some other friction clutch surface against one on the drum itself spinning the drum. When disengaged there is a brake band attached to a foot pedal that friction binds the drum and keeps it from free spooling. So the operator finesses both the brake and the clutch to run each individual drum. He also has a throttle and a lever to engage the cylinder in forward/neutral/reverse.

Again as with the support rods on your donkey, the yarder should use brass. And the boom should probably be wooden dowels.

Yes John we are going to make the main pieces of the booms dowels like we are with the skids. The fittings for the boom will be printed. And then either brass rod or chain for the supports for the boom. Not sure how the real one was done will have to look closer. But either way the boom supports will be brass.

On the picture I posted it looks like the boom was supported by cables that must have run back to trees or something. Its running way astern of the donkey.

Well a lot of progress has been made in the redesign. Still have a lot of fiddly parts to put on it but the main portions of it are done.


1 Like

Beautiful work Devon, ya gotta be proud!

Some great detailing work, for sure.

About the pink and blue drums, is that code for “we’re not sure if we’re having a boy or a girl”? Because if you were sure, they’d be the same color. Cuz that’s how donkey engine designs work, IIRC.

:stuck_out_tongue_winking_eye:

Well done, Devon. That’s going to be a very nice kit when you and Mike get done. Why do the drums appear as mesh bodies vs solid bodies?

Because they are. This was what I was asking you about early when it came to scaling things. I made the first drum too small in diameter. And because it was a bunch of components and not bodies I couldn’t figure out how to scale it. So I took it and exported it and scaled it in Matter Control and then exported it and uploaded it back into Fusion. That does work pretty well, you just have to be satisfied with it. As it turns out I resized it again to make two drums of different sizes. I won’t say that is the correct way to do it but it was a work around because of screwing up the design in the first place and not knowing how to fix it in Fusion.

Its what Fusion does when I import foreign parts into Fusion. See my response to Dan

The model is up to 21 parts and counting.