After working with one, it is at the top of my list. I’ll use the one I borrowed for this project but I will most likely have one bought pretty soon.
Hey everyone,
I got a little more work done on the building this weekend. After working out a few kinks I think I’ve hit my stride and got the trim cutting down pretty good.

This my showing the Board and Batten siding. After borrowing the Pin Nailer (thanks whoever suggested it) it is very easy and I have no worries about splitting. I broke down and bought one, but to stay within the rules I’m not using it. I’m using the borrowed one.

Another picture of the lower level of the building. I will cut out the window and door openings after I finish the siding. I thought it would be easier this way, we shall see.

This is a overall view at this point.

Different from above is I started placing boards on the upper level of the building.

It is slow going. But I am cutting all the boards out of my scrap redwood so it is taking a little bit to get everything cut. Hopefully I can get this done!!!
Looking good. Will it be left natural, painted or stained? Will there be any windows?
Keep up the good work.
Very nice. Have to get me a pin nailer some day.
Tom
I’ll put windows in, but I thought if I did the siding first and then cut the window and door holes. As far as staining it, I’m not sure, I like the natural wood look, but I do want to date the building a little bit. I steering toward a light weathering which will include a lighter colored stain.
Looks like that pin nailer moved you right along. Nice job Jake
I like this gold mine a lot, Jake. The framework is very impressive, I could never do that and keep everything in square. Where can I get one of those pin nailers you’re using? I’ve seen and have a finish nail gun, but that would be too powerful for this kind of work.
Actually I have two questions…how do you cut that framework scale lumber? I have a table bandsaw but it is never angled correctly for some reason.
John,
Is your band saw blade sharp? Dull ones drift.
I bought an old Sears 14" band saw 10 years ago and have replaced the tires and guide blocks, really helped get back to square. Don’t hold your wood to the fence, push down and let the fence guide you. Keep the guides as close to your work as possible. Keep the blade taut, it’s a sweet Ping when plucking the blade… Hard to remember reflex adjustments …
I use a cheap Harbor Freight pin nailer and name brand pins, HF pins are to cheep and jam.
The pin nailer was around $20 and look for small air compressors w/ tank on sale. I find them in the $50 - 70 range.
Gluing and then a pin or two and more glue, no shortage of air.
Happy Rails,
John
I like to use my table saw to cut scale wood over a Bandsaw but you can do it with a the bandsaw jsut as well. If you are wandering how much of your blade is showing? I can adjust mine, you only need ot have a inch or so of blade showing to cut scale lumber. If you have too much blade out then it can wander from the rollers. Set up a fence, I use a T square and 2 clamps then it is easy to let it rip.
I have a Bostitch pin nailer and it shoots the 1/2 pins from harbor freight easily but not the longer ones
that tend to jam. Remember when using a pin nailer the pins don’t have heads like a brad does so they can pull through your wood. What you need to do is glue then pin at a angle and this will allow you to move on to the next piece without having to wait until glue dries.
Get yourself a pin nailer John they are so cool but watch your fingers the pins bend easily and will shoot out the sides of your project.
Looking good Jake. We are all in the home stretch now will you be done?
John I think the questions about the Pin Nailer have been answered. I borrowed an off brand one I dont remember the name. I purchased a pin nailer from Lowes under their Kobalt brand name. It works pretty good. However, like the other John said, Harbor Freight has them cheaper.
I have been using Titebond III as a glue and then pin nailing the joint. To me the pins really look like nail holes so I have liked how it has worked.
For cutting my scale lumber I use a table saw.
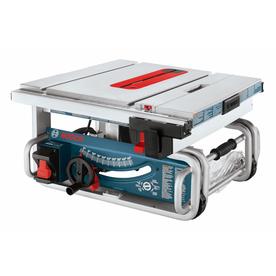
I also use plastic fingers to set my work solid against the fence. I also take my time and don’t get in a rush. I don’t use the little guide fence that comes with the tool. The fingers can be made or purchased. I referring to the little Half moon guide that slides along the table top, which you can see to the left of the photo above.
The steps I take to cut my redwood scraps down are:
I cut off the old painted surface of the board. I try to go as thin as I can so I keep as much wood as I can. Then I start ripping the board down to further smaller dimensions of what I need.
If it is really thin wood, then I use my band saw. But I dont like to use it for long straight cuts because of the wandering.
As far as getting this done…I dont know if I am. But, that doesnt mean I’m not going to try and if I dont oh well. I’ll still keep updating the build log until it is done. Speaking of updates:
Here is where I’m at. I’m working every night to get this done, but I’m also not going to rush it, so if it takes longer then, oh well…


I have pretty much all the Boards on and am about 3/4 done on the battens.
Jake Smith said:
As far as getting this done…I dont know if I am. But, that doesnt mean I’m not going to try and if I dont oh well. I’ll still keep updating the build log until it is done.
Jake, I’ll be following until you’re finished whether it is by Monday or not.
I like that small table saw. All in all, I think I’ll sell the bandsaw on craiglist if I can because my experience and what others have said here confirms for me that it’s just too limited for the amount of trouble.
Alas, I have to beg forgiveness (sort of). I did not finish my model. I just got too busy and I probably bit off more than I could chew in a short time period. Oh well, the competition got me started on the build I had been stalling on and I will see it through. Stay tuned for more build photos as I am still actively working on this.
Well Jake, I believe you officially have until midnight, your time (whatever that is as I don’t know your location) to finish.
But our friendly Challenge promoter, Dave, has granted an ‘until sun up’ extension for those that need it.
As promised I have an update on my build.

This is an overall view of where I’m at. The Board and Batten is done except for the front face of the upper building. I stopped because since I’m not pressed for time now. I decided to add some floors to the inside so I could add some detail if I wanted.
From the pic you can see the floor joists in the upper building. So if I plan to actually build the interior I decided I better have a plan for the processing facilities. (Yay I get to actually use my education again!!)
The top floor would hold the primary crusher where the initial sizing from the mine would take place. The standard reduction would be from “run-of-mine” to a maximum of 4" diameter. Underneath the crushers output would be a screen assembly to separate the smaller rock from the 4" stuff. This would be located in the angled back area of the upper building. A secondary crusher would be located on the second level below the screen to reduce the 4" down to probably 1" - 1 1/2" diameter. This material would then be fed into a second screen to recycle any material that came out oversized and also to receive the smaller material coming off the primary crusher output of this screen of 1" of less would be moved to the ore bin. Also in the bottom level of the building I would put a workshop area because all this equipment requires a lot of maintenance. This machinery would most like be powered by a steam generator placed in a separate building and the steam piped into this building.
So more pictures…

This is the floor joists of the 2nd level. Where the secondary Crusher would be located.


I’ve started laying the planking for the floor.

Another angle.

Here is the upper floor finished. I left an open space to build stairs and also for ventilating this building.
I finished the planking on the 2nd floor and the floor joists on the 1st floor (bottom floor). I also cut the door hole for Dave’s Door. I think it will work well putting all the siding up first and then cutting the window and door holes.
I’m still liking and still following your build, Jake. It’s turning into a really serious model now!
You’re doing great. Cheers…
Your top level screen was often called a Grizzly, kids were stationed there with sledge hammers to break up what wouldn’t go through. Cheap unskilled labor.
Ball mills were often the secondary crusher…
Keep at it, talk has been next year’s Challenge might be Unfinished projects… I’ve started the station to go with the freight depot…
John
Wow, this is really turning out nice!