Large Scale Central

Your thoughts/advice on my track plan

I was out feeding the backyard plants and noticed an area under some trees where our flowers didn’t grow well because of the shade. And I thought, “Hey, I could lay some track there.”

So here’s my plan. I’ll get me some Trex or whatever that outdoor decking stuff is, mount my Aristo brass rail and switches on it–in sections–then drag the whole thing out into the yard and plop it down under them trees. Kinda like ya do with your under the Christmas tree trains. Nothing fancy, just a chance to run my locos back and forth and maybe do some switching. And to tell y’all that I too are a garden railroader.

Your thoughts, comments, accolades, etc.

Oh, I’d have to hook up my Aristo Train Engineer to provide track power (no batteries yet).

Ya gotta start somewhere…:wink:

And thats how it gets started…

Sounds like a workable idea. Assuming you plan on laying the Trex flat and track directly on top… If you can avoid having the track joint and the Trex joint in the same place you will have less problems with bumps. Cut the Trex longer than a track section and when placing outdoors, use another section of track to fill in the gap.

How level is the area? I think that what you are planing will work great, the big issue is the joints, and that makes the levelness of the area a key feature. Estimate on the starting size you would like?

Be sure to support your trex well or it will sag. I have a elevated section along the back of the RR that is a bit out of view and I used PT 2x4’s and screwed them together to form a “T”. This has held up well for neear 6 years now.
Good advice already given over the joints adn what to watch out for.
Have fun and keep us posted

The only 2 things I can see as a challenge are:

  1. How are you going to hold the sections together? and,

  2. How are you going to make all the sections level?

Using track clamps to hold the sections together is one option but my experience is thats not really what they were designed for and that some sort of screw or bolt together system might be a better option.

There are several methods modular layout guys use to level their layouts, most involve some sort of of bolt threaded into the bottom of a support leg that can be adjusted for height.

Also its a good idea to pre-ordain a dedicated storage area before you start, I have gotten into trouble by building first then saying oops, where am I going to store this?

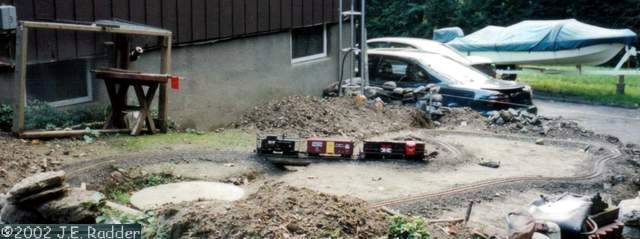
Let’s see now. The area in question is dead flat, next to the patio. It’s about 15 x 3 feet and covered with cocoa shells. We tried growing impatiens, then begonias there, but the Pitts (pittosporum trees) are making a lot of shade, so DW has given up on the flowers.

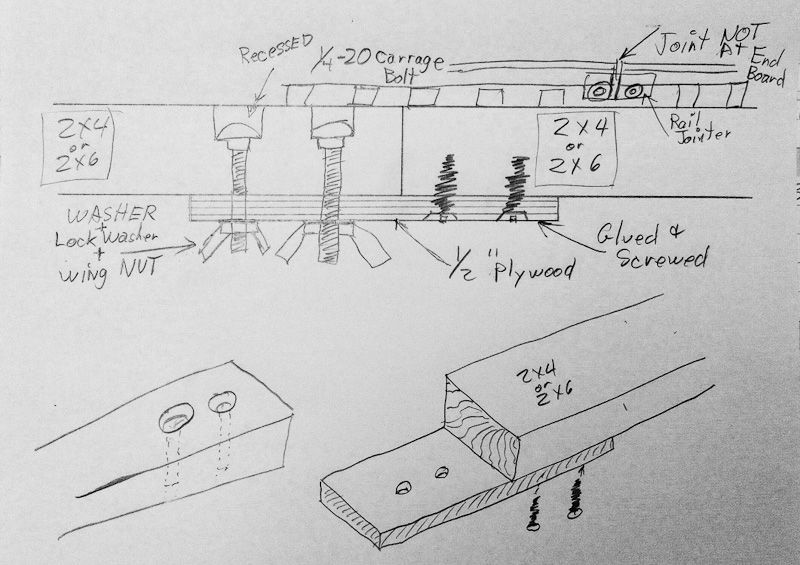
Umm, yeah, I will be sure not to make the Trex joints and the track joints occur in the same place. And if I use the same material on my for-real layout (coming to a theater near you) I will probably secure the Trex (is that its acutal name?) to 2 x 2s driven into the ground.

When not used, the boards will undoubtedly rest under my trusty old 911, which doesn’t see much action but is appreciating nicely. The car guy in me says, “Shame on you,” but the lazy hoarder says, “Oh, lighten up!” I ran my plan by DW and she approved, but I think it’s because she’s on jury duty and feeling beaten down.

BTW, she told me that because our impatiens (and we have about 1,000) are suffering from Downy Mildew, which is sweeping the nation, I am free to run some trains in one of her precious flowerbeds. Only thing is, this will require using curved track, elevation changes and all. “And yet…” as Homer Simpson once said.

I inventoried my Aristo track stash and while I have lots of straights and curves, I have only three wide angle Aristo turnouts, two rights and a left, so my options are very limited. My ultimate plan was (and now “is” ?) to buy more switches as needed.

Guess I’ll run over to Home Despot or Loze and check out the planking.

Joe,

You are going to get sticker shock at the price they are asking for Trex decking boards.

Giuseppi, yes, I know. I read the ads and I believe that stuff costs about, what? Like a buck a foot? More? Guess I’ll find out. :frowning:

Joe Zullo said:

Joe,

You are going to get sticker shock at the price they are asking for Trex decking boards.

No kidding! I checked the other day at one of the “not so Big Boxes”, they had very minimal stock. One of their yard employees told me point blank that he considered TREX for his deck, but used cedar instead.

Still have to check two more suppliers, I’m willing to buy if they have the dimensions I want. You can’t curve cedar the way you can TREX.

:wink:

Hans-Joerg Mueller said:

Joe Zullo said:

Joe,

You are going to get sticker shock at the price they are asking for Trex decking boards.

No kidding! I checked the other day at one of the “not so Big Boxes”, they had very minimal stock. One of their yard employees told me point blank that he considered TREX for his deck, but used cedar instead.

Still have to check two more suppliers, I’m willing to buy if they have the dimensions I want. You can’t curve cedar the way you can TREX.

:wink:

You can if you soak the cedar, first. Just let the sprinkler run on the cut pieces for a while.

TREX you bend on a hot day, clamp it to the PVC pipes, Next day rlease the clamps and start fastening to the pipes. No muss, no fuss, no splinters!

Yup, and then it begins to sag between the pipes. Still, no splinters. Dull saw blades, though. :slight_smile:

Here is my idea for you. This is to be a temp layout , not to be forever correct? You want to be able to disassemble and put away, Right?

Being in SoCal, the weather is not a moisture issue as with much of the rest of the states. Here is what I would do. I would use Good quality 2x4s or 2x6s for the straight sections. 3/4 inch ply for the curves, double upped and glued and screwed with waterproof “TightBond III”

(http://i1234.photobucket.com/albums/ff403/dave2-8-0/TRUCKS/Track02_zpsedc1093f.jpg)

The joints in the rail should be offset from the joints in the wood. Cut and assemble all pieces and not fasten down the track yet. After you have the layout put together, dissemble and prime the wood with a quality “Oil Base” primer (if you can get one in Calif) Then paint with a quality “Oil based” gloss exterior enamel trim paint. Two coats would be best. The wood will be the same as on a house and should last for 10-15 years in SOCal, if the sprinklers don’t wet it daily.

On the Plywood pieces I would use two coats of primer and pay attention to the exposed side/edges, and two heavy coats of paint and a third on the edges.

Lay some 2x2 “Cross ties” Painted on top (to prevent ground moisture wicking) under the wood to get it off the ground.

Screw down the track with only one joint per base splice, and use rail clamps at the joints, for good elect contact.

Any and all sections could be re-arranged in what ever configuration you might like to change it to, if you use the same spacing and locations for the connecting bolts/wingnuts.

Alternative Track plan #107.

  1. Lay it on the ground, Connect with rail clamps.

  2. Run the hell out of your trains…

  3. Have Fun…

Steve Featherkile said:

Yup, and then it begins to sag between the pipes. Still, no splinters. Dull saw blades, though. :slight_smile:

Do you see any sag? Not even at the splice!

(http://www.rhb-grischun.ca/P1/LadderTrack43.jpg)

Has been up a few years and stayed in place.

:wink:

BTW I buy cheap throw-away carbide blades when they’re dull, there are more on hand. If you can afford TREX, but need to save on sawblades …

Not to seem ungrateful for all the swell advice, Dave’s idea appeals to my lazy side. :slight_smile:

I went out into the yard and stared and stared and thought and thought, but no inspiration on what to build, came. Except for the flat part, which is what it is, the flower garden part is so sectored that you’d hafta use 2-foot radius curves to make it work. I don’t think DW had trackwork in mind when she offered me that spot. She just wanted me to get some of my buildings off the living room floor. Anyway, I will post a few photos so you can see what I’m talking about.

At the moment, I’m examining the tender of one of my Bug Maulers to see what wires I’d have to disconnect in order to install a battery (see my other question about battery power in the post I hijacked from Ray Dunakin, who is battery-ing his Bug Mauler.

Looking at the wiring I did years ago, I am amazed at how handy I was back then. Right now, it all seems like a jumble.

Joe, Bug maulers run just fine on 2ft curves. Just throw some track down and run… you don’t even have to connect the ends…

Dave Taylor said:

Joe, Bug maulers run just fine on 2ft curves. Just throw some track down and run… you don’t even have to connect the ends…

Perfect lead-in to post my 11 year old Just Do It photos…

(http://photo.cvsry.com/NSS_Do-It_1_640.JPG)

(http://photo.cvsry.com/NSS_Do-It_4_640.JPG)