Large Scale Central

What are the most common roadbed methods?

Since I joined this website forum a few weeks ago, you have been a wealth of information and knowledge. I am hoping to continue to tap the knowledge and learn from your collective expertise.

Here is my question: What are the basic ways to lay track and roadbed in a garden railroad? I have seen forum chat referring to the use of concrete, cement, wood, PCV pipe and balast. I am not sure what is the best way for the area that I am in.

In Indianapolis we do experience the 4 seasons and will have a decent freeze with layers of snow and ice. We also experience the summer days of 90+ degree weather (about 15 days so far this year). We deal with extremes.

My thought is to use segmented track. I need to understand the laying of the rails and roadbed so that I can use in in the decision of battery versus track power. I know they are closely intertwined.

Finally, is there a decent source (video or book) that I can purchase to assist me in my research?

Thanks again for your help.

Dan
Indianapolis, IN

I dug a 6-inch deep and wide trench that I fill nearly to the top with pea grave; After I leveled it I added a one-inch layer of fine gravel which I again leveled. On top of that I laid my track and ballasted it with fine gravel.

This year I replaced my rail joiners with rail clamps so when the rail expands and contract it will “float” as one solid unit. I usually have to relevel it once every five years at the most.

We live in a dry, desert climate at 4,000 feet. Our temperatures can range from 0 to 120.

Welcome Dan,
There are numerous books out there by Kalmbach (spelling?) basics of outdoor or garden RR’s . None I personally would recommend as they are all good! There is a wealth of knowledge here on LSC and some is biased but be careful as it is depending on what works for them in their climates or conditions but there is no real standard “silver bullet” in outdoor railroading IMO. I personally use the ladder method combined with the raised method on PT boards here in south central PA.

New materials and new ideas are always coming to light and I personally tend too grab hold and experiment with these materials like a few here. Some ideas fail some succeed and this is what makes this hobby so interesting for me and much better than indoor modeling. Your tackling mother nature as the prototype does daily but you need to determine what will work best for you considering the several questions you asked.

My first RR was a 10’ diameter loop in the grass outside and I was tickled pink for hours watching it go roundy round. I still watch it go roundy round but on a different level now and hope to have switching industries in the near future. Good luck with your search and this forum has a ton too offer.

Just my thoughts
Rooster
:wink:
P.S. We love pictures here!

Hi Dan -

There are almost as many methods as there are garden railroads :slight_smile: I’m in Southern New England and I’ve experimented with quite a few methods and so far none have proven to be overly superior to the other. Each has pros and cons. Here’s what I have outdoors so far…

Trench & Fill: About 20% of my railroad is built using shallow trench filled with 3/4" process (3/4" crush to dust), tamped and leveled then dressed with stone dust (fines) ballast. Needs re-ballasting annually or more often. Tends to grow in height requiring cutting down occasionally.

Mounded Fill: About 15% is built with mounded fill. Originally I started with scrap brick and block, covering with dirt. Later it was dressed with 3/4" process which was repeated for several seasons, with stone dust ballast on top. This area of the railroad is directly in the drip line of a huge Maple. It has required annual maintenance to replace what the rains wash away.

3/4" Pressure Treated Board: Another 20% is built on PT boards. This section is 100% elevated supported on Deck blocks with posts or small wood blocks over a flagstone patio. Originally I added plastic edges with J-Channel and ballasted the track. I removed the J-Channel due to clearance issues so now it’s just track on wood. This section is nearly 7 years old now and starting to show some sag and split problems. When I rebuild it I’ll either use ladder or 2x6" dimensional PT lumber “cup down” [the IPP&W method].

Concrete: Close to 40% of my railroad is on 3-5" reinforced poured concrete roadbed with track dressed in stone dust ballast. The roadbed has required no maintenance and has stayed put. The problem with this method its that the ballast works itself under the track raising it.

PVC Ladder: A short section, about 5%, is on ladder made from 1x2" PVC board with 2x2" PT lumber posts sunk about 12" down. I like this method for speed of construction, but the jury is still out on frost heave. This spring, after the first winter, my posts had pushed up about 4 inches. It was easy to push them back in the holes in very early spring and they stayed put so far this season. I will be adding another section of about 40 feet using this method this fall and next spring.

Mine and most others in our club are the same as Dougs.
Track is floating, not fastened to anything.

Here’s how I did mine “Easy Peasey” I laid out my track, how I wanted the layout to be, and then went back after and spread black plastic liner underneath the track, I would suggest wider than I did by about at least 2-3 inches on each side. Then I poured my ballast over the track to the width I wanted and depth, then pulled each section up through the ballast till on top, then after doing whole circle of track 80x40ft wide then leveled, and re ballasted for appearance where needed. I did the inner loop the following year. I have to re-level and put ballast in a few places maybe once or twice a year heavy rain and or ballast shifting until after 2yrs. pretty stable. On the curves I used some grey cement blocks to hold the curves now. This year I made change to the layout and again yesterday re-did the West end of the layout. After re-routing the track from the cement pad to off of it and down below it with inner loop, spent about 5 hrs. doing that yesterday the inner loop was too close to the outer loop, so I put in a piece of 54" instead of 60 inch and then pulled the curve inward that distance now loops are far enough apart so NO collisions. Had one a couple of days ago which told me they were too close. Found out the “hard” way. Dash 9 collided with my Mallet and derailed both breaking the rear steps loose on the dash 9!! So here is the picture of what I did to start with! Regal

(http://www.lscdata.com/users/blueregal/_forumfiles/howtotrack.jpg)

(http://www.lscdata.com/users/blueregal/_forumfiles/layoutwestend.jpg)

The above pic is how the layout stood a couple of days ago, I have now brought the inner loop closer from the West to the East to avoid collisions. Will be on “live” randomly with Noel from California 6-10pm California time. 7-11pm my time Saturday if any of you care to join us for some train fun!! Follow the link below on Saturday!! http://www.livestream.com/crazytrainguyschannel?t=483092

I float my aluminum track on a gravel base. I only trench when required for grade. I use weed cloth underneath now, but didn’t for the majority of the RR. Ralph

(http://www.lscdata.com/users/cabby/_forumfiles/SUM10011Med.jpg)

100% of my RR is done the same way Doug mentioned except instead of pea gravel I used crusher fines (stone dust) for the trench and base. I also have a backwoods RR so any plants that grow bwtween the track is welcomed.

(http://i32.tinypic.com/dh8sis.jpg)

I am not totally understanding the floating track laying and roadbed. In many books I have seen talk about attaching the track to some sort of underground framing (wood, PCV piping, laddering, etc).

Doesn’t the floating of the track move around from ground freeze/movement? Is the track spiked into the ground? How often do adjustments or ground maintenance need to be done?

Sorry if I sound like an amateur - but I am!

Thanks for your patience with me and especially thanks for your mentoring.

Dan Perrott said:
I am not totally understanding the floating track laying and roadbed. In many books I have seen talk about attaching the track to some sort of underground framing (wood, PCV piping, laddering, etc).

Doesn’t the floating of the track move around from ground freeze/movement? Is the track spiked into the ground? How often do adjustments or ground maintenance need to be done?

Sorry if I sound like an amateur - but I am!

Thanks for your patience with me and especially thanks for your mentoring.


I don’t understand it either. I tried it and it failed miserably. I was constantly doing maintenance on the track.

I went with the ladder method since I have to deal with outside forces: hoses, squirrels, wind, rain, mis-steps. My track is secure and lasts through the seasons. The most I do is push down spikes in my trestles and switches that I have hand laid.

You’re not asking an amateur question.

When the track floats it is actually not attached. The track is fee to expand and contract and usually stays on the ballast and rock trench you have dug. In very hot weather I have actually seen it move further than the trench. That’s not a problem if the ground is fairly level

Our ground is sandy and not subject to ground freeze so it’s never been a problem for me. Depending on your ground I could see the winter freeze and thaw cycles as being a problem. But would that be the same if the track was attached?.

the problem with moving track comes from two factors together.
long pieces of track and big temperature differences.
a layout made of one foot long sections very seldom gets problems with expanding and contracting. the connections every foot can open and close enough to neutralize the expanding and contracting of the rail-lengths, without hindering the wheels of the rolling stock.
the longer the single lengths of track, the bigger the gap from contraction.
if one uses railclamps the problem gets worse. no gaps to open or close with the temperature. the rails have to bend, when they get longer from heat. they will curve out between the points where they are nailed or screwed down. i have seen pics of “straights” that looked like snakes.

when i had an outdoors layout, i just fixed the switches, nothing more.
.

Our temperatures can range from 0 to 120 but because ALL of the track floats it’s not a problem. But you can’t tie the track down anywhere or you will get kinks.

The rail joiners were a problem because the long lengths of flex would pull out of the joiners. By clamping it into one unit the track can expand and contract as one piece.

Near us in San Bernardino a few years ago they replaced the rail in the yard. One hot, summer day the crossing tower crew watched the newly laid yard kink! I would guess the switches didn’t move!

Dan Perrott said:
I am not totally understanding the floating track laying and roadbed. In many books I have seen talk about attaching the track to some sort of underground framing (wood, PCV piping, laddering, etc).

Doesn’t the floating of the track move around from ground freeze/movement? Is the track spiked into the ground? How often do adjustments or ground maintenance need to be done?

Sorry if I sound like an amateur - but I am!

Thanks for your patience with me and especially thanks for your mentoring.


With the floating method I have to rebalest every spring and for the most part my track stays level. I just rebalest to spruce things up. I think if I were to secure my track to anything I would move to much in the wintter cauing more of a head-ach. Plus any other method is too much work for me.

OK,due to my experience I would NOT USE CONCRETE! We get LOTS of moss here and it is a real pain in the b__t, it will derail a loco. I am using TREK deck boards that got salvaged form my neighbor’s deck construction a few years ago. And the rest is elvated on treated lumber (makes work much easier). If you go ground level, consider flooting the track with rail clamp[s on each joint!

Paul

Funny how some people seem to have troubles with attaching track to a stable roadbed…

Here in Eastern Ontario, we get temperatures that range from 100F+, down to -30F. Most of our track (Aluminum/brass) has been nailed down to PT 2x lumber for 20 years, and we don’t get kinks.
We do nort put posts into the ground (We get frost down to 4 feet), we let the pt roadbed float, backfilling under it, or using deck blocks and 4x4 legs where raised.

The track is joined with regular joiners. When laying track, we considder what the temperature is, when laying it. Usually we only lay track in the Summer. If it is VERY hot, we leave a small gap, and when cold, a large gap, at each joint. We do not use track power, so clamps are not needed, thus saving a lot of dollars.

For some reason, our experiences do not sink in with some people. They try to go cheap on roadbed, and then have all sorts of trouble. You have to start with stable roadbed, or you will always end up with all sorts of maintenance problems, and end up frustrated…then the fun goes out of the hobby.

One thing with PT roadbed.....when using PT....use 2x lumber, and at all joints in the roadbed, use the same thickness of wood for the joining plates. The joining plates should be at least 18" long, and 8 deck screws should be used at each joint .  Use 3" deck screws. Treat cut ends with wood preservative.

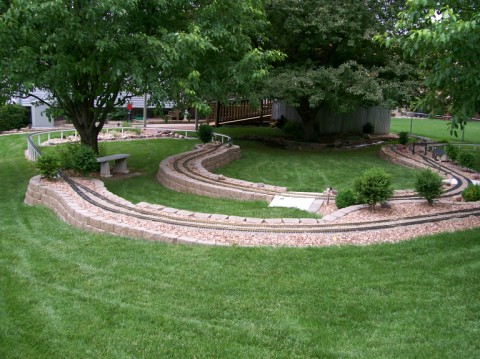
The roadbed should be joined together, and then set to whatever grades you choose. Prop it up with anything (old bricks, ols shoes, dead bodies, whatever,,,,,) then backfill with earth, and a good layer of crushed stone, for drainage.  

If you want raised roadbed…avoid the expense and labour of digging holes for posts. Use deck blocks…on long spans of PT 2x lumber; screw a 2x4 on it’s edge, under the roadbed to act as a girder, to prevent sag.

I have tried just about anything you can think of for roadbed, over a span of years from the early 80’s to the present… Yes…I have used concrete…my problem with concrete, is that it is too hard to change if you decide change is needed. Our railroad grows, and changes as we grow with our hobby. I don’t enjoy trying to cut concrete, or the metal reinforcing rod…I also find that it is more labour intensive. Wood roadbed is easily cut, or taken apart when needed.

OK…so you have better results doing it your way…go ahead…as long as you are happy, and having fun…my heart is with you.

The quote of the day is:

If your track is happy, you are happy!

A number of the club members have used concrete but I agree with Fred. It’s a lot of work to put in and even more work to move. Because of our arid climate we don’t have moss.

Because of our heat everyone uses brass. That’s also an important consideration if you are track or battery power. I was battery power until this year when I added track power. Luckily I had all brass track and it was just a matter of using the drywall sanding brush to clean the track. I also used Scotch Brite pads on all the joints when I was installing the joiners.

I went with the ladder, had 2x6 cedar outside for 18 years it started to rot so!

(http://www.trainboard.com/railimages/data/500/Wahsatchsiding_E1.jpg)

I used 1x2 plastic house trim and 1 1/2" pipe. The pipe is in the ground 24". Been out there three years with no problems. Don

In our climate the rail joiners were the problem. Because I used long lengths of rail it could pull the joiners apart. With the floating track and rail clamps the only expansion is on the east end and it just moves the rails in and out and because it floats there is no kinks. But if you let your track float it must be allowed to float or you will have kinks.

Near us in San Bernardino I’ve heard they had a life-size problem.They replaced track in the yard in the Spring. One hot summer day the crossing crew looked out and saw the newly laid track in the yard had all kinked! I wish I had a picture!b

I don’t have a lot of maintenance issues floating my track on gravel. I think the key is having good drainage so washouts are avoided.

What I like even better is the ease of making changes and repairs too. A new dog had yanked my track over about 6 inches by pulling on the wiring.
In less than an hour, I was operational again. And I can’t count how many times I’ve changed my track plan. I believe every change was an improvement :wink:
Ralph