Large Scale Central

USA TRAINS DIESEL DRIVE GEAR REPAIRS

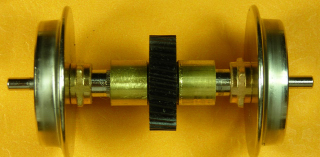
If your USA Trains diesel is running lumpy at slow speed or frequently derailing, the axle sleeves on the drive gear in the motor block may be split. You should not be able to turn any of the wheels with your fingers. If you can, the wheel will slip under load and may not stay properly gauged.

Although axle assemblies are available from USA Trains, the damaged drive gear axle sleeves can be repaired with a collar of brass tube.

The tube required has a 10mm outside diameter and a 0.45mm thick wall. Great Hobbies here in Ottawa has a metric display of hobby brass and can order the correct tube if they are out of stock.

The K&S Engineering stock numbers are 9809 for an aluminum tube and 9828 for a brass tube. In the U.S.A. the McMaster-Carr stock number for the brass tube is 88605K29. Unfortunately they do not ship to Canada unless you are a registered business customer.

The tools required to complete the repair are: a tube cutter, chamfering tool, drill press, small bench vice, sanding board, and flat metal file.

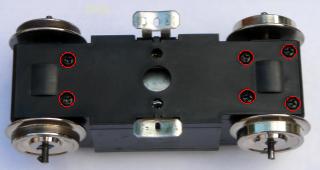
Remove the motor blocks from the diesel, and remove the bottom covers. Lift the axle assembles out, and set the motor blocks aside for now.

Pull the half axles out of the sleeves on the drive gear. Clean the gear with vegetable oil and an old toothbrush to remove any grease. Wash the gear with Dawn dish washing detergent and hot water. Set the gears aside to dry.

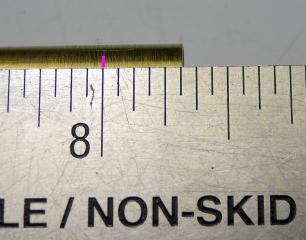
Place a pencil mark 5/16ths of an inch from each end of the 10mm brass tube.

Place the tube in the cutter with the blade on the mark. Snug the cutter down, but not too tightly. Holding the tube firmly, make one turn around the tube with the cutter. Snug the cutter down, and make another turn around the tube. After the third time, inspect the tube to ensure the blade has made a groove on the mark and not a spiral thread. Continue the process until the brass collar drops free of the tube.

Repeat the process until eight collars have been cut.

Sand the edges of the collars smooth on a piece of fine emery paper. A sanding block works well for this purpose. A sanding block is simply a 8 1/2 inch by 10 1/2 inch piece of 3/4 inch thick MDF with a piece of fine emery cloth fastened to it with spray glue. Once the glue has dried the edges of the emery cloth are trimmed flush against the edges of the MDF, and non-slip feet are added.

Mount the chamfering tool in a drill press. Use it to bevel the inside edges of the brass collars to remove any flash.

Use the same tool to bevel the inside edges of the axles sleeves on the plastic drive gears to make the axles easier to install.

Remove the chamfering tool, and place an axle sleeve of a drive gear in the drill press chuck. Use a flat metal file to bevel the outside edges of the exposed drive gear axle sleeve to make the brass collars easier to install. Repeat the process for the other seven axle sleeves. Use an old toothbrush to clean any plastic filings from the axle sleeves.

Turn a brass collar onto each of the drive gear axle sleeves. Place the drive gear into a small bench vice, and close the vice until the brass collars are flush with the ends of the plastic axle sleeves.

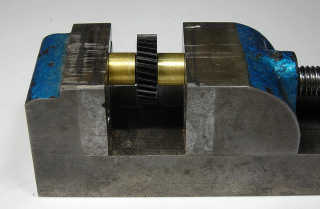
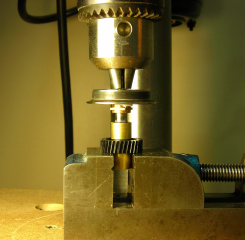
Remove the gear and place it in the vice with one of the axle sleeves and brass collars facing up. Close the vice until the jaws just touch the bottom brass collar. Place the vice on the drill press platform.

Fasten one of the wheels in the drill press with the inside axle facing down. Use the drill press to push the axle into the repaired plastic drive gear sleeve in the vice until just 1/32nd of an inch of the splines on the axle are showing.

Turn the axle assembly over in the vice. Place the other wheel in the drill press with the inside axle facing down. Use the drill press to push the axle into the other plastic drive gear sleeve until just 1/32nd of an inch of the splines on the axle are showing.

CAUTION: Do not push the wheels beyond the NMRA standard for back-to-back clearance of 1.575 inches. Attempting to draw the wheels back out to widen the back-to-back clearance may break the axle sleeve off the drive gear.

Carefully use the drill press to adjust the back-to-back clearance. The minimum measurement on an Aristo-Craft track and wheel gauge or a caliper can be used to take the measurement.

Nice write up Paul

That is a nice write up. That is a great idea to use the drill press to push the wheels back on.

I have a mighty moe with a split gear so I will have to give this a shot. Thanks!

With Aristo going under we will need more how to’s like this to keep our fleets working.

This will help on a couple of my engines so thanks. I already swapped out the whole sets on a couple more. Have you found any stripped idler gears? Three or four of my engines had them.

Paul, I think that I understand what you are trying to repair, but I just want to be sure. Can you post a photo of the damaged part to remove all doubt?

Thanks.

I know you know Steve but others may not. The fix that Paul provided instructions to are for the USAT nylon gears that have “ears” on them. These ears have little edges inside that catch and that are press fitted onto the metal axles to the wheels. Over time or stressed these nylon ears can crack thus allowing the axle to slip inside them.

I believe another fix for this issue is to take the axle and gears apart and wind fishing line several times around each ear and stick it with epoxy to hold it.

The fishing line repair is not as easy or permanent as the brass collars.

That is why I deleted the old article from our club web site and added the new one.

Tony had mentioned the brass collar repair years ago, and Greg has it posted on his web site. However I never found a suitable brass tube until this past month.

Initially I cut the tube with a razor saw, but removing the flash from the saw cuts took a lot of time. The $12 tube cutter made the job easy, required very little clean-up, and the collars could be pushed onto the gear sleeves easier.

Joe, I have not seen any stripped drive gears yet on any of the USAT diesels that have come through my workshop. Probably because our club members haul less than eight, 40 foot freight cars during our standard gauge railway operations.

Steve, the sleeves on the plastic drive gear that hold the chrome half axles are susceptible to splitting. They are the sleeves that are wrapped in monofilament fishing line in the above pictures.

Our club members run their standard gauge locomotives on Fred Mills railway every second Saturday during the summer. Given that our operating season is only 26 weeks long, we only run standard gauge diesels 13 times a year. As most people have more than one standard gauge locomotive, I have four I run at Fred’s, most diesels would not be run more than 3 or 4 times a year. Despite the light loads and infrequent use, all but one of the USAT motor blocks I have ever opened in my workshop for both myself and other club members had split drive gear axle sleeves. This includes axles with and without traction tires on the wheels. The exception was my brand new S-4. It had check marks on the motor block bottom covers and OK penciled on them. I assume it may have been checked by USA Trains before being sold.

I do not believe the splits are caused by abuse. Perhaps the axles are too large for the sleeves, or the sleeves are too rigid to be stressed, or they become brittle over time. Whatever the reason, it is only a matter of time before the drive gears will need to be replaced or repaired. I purchased new axle sets from USA Trains for my two GP-9s when they were $10 a pair. But now that they are $20 a pair, plus shipping, plus credit card currency exchange; I want a less expensive and more permanent solution. I am sure the owner of the GP-9 sitting on my workbench at the moment will appreciate that he will not have to spend $40 plus for new axle sets.

Paul, I find that cutting the tubing with a dremel and a cutoff wheel distorts the inside diameter less.

Having the ends perfectly square looks good, but is not essential in my experience.

When I press the wheel/axle combination into the gear casting, I have a wheel back to back gauge handy, or lately have a pair of calipers watching the back to back to get exactly to 1.575"

Do you have the K&S part number? I’ll put that on my site.

Thanks, Greg

Why don’t you guys make a slotted gauge block to your finished back setting of 1.575 and place it between the backs of the wheels you are pressing together. It seams like it would make the operation a little easier while pressing everything together.

Just a thought.

Hi Greg!

I am rather clumsy with my Dremel, so it’s only used for rough cuts. I distorted the tube on my first try with the cutter by tightening it down too much. But after that I had had no problem.

The sanding block was more to smooth the end of the collar that square it, as the tube cutter cuts it square.

I have used both my Aristo gauge and modified Kadee gauge filed to 1.575”, but like you I prefer to use my caliper.

The K&S stock number is 9828.

http://ksmetals.com/resources/1005+m.pdf

The McMaster-Carr stock number is 88605K29 and their price for a 300mm length (approximately 12 inches) is $3.38.

http://www.mcmaster.com/#metric-brass-tubing/=ot8vv7

Todd, I’m not as smart as you give me credit for, that’s why I asked for clarification. I was pretty sure, but… :slight_smile:

Thanks for taking the time, Paul.

So far, my USAT locomotives haven’t needed the fix, knock on wood. I’m reluctant to fix something that ain’t broke.

(http://ovgrs.editme.com/files/Fixes/Gear02.jpg)

OMGram…that is too neat Paul and looks nothing like my job …I did that fix a few years ago when I saw your reference to it. Thanks! and the F-40 is running just fine to this day.

:wink:

Steve Featherkile said:

Todd, I’m not as smart as you give me credit for

Shut up Rooster!

:wink:

I almost missed this!

BTW…you guys are the best!

David Russell said:

Steve Featherkile said:

Todd, I’m not as smart as you give me credit for

Shut up Rooster!

:wink:

I almost missed this!

BTW…you guys are the best!

Falcon 221

Steve Featherkile said:

So far, my USAT locomotives haven’t needed the fix, knock on wood. I’m reluctant to fix something that ain’t broke.

I agree. I won’t fix something that aint broke either, Steve. At least not under ordinary circumstances. But I feel these gear issues are a different matter. They ARE broke from the get go. The fragility of these plastic cylinders is just about 100% predictable. If I happen to have one of these types of mechs disassembled on the workbench anyway, it’s very easy while I’m at it to turn the weakest link into the strongest I’ll go the extra mile and apply the brass tubing fix to all the gears, split or not.
My experience is with the AristoCraft ones rather than USA Trains, by the way, but it’s the same problem. The brass tubing is definitely better than the fishing line…
As far as sizing is concerned, I take my part to the shop with me and try various size of tube, buying the snuggest fit that I can find. If I had to, I’d make a tube of shim brass to slip inside a slightly oversize tube. If things were too tight, I’d smooth down the plastic cylinder to make it snug. I use epoxy to hold everything together, and this fix gives you a strong permanent fix. But I still question the manufacturers’ decision to create such a shoddy drive in the first place,
I have always thought that one part of these problems was that with time the plastic actually goes brittle and shrinks around the metal axle, which of course does not give, but splits the plastic. Anyone else with that view, or am I alone here?
This theory is not to deny the stupidity of using plastic for these parts in the first place, of course. They are after all under considerable stress even under normal conditions. I say yay for metal…
Paul’s report that all of them that he’s seen are broken does not surprise me in the least. Steve’s report that his loco is fine on the other hand, does surprise me. Maybe he’s just plain lucky.
Hey, Steve, by the way: Just a couple of months to forget-me-not time!

I was told that they have been upgraded in recent runs. Might explain some of this. Maybe if the locos aren’t subject to certain conditions also may be an answer. The replacements I’ve gotten from USA came with a description from their parts guy that they are better now, from my memory.
I’m replacing any cracked ones and can understand why some might want to fix them all. I can’t be fair since many of mine were bought used. I don’t know their full history. Three of them looked new to me and still were cracked.
My SD70MACs got new ones and I got rid of the traction tires. I believe that USA did that at some point in their production. So all of mine are going to lose their tires. I just have to save up for all new ones. Maybe those without tires will help the idlers last longer I’m hoping. Some older gear boxes just sound rough. The 70’s sound nice and quiet. I believe with care they will last.

I tried to get the tubing at the hobby shops. They didn’t have the right size. McMaster-Carr delivered the next day! Thank you for making this post and the helpful links too. It made life easier.