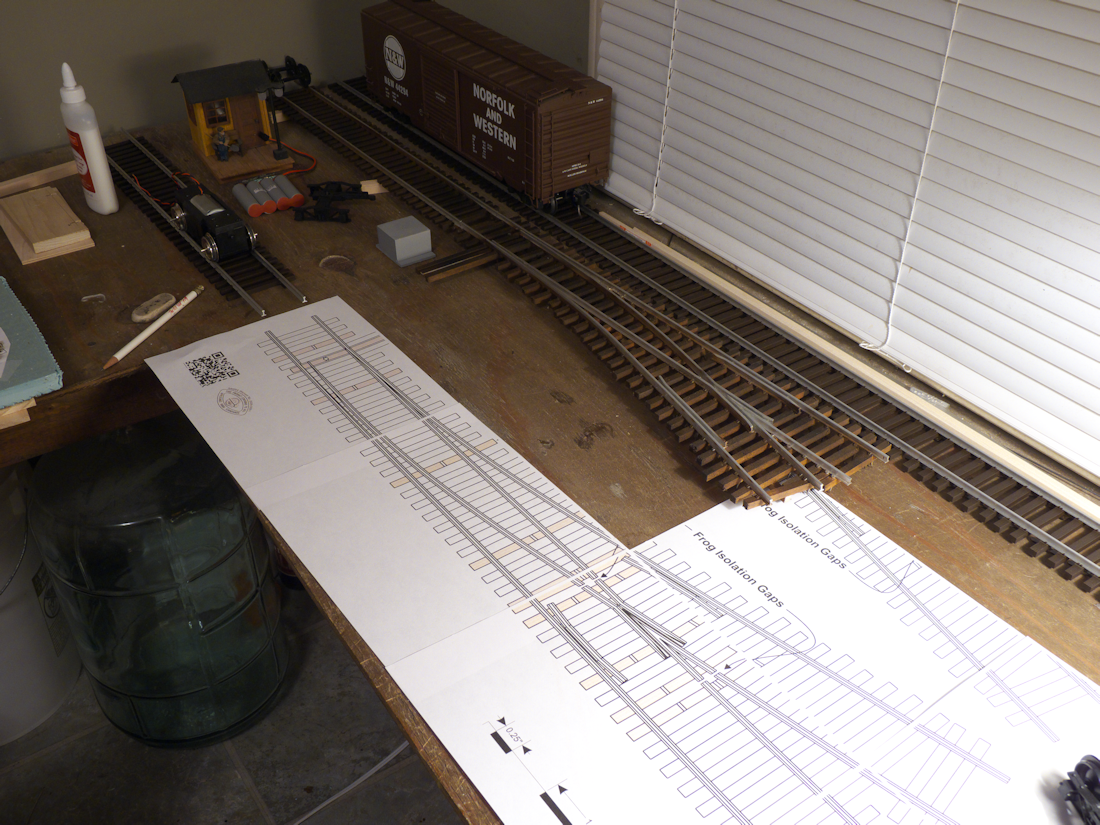
I build most of my turnouts from scratch. I find it much easier and faster to use a jig to hold the parts in place during construction. I use a piece of 1’ x 6’ x ¾” thick melamine-covered particle board for the base of the jig (actual size 11¾” x 71¾” x ¾”.) The melamine coating provides a smooth surface for paper templates to be temporarily placed on the jig. I used ¾” x #8 flat head wood screws to attach lengths of universal T-track aluminum channel to the top and bottom of the base with the centerlines of the t-tracks at 11 inches on center. Here is a photo of the jig setting on my workbench

Hold-down clamps slide in the T-track to secure the turnout components in place during assembly. The clamps are thirteen inch lengths of ½” x 1½” poplar drilled near each end for ⁵∕₁₆” T-bolts. The holes are 11 inches on center. The heads of the T-bolts slide in the T-track. The clamps are tightened with 5-star knobs on each T-bolt. Pieces of T-track and related bolt and knob hardware are available at most woodworking stores and on-line at places like Rockler.
http://www.rockler.com/woodworking-jigs/jig-parts-kits

I drew a turnout template on the computer and printed it using multiple sheets of 8½” x 11” paper. This template is for a right hand curved turnout with a 15-foot radius on the outer leg and a 10-foor radius on the inner leg. The frog is #10. The rails are continuously curved except for a short tangent section through the frog.

I trimmed the individual sheets and assembled them with a glue stick into a full-sized template. Paper templates are also available from some turnout manufacturers (SwitchCrafters, etc.) I secured the template to the jig with small pieces of drafting tape at the corners.


I place turnout ties at each tie position on the template. I either use composite ties from SwitchCrafters or cut my own and stain them to match. All of the ties for this turnout are homemade and were cut from ⅜” square cedar. Note – My regular ties are 3.8” long x ⅜” wide x ⅜” thick and are spaced 1⅟16” on centers. My turnout ties are the same width and thickness, but vary from 4½” to 7½” long in ½” increments.

There have been several outstanding articles on scratch-building turnouts in the past so I will not bore you with the details of how I make mine. I will say that I use LLagas Creek Code 215 aluminum rail except for frogs. I either use nickel silver frog castings from Llagas Creek or cast my own frogs from two-part resin in homemade silicone rubber molds. The point throw bar is made from ¼” wide copper clad PC board material with brass pins connecting it to holes drilled through the base of the point rails. Note – I use battery power exclusively so I am not concerned with rail conductivity or short circuits.
Using the template as a guide, pieces of unpainted rail are formed to the desired curve with a rail bender and laid in position on the ties directly over the template lines. The template shows where the rail bases need to be filed away for clearance at the points and where the throw bar is attached to the point rails. I mark these locations on the rails, remove them and modify them accordingly, and then test fit them back in place.
When everything is ready, I remove the rails, clean with aluminum wheel cleaner, rinse with water, wipe down with isopropyl alcohol, allow to dry, and spray paint a rusty brown color. When the paint is dry, I assemble the points to the throw bar, place the rails back on the template and clamp everything in place.

A three-point track gauge is used to verify the precise gauge at each point as the rail is being spiked. The clamps are loosened and moved to the side as needed. I use ⅜” steel spikes from Micro Engineering and a spiking tool from SwitchCrafters. After all rail is spiked in place, I attach an Accucraft brass switch stand to the ties with small screws and use a length of steel music wire to connect it to the throw bar.
I remove the clamps, verify proper operation of the turnout, and lift it from the jig. The paper template is removed from the jig, rolled-up, and placed in storage for future use. I remove the paint from the rail tops with fine emery cloth before installing the turnout on the layout.
Using the jig helps ensure this type of turnout will perform flawlessly when installed. If you are not already using jigs and templates for turnout construction, give it a try. I think you will find it makes the task easier and provides more accurate and consistently repeatable results.