Large Scale Central

Trestle template

Recommendation - make certain that the glue is easily released from the template’s surface should any squeeze out. I will sometimes just build over waxed paper as it is reasonably transparent when laid over a template. I’ve also used wax paper under the surface of a jig when making a bent or other repetitive frame or somesuch.

This the usual “don’t ask me how I know”!

I used glue and pin nails, and carefully removed each bent after pin nailing, and with the cross braces on one side via my template, it was strong enough to be handled.

I wiped out excess glue that had gotten into the template every so often with a wet rag.

It took me about 2-3 hours to make a simple trestle with bents, it was straight, but similar to the curved one you see

Once you set up the jig you will be surprised how fast it goes, if you want to pin nail. If you want to screw together or nuts and bolts, then of course a lot more time is involved.

I built a jig with plywood and wood strips to hold the parts when building my trestles. I rubbed the jig with a bar of paraffin wax to keep my assembled bents from sticking to the jig.

I bought the paraffin wax in the baking department of the local grocery store.

A candle would probably also work, but candle wax is harder and doesn’t rub off onto the wood jig as well as paraffin will.

This is the N scale trestle jig I made, with a mostly assembled bent it it. The scale ruler was used to help lift the delicate N scale bent out of the jig.

And the bare jig. My large scale jig looks similar, but a bit bigger.

I avoid paraffin out of a woodworking habit as it will often transfer to the wood and can affect the finishing process if not completely removed. I would imagine that might not be as much of an issue with model building so I think that I may try it with my next jig build.

oooops! i’m getting old. confunded truss bridge with trestle bridge.

so, a trestle. here we go:

http://www.largescalecentral.com/forums/topic/21015/a-trestle-bridge

in the first pic can be seen the jig i made.

Mark Hadler said:

I avoid paraffin out of a woodworking habit as it will often transfer to the wood and can affect the finishing process if not completely removed. I would imagine that might not be as much of an issue with model building so I think that I may try it with my next jig build.

Yes, but when rubbed into the jig, and leaving no odd clumps behind, it hasn’t been an issue on my trestles.

because of the glue affecting staining, we stained all the wood first… then when you cut to length, you dip those ends in paint/stain.

So you basically assemble with wood already stained so glue won’t affect the stain… I guess the downside is that you have to glue “through” the stain, but with a pin nailer, it seems to work very well.

On my jig, I laid wood on both sides of the posts, so put the cap piece in, pin the posts to the cap, then pin the sills, and the sway braces.

Greg

GAP - Read the first part of my thread on the 6000 series flat car build. It is on how I built a fixture for the framing so I could build multiple cars and have consistency in the structure. Although the details for a trestle bent will differ from that of a car frame, the principal will be similar. Check here https://www.largescalecentral.com/forums/topic/17324/d-rgw-6000-series-flat-car

OK answers to some suggestions and more description

  1. Korn could you please shed some more light on this statement “now comes the interesting part. for the trestles to stand straight, when everything is finished, they have to be fixed a 3.5° inclinated to the beams.” is this because the bridge is on a grade?

  2. Bob and David I thought I may have been a bit misleading when asking about a template my intention is to draw a plan then use that as a template to make a jig so the bents are all the same.

  3. Greg the whole thing will be glued and nailed using “Liquid Nails Landscape glue” which is a rubbery adhesive similar to Liquid Nails/Construction adhesive.

This thing will be made out of hardwood decking timber that was ripped out when the deck was replaced it has been thoroughly well seasoned and the deck builder told me it will outlast me.

The timber is so hard that nails cannot be hammered into it unless it is pre drilled I may even go down the screw path yet if I can find the right screws.

Right so I should never caught that virus as I have spent that last 2 days sitting on my deck drinking tea and thinking about the bridges (my wife says I should never be given time to think) as the layout is double track I was originally going to drop the trestle height 100mm below the inside line(the bridge being on the outside line) but know I am thinking a double trestle which, I think, will look impressive, so planning is going to start on that idea.

I found this on a HO site so will try to scale it up to see if it is doable.

GAP - My purpose was to demonstrate a fixture that will hold your bents consistent, and being coated with polyurethane most glues will not stick to it.

Bob Cope said:

GAP - My purpose was to demonstrate a fixture that will hold your bents consistent, and being coated with polyurethane most glues will not stick to it.

Thanks Bob that is what I thought was meant.

GAP said:

OK answers to some suggestions and more description

  1. Korn could you please shed some more light on this statement “now comes the interesting part. for the trestles to stand straight, when everything is finished, they have to be fixed a 3.5° inclinated to the beams.” is this because the bridge is on a grade?

just that.

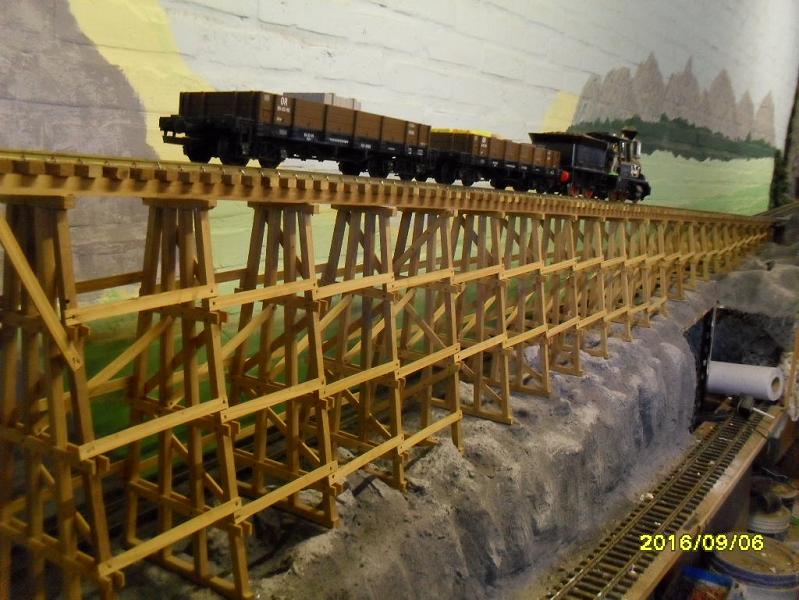
for the observer standing in front of it, the ground goes up from the left to the right, while the deck of the bridge goes down from the left to the right. (both at 6% grade)

thus the vertical trusses build no right angle with deck or ground. the leftmost trestle is 40cm high (nearly 16"), the rightmost one is 8cm high (about 3").

my bridge is not broad enough, because i had little space for the footing.

in general:

don’t forget, what i forgot. these trestles had some little platforms sticking out from the sides, for barrels with water.

make the trestle as big, as possibly fits in the space avayable. size matters - and distracts from sloppy building.

Just remember one piece at a time

(https://www.largescalecentral.com/public/user/18f8d/18f8d_59e3.jpg?c=559e)

Well a complete rethink has taken place and the double trestle idea has been shelved for now, it was going to be so resource hungry that a large percentage of my hardwood would be consumed leaving nothing for anything else.

The local garden centre has hardwood stakes of a length and dimension that will work for the posts so they will all be made of these while the sills, sway braces, cap etc will be made of the hardwood (just need to cut it, how hard can that be?).

On another tack what is the recommended track centre spacing for 2 parallel straight tracks?

Track to track spacing in inches needs to be referred to scale. I would make my minimum 13 scale feet, but be careful on curves that you get the tracks apart to a much larger spacing before the curve.

Greg

GAP said:

On another tack what is the recommended track centre spacing for 2 parallel straight tracks?

I personally like or prefer a 5.75 inch minimum spacing to a 6.75 inches of maximum spacing (O/C of the parallel tracks) on the straights. However it also floats in the section shown above. I also prefer to “run or model” cars that have body mounted couplers which have a maximum length of 37.5" inches to a minimum length of 8 " . Everyone’s railroad is different within G scale and there is really no standard answer to your question as far as I’m concerned.

Edit because I forgot the " . " after straights and before however didn’t have a capital H after the period so I had to correct that as well but it’s all fixed and sorry for the misunderstanding !

Using an online calculator 13 Feet in 1:20.3 scale (my largest) it works out to be 7.6847".

So somewhere 6.75" and 7.69" will work looking at that I think I use 9" between track centres and 5" away from the fence posts that the shelf will be screwed to should give me plenty of clearance.

I thought I read somewhere years ago that 8" was a sort of standard but evidently that is not the case

Thanks to all for the suggestions.

I use about 9-1/4" but I am 1:29, and that is my mainline spacing. I understand that prototype minimum spacing in yards was about 13 scale feet.

So I did specify in my responses minimum… for typical mainline, clearly it should be larger.

This page has some real-world examples, as it varies between countries: https://en.wikipedia.org/wiki/Track_spacing

Greg

Greg Elmassian said:

I use about 9-1/4" but I am 1:29, and that is my mainline spacing. I understand that prototype minimum spacing in yards was about 13 scale feet.

So I did specify in my responses minimum… for typical mainline, clearly it should be larger.

This page has some real-world examples, as it varies between countries: https://en.wikipedia.org/wiki/Track_spacing

Greg

Thanks Greg I have 2 scales 1:20.3 and 1:22.5 (LGB) so the 9-9.5 should give me heaps of clearance.

Another question;

What spacing between bents on a trestle do people use?

I’m doing some calculations to see if I have enough timber to make one about 10’ long.