Large Scale Central

Transfer car kit build

This thread will be about a kit I’m starting to build: a model of the V&T locomotive transfer car, from a kit to soon be produced by Iron Creek Shops.

But first, a bit of intro.

A few years back ('22) I made a model of the Joe Douglass loco, which ran on an NG shortline near the V&T. Here’s that thread.

The Joe was often serviced by the V&T, and did so via a short trip from Dayton NV over the C&C (also NG) to Mound House NV. There it was placed on the V&T’s standard gauge transfer car, brought to their Carson shops, and worked on.

So that’s where the transfer car comes in; and I’ve long wanted to make a model of it, to park the Joe on. NV State RR Museum (NSRM) had started on restoring it in '21, and I was amazed by the heftyness of its swing trucks then, and impressed by their woodwork.


Last October, NSRM let me borrow a model of the xfer car (which its developer / modeler, David Frey, had built and donated to them), for display at the annual V&T Historical Society Conference. The designer, draftsman and casting-master producer on this kit (and others) was Al Pomeroy.

Also at the conference, an unbuilt version of the xfer car was offered at our silent auction, and I was able to win it, woo hoo!

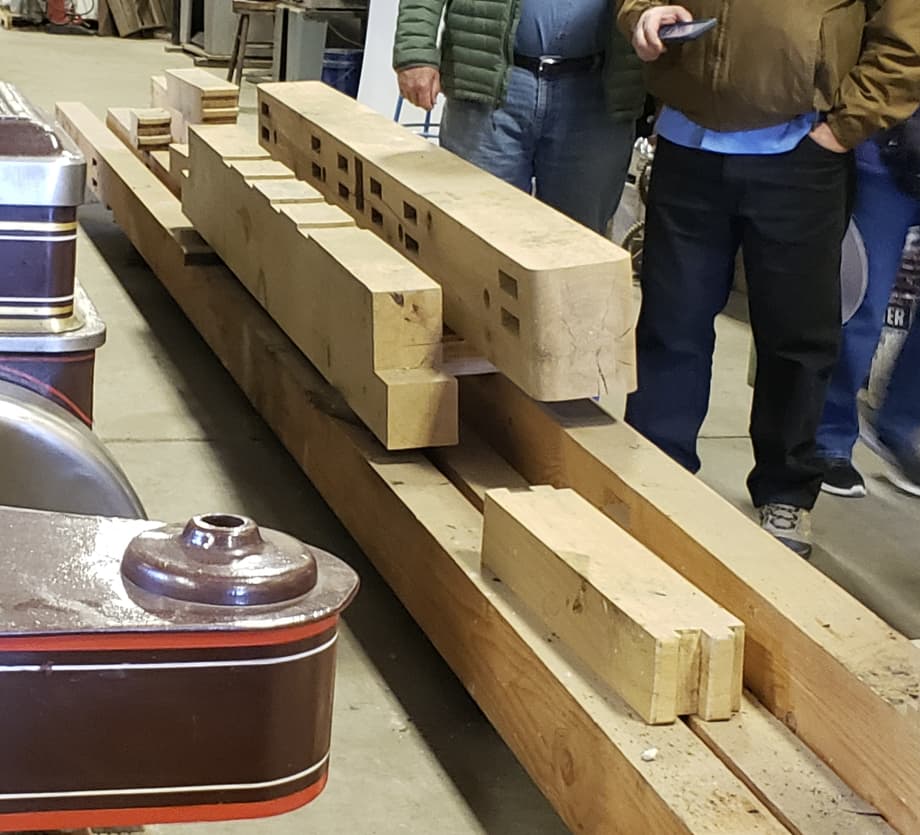
In the mean time, back in the 1:1 world, NSRM was finishing its rebuild of the same car, and the society folks were about to tour it. It is a beast!

And as icing on this cake, NSRM also performed cosmetic upgrades to the Joe, preperatory to putting him on the xfer car. This recent shot is from Adam Michalski, Curator of Education at NSRM.

One other cool thing, when I did my research on teh Joe model, I found strong evidence that it was delivered with pilots on both ends, which I criculated. But the tender pilot was taken off at some point, and not included on the Joe as it was at NSRM. So, to match the real thing, I left it off my model.

Low and behold, when we went to NSRM in October, he was being outfitted with the tender pilot!

So now, as part of the xfer car project, I definitely gotta put that second pilot on my Joe model.

Last week I decided to get moving on this kit, and do a build log. I’ll start that in my next post.

1 Like

Now to the kit. As I understand it, here’s the team who made it (and Al, David, please jump in and make any corrections if I get it wrong).

David Frey did all the research, trips to NSRM and conversation with folks there, taking measurements, and working with other historians such as Mike Collins.

Al Pomeroy “built” the CAD model, designing each part for model producability and assembly. He also made drawings, bills of materials, and masters for the metal castings.

Don Niday, of Iron Creek Shops, handled all the castings. And David Frey did the official first article build, and wrote the instructions.

Here’s the bulk of the kit’s contents:

The drawings (by Al) are beautiful. There are several, and here’s a couple.


There are a LOT of white metal castings.

The kit comes with all the rod needed, and also the rails.

I’m NOT by any means a great model maker, and this is my first “craftsman” kit (other than an HO Campbell coal tower kit I butchered when a youn teen). So I really appreciate how thorough David’s instructions are. Each paragraph has step-by-step check boxes, making it easy to follow along.

The wooden parts are excellently laser-cut, with gobs of holes where NBW’s and other hardware go. After sanding them lightly to remove laser charring, the instructions took me through a number of steps for drilling in the other axes (usually the bottom of a given piece). Clever cardstock templates are provided, which wrap around and index with the piece to be sure you get the hole location right.

A few finishing options are described, and I’ll be painting mine yellow on exposed wood surfaces. But my next step was to stain all the underside surfaces, because those weren’t generally painted.

Then came installing of certain underside hardware (seen in the above) which would be tough to install after frame assembly. The last step I’ve taken is the assembly of the main frame.

I’m in awe of the research and sweating of detail that went into this. As a professional mechanical designer, my hat is way off to Al for the sheer enormity of parts he had to CAD up, and tweak for producibility.

This team of Don, Dave and Al (and others) are producing astounding kits, with the first one to be offered being the Barnhart loader, which many of you have seen. These V&T kits, if my understanding is correct, will be offered soon after.

As for my F Standard Gauge interest, I don’t see how I’d ever accommodate that on the layout. But for purposes of just having fun, I’m considering a special shelf for these queens:

V&T Transfer Car 1 (SG, kit by ICS; with Joe Douglass aboard)
V&T Derrick 50 (SG, scratch, made a few years back)
V&T Flanger 52 (F scale, but forced into NG when built; needs rebuilding to SG to not look weird)
V&T Ore Car 95 (SG, scratch, made with the NG set earlier this year)
V&T Water Car No. 1 (SG, kit by ICS; on hand)
V&T Box Car No. 1005 (SG, kit by ICS; to be acquired)

Cliff

4 Likes

And just when do you find time to do things us mortals do like sleeping and eating?

The usual times, Lou, otherwise my wife would (justifiably) kill me. :grin:

Other than that, I try not to mention how long a project might take… just ask Sean. :grinning_face_with_smiling_eyes:

Also, I’m taking Fridays off now, working a reduced schedule and salary until I retire in maybe 4 years.

OK…so staying on topic here but when I saw this pic I thought you done snapped and were making wooden Superliner Transition Sleepers out of 6x6. Then I looked at it again and thought beautiful joinery. THEN I looked at it again and the 2 guys in the pic look awful suspiciously like you and Hollywood.

Just saying
:rooster:

Okay so I do remember correctly you made the Locomotive roughly 7/8" scale so it would run on 45mm gauge track.

Are you planning on making a transfer car for it said locomotive on as well? Or just what I assumed to be is a 1:20.3 version of the transfer car?

The loco is 1:20.3 scale, running on 45mm track; it’s 36" gauge in 1:1. If I said 7/8 somewhere, I misspoke. :flushed: The xfer car kit is also 1:20.3 scale, but standard gauge (70.6mm).

1 Like

Are ICS kits available, or something from the past.
I just ordered a bunch of parts from Don. His castings are the best.

Great kit! I agree that the work going into producing these kits is outstanding.

I don’t know your RR real estate situation, but you might consider some dual gauge leading to a tunnel or some other feature to disguise the end of track. You wouldn’t be able to run them, but they could be displayed outdoors for photo ops and/or open house / guest days.

That is a great plan. I did that for several years before cutting back even further toward the end.

They’re future releases John, hopefully soon to be released. I’m not connected to ICS, but you might call Don to ask about something particular you’re interested in. The Barnhart and associated cars are jaw dropping, and I’ve been told those will be first out of the gate in ICS’s kit offerings.

I agree, his castings are the best. As I understand it, a lot of his castings went into the Harford kits; and many Hartford parts came to Don when H stopped operations. So if anyone has a missing Hartford casting (or drawing or whatever), Don’s the guy to go to.

Thanks Jon, great idea on the length of dual-gauge. My track is all flex Train-Li, but maybe I could 3d print the ties for that section, like @Neil_Wiggins has done.

Cool, thanks. I’m glad I’m not the only one who’s used the cutting back method.

Naah, I don’t have a jacket like either of those.

I agree. I love all the mortise and tenon joints everywhere on this car and the V&T derrick (and I suppose everywhere else to at least some degree). Here’s an example from the derrick, with 15 m&t’s in just this shot.

One can imagine tightening all the tie rods, and watching everything become super rigid (yet still have some compliance) without further fasteners. Very cool old school engineering. The dudes knew exactly what they were doing.

That’s my plan, to have a non-functional section of standard gauge track at a couple of interchange points, like a cross-load to a boxcar, or a hopper car.

Sunset Valley sells 3-rail (32+45mm) track. I suspect it is code 250.

Thanks Pete, but for this I’d need 70.6mm / 45mm.

CME?

https://www.cumberlandmodelengineering.com/CMEProductsTrack.html

Great idea Bob, but their last web page update was in 2014, and I didn’t get a reply when I contacted them. There’s no way to order the products that I can see.

Also, my main line is all code 350, so I’d need that as well.

And, to be honest, the more I think of Jon’s suggestion (which is brilliant), the V&T was always std gauge, but I’m faking my narrow gauge to represent that. No choice, because there’s no locos in std ga, and the track work is done.

So, adding a siding with a broader gauge than my fake standard gauge is a psychological conundrum I’m having difficulty with…

The easy solution is to scratch build a std gauge track on one of my shelves for the special V&T cars. Since “easy” is attractive, I’ll probably just do that.

But thanks again for those suggestions.

After assembling the chassis frame, the next step has been to paint all the exposed wood (yellow) and metal (black). Underside wood will be stained (“dirty”), and metal parts blackened, all of it weathered some.

Here’s the target for exposed items:

It took awhile to sort out the exposed kit metal parts to be painted black, but I did. Then cleaned them with warm soapy water & a toothbrush, let dry, masked certain areas, gave 2 coats of primer, and 2 of gloss black.

To get some clarity on where the boundary of painted / non-painted was, I asked some historian friends how extensively the yellow (or any paint) would have extended into the undercarriage. One gentleman, who is an actual railroad paint historian, said technically they should have painted everything; but didn’t. Another said, As far as the man’s arm could reach without crawling under the car.

In this wonderful hobby, ya learn something new every day! So from those inputs, I’m painting (yellow) what’s in the photo above, and also the underside of only the end and side sills, also the ends of the needle beams.

BTW, the needle beams are separate at this stage, I suppose to make life a lot easier in the brake air plumbing which sometimes is located between the beams and the deck boards.

I masked the frame & needle beams, spray-primed, and did 2 light coats of yellow. After 2 days to cure, today I lightly sanded the frame (lots of wood fuzz came up), did a bit of wood filler at the corners, sanded that, and did another 2 light coats.

I’ll give this a couple days to cure before messing with it.

Cheers,
Cliff

Looking good Yellow is one of the hardest colors to paint. Ya done gud!

1 Like