Large Scale Central

Track switches and curvature degrees.

Steve Featherkile said:

Devon, I think that you will regret this decision. Toy turnouts take up more room in the long run, and they will give you more problems with derailments. But, its your railroad.

OK Steve, I will do it prototypical. I really do want to make it the best I can make it. Actually as I look at my track plan I will be able to do it relatively easily anyway. So this brings up a new question, What is the shortest/ lowest number switch that is practical. Because of this conversation and the conversation about making elevation I have re-examined my layout plan. All of my switches save one can come straight in and straight out, the only exception would be a true Wye. 4 of them will be a double crossing. Two of them are on straights that simply diverge into parallel tracks. One would need to continue straight onto the siding and the diverging track will almost immediately head into a 10’ dia. curve.

My plan is to have at least 9" center to center separation on straight parallel track (that’s a whole other debate, is that a reasonable separation for 1:20.3 on straights). If that is reasonable then what is the shortest switch one can use to make this double cross happen? The two simple diverging tracks can be longer so what is a good reasonable # switch for these? Then the third switch I want the main to be the diverging track and diving that into a 10 foot curve what switch can I get away with here? How long does the diverging track have to run straight out of the frog before I can begin the curve? Or begin to make the curve back to parallel?

Whew. Whats scary is I said all that and actually understood what I was asking. Its sinking in.

Do you have a track plan somewhere?

Not a digital one. I did have a digital one but I have sense changed it. I might throw it on the program I have and then I can post it. By changing it around I was able to eliminate the need for switches on curves. But I do have it on paper so maybe when we get together next you and I can go over it and you can beat me senseless until I get it into my thick skull (http://www.largescalecentral.com/externals/tinymce/plugins/emoticons/img/smiley-undecided.gif). I did accomplish a few things with the new design. One I have more track shoved into my space. Second I was able to increase my radius on all but one curve to at least 8.5 ft diameter. The only remaining 8’ dia is a very brief corner and when i get down to it can be smoothed out to a larger dia as well. The trade off is I went from 1.6% to 2% max grade.

Devon, there’s a fellow named Jose Morais, from Portugal, I think, who hangs out here. He designed Shawn’s Kittatinny RR, with a lot of kibitzing from some of us. He’s an absolute genius at designing small layouts. Shawn’s layout isn’t much bigger than the space you have for yours, I think. You might check with Jose for ideas.

I will see if I can find him. I am actually pretty happy with what I came up with but always am interested to hear how I can make it more expensive oops I mean better. Lol. One thing I wanted since I have a small space is visual appeal. A few tunnels a few bridge cross overs things like that. I also wanted it to be buildable in phases one loop at a time. I got that now. But like in said I am always open.

Ok so playing around with switch design and frogs. I see on llagas that they use a 40mm wheel back to wheel back measurement and a 45 mm guage. That means the flange ways are 2.5mm right? I was looking at a real prototype frog this afternoon and the rails come into the frog and bolt on. That means that the “rail” portion of frog needs to be the same width as the rail. I want to use llagas code 215 rail so how wide is this rail? Is rail width fairly standard between codes and manufacturer.

I am thinking about making a #6 switch just to do it and learn from it.

Devon,
Let me send you a PDF of the NP standard plans for track work that has both a #7 & #9 turnout. I used the #9 plan to build my turnout and frog out of llagas code 215. Llagas track has I believe a rail base of 5mm, others are different. I think I just laid the guard rail and stock rail right next to each other and didn’t file any of the base off.

Craig Townsend said:
Devon, Let me send you a PDF of the NP standard plans for track work that has both a #7 & #9 turnout. I used the #9 plan to build my turnout and frog out of llagas code 215. Llagas track has I believe a rail base of 5mm, others are different. I think I just laid the guard rail and stock rail right next to each other and didn’t file any of the base off.

That would be hugely helpful. One thing I want to do is give a go at making my own frogs. I see that there are various designs but the prototpe one I was looking at looked very similar to this one:

Hey since you are using code llagas 215 do you have a small scrap of rail. Even a couple inches would be enough. I want it so that when I make up a frog blank for casting I can have the profile so that the frog matches up to the track right. If I am ging to make it prototypical in theory I think it is only right to make it prototypical in design. I know people do the whole bent rail design I like the idea of making a bolt on frog. Maybe I am insane.

There is a person in Spokane that will give a 2 hour class on greensand casting of a part in aluminum for $45 bucks. I think this would be a fun thing to do and add another dimension to hobby resume. Then I can use the aluminum frog as a master for later bronze castings. I have an unlimited supply of bronze so I think this could be fun.

That frog looks like a flange bearing frog at least to my eye. Did the prototype have a guard rail? Or was it in a slow speed yard area? If it’s a flange bearing frog it’s a bit modern for your tastes…

I’m sure I can round up some scrap pieces of both 250 & 215 and mail them off. It might not be until the end of May because I’m really busy right now with then end of school stuff. I’ll send you an email with the PDFs for the turnout and the frogs.

Devon, I’ll comment on your frog casting ambitions, since I aspire to that myself. I have recently started and got a good way down that path but gave up. In my endeavours I had no intention of doing green sand casting for a few reasons. First with a frog there are undercuts that just can’t be done with sand unless you are pouring on a wax or plastic part in the sand to vaporize it and replace with the metal. This method would have a few down sides. It adds a lot of contamination in your new cast frog and still at the end, a rough sand finish.

The proper way to cast frogs is lost wax or investment casting. This process is much more involved First a model of the part. Second Make a silicone negative of the model. Third remove and pour wax positives in your silicone mold. Now Take you waxes add sprues, risers and such and dip or mold in an investment plaster cast. Now place you plaster molds in an oven heat to 900 degrees and burn out the wax and cure the plaster. Finally remove the hot molds and pour you metal in.

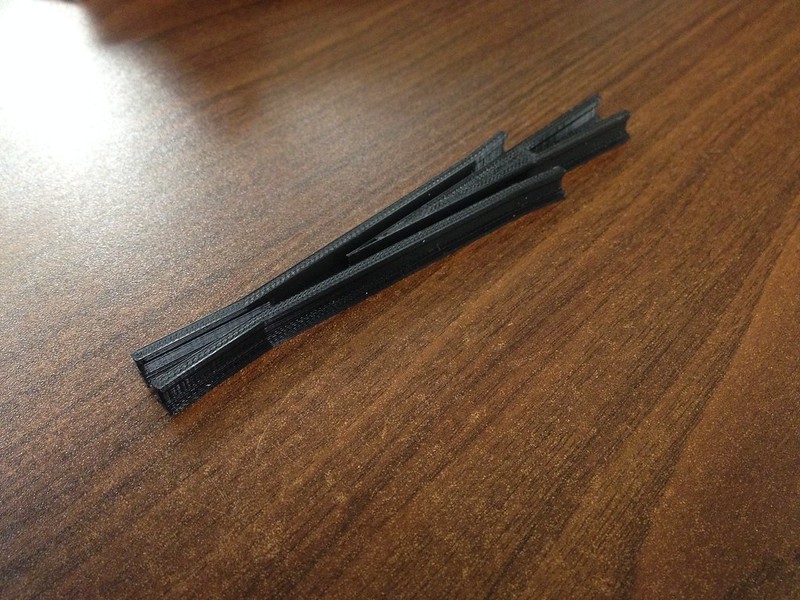
I hit my wall making the wax positives. I used candle wax and it crumbled when I tried to remove it from my molds. I decided to cut my time losses at that point and just get some frog points made at the local machine shop. I’ll definitely get back to casting once time permits. Below is a shot of the frog I had my buddy 3D print for my model. More pics of my furnace can be seen in my layout build log.

IMG_1309

Craig Townsend said:
That frog looks like a flange bearing frog at least to my eye. Did the prototype have a guard rail? Or was it in a slow speed yard area? If it’s a flange bearing frog it’s a bit modern for your tastes… I’m sure I can round up some scrap pieces of both 250 & 215 and mail them off. It might not be until the end of May because I’m really busy right now with then end of school stuff. I’ll send you an email with the PDFs for the turnout and the frogs.

Well see there you go you introduced something new to the program, a flange bearing frog. The drawing is only just that something I found on the net that looked similar to what I was looking at yesterday standing on a switch trying to wrap my brain around this stuff. Yes it was a slow speed yard area and there are guard rails on the stock rails but not at the frog. Now I really didn’t think to much about the modern vs old switch. An older style would be better obviously so I will have to do some looking at pictures. Those drawing you have for me will give me a much better idea of an older style switch.

Randy,

I am glad you chimed in here because it was your endeavor that made me want to do it in the first place. I didn’t realize or remember reading that you had given up on it. Here is a classic example of my appetite being larger than my stomach. As much as I would like to get into lost wax casting (something I have always wanted to do not just for railroading) the expense to setting up the need tools has prevented me from doing it. I had sand casted many moons ago in Jr High and it was fun so I thought what the heck. Beyond a furnace to melt metal not much expense there. But did not realize the limitation of the under cuts, makes sense. So I appreciate your input as I don’t need very many and have no desire to be in production so I will scrap this ambition now.

I also read where they can be cast in JB weld in a silicone mold. Thoughts on this one? Silicone molding I understand and I have no problem doing that. But are JB weld frogs durable enough for our use? People on here have said they have used them with good success. The only reason I even wanted to cast them in bronze in the first place is because I have virtually an endless supply of scrap bronze. I am not oppossed to alternatives. I also am not opposed to buying them. I might also make my life easier and just do the bent rail option.

Devon the bent rail option is not bad at all in my opinion. Where it fails for the both of us is that we are using aluminum rail. When you make a frog point from rail it leaves and overhung portion right at the tip on both sides. An aluminum frog tip is bad enough considering the wear it will receive, but add in the overhang and it just doesn’t seem like it will last long. This is why I’m going to use the brass tips (not a whole frog, just the tip) for mine. I’ll edit this post tonight with a close up picture of the frog on the first LS switch I built a few years back showing the “weak” point.

WOW OK so usually I don’t mind admitting ignorance as I never hold the lack of knowledge and understanding against someone. But at some point you just have to admit to being dumb. So after it took Craig to point out that the frog I was looking at was “modern” for my taste I did a simple image search of narrow gauge switches. Now I really should have done this first. Because they are nothing like what I was looking at yesterday. I can see now why some of the switch building methods are the way that they are, it is not because they are easier to make as I suspected but instead that is how they were made. So with that said I should have listened to Steve all along and use that website he directed me to because that will guide me to making a prototypical narrow gauge switch of the proper time frame.

Geez some guys are just stubborn and dense I guess. Sorry for the nonsense guys, I am getting it I swear.

There are waxes designed for lost wax casting, it needs the strength to withstand being ‘pulled’ while still warm.

A pressurized Wax Pot has a small rounded nozzle to fit an indent on the mold, waxes are NOT poured into molds they are injected at about 10lbs. The molds were clamped between two steel plates to hold mold shape and held to the wax pot to fill. I’d shoot 6-7 waxes before pulling the first.

Cutting molds is tricky, takes a new scalpel blade and a vision within. Experience taught me where to make the cuts for venting and ease of pulling. Where to leave parting lines etc… A good mold would fill and NOT require touch ups.

After waxes are shot they must be ‘treed’. A base with a wax trunk and the waxes become branches, angled upwards and within the diameter of the flask. As it is heated most of the wax will drip out. The investment (plaster) must be fired and kept hot so the injected molten metal doesn’t shatter the investment patterns. The oven burns out wax residue which could cause bad castings. The flasks glow red when at their hottest aprox 1450 degrees F.

I have a vacuum assist casting machine and an electro-melt furnace… Metal in furnace and flask in the burn out oven over night. Once metal is melted, take flask from oven at 900 degrees, put in machine upside down, turn on vacuum. Lift crucible from furnace and pour liquid metal into the flask.

Quenching is best when still hot, a cold quench leaves investment stuck to the metal…

So easy this geezer can do it. Cost effective? Doubt it.

John

The hot setup in outdoor model railroading is to use stuff that works, AND will survive the slings and arrows of being outdoors 24/7/365. We call it “operations quality.” If it is 100% faithful to prototype, that is a plus, but is not really necessary. My goal is function over form.

If you want 100% fidelity to prototype, I fear that you will have to stay indoors.

Devon, since you are new to this, I will give an opinion on flange-bearing frogs: don’t do it unless you have very consistent flange depth on all your rolling stock (that includes locos).

flange-bearing frogs works well for LGB, for example, since they pretty much standardized their wheel contours.

But if you have some rolling stock with smaller flanges, then the switches don’t work as well, as they are relying on the flange to keep your wheels from dropping “into” the frog.

I prefer more prototypical operation and a frog design that supports the tread of the wheel by the geometry of the frog design. Of course this requires better tolerances in the switches, and better control over your wheel gauge and back to back, but my experience has shown me that doing all of this has given me much more reliable operation.

Regards, Greg

Well said, Greg. I’ve modified all my “store bought” turnouts to that standard. I no longer have locos hopping through the turnouts.

John,

I also did lost wax casting in Jr High and that was aso very enjoyable but I knew that would not be something I can tackle just for a few frogs. If I was going to go into business casting detail parts and what not and try to make a business of it maybe but I have zero desire to do that. It wold be fun but I don’t have the time or capital to get set up to do it. For my own purposes detail parts cast in plastic re easier and are just fine by me. Thanks for the explanation though. I find it a fascinating process.

Steve,

I have no desire to stick 100% to prototype especially in track work. Function will be #1. If there are products and construction methods that function well and allow for a prototypical look and feel then all the better. You asked about givens and druthers well in this regard function trumps form. It must work and if I can make it look right great. The website you sent me to not only looks like it will work well it has a prototypical look (now that I know what that is). There are places where I will try to adhere to prototype but this is just not one of them.

Greg,

Thanks for the advice. I didn’t even know there was such a thing as that sort of frog. But now as I look at the different type frogs with that understanding I can see the difference. What you say makes perfect sense and I will not being using that style of frog.

Greg Elmassian said:

Devon, since you are new to this, I will give an opinion on flange-bearing frogs: don’t do it unless you have very consistent flange depth on all your rolling stock (that includes locos).

flange-bearing frogs works well for LGB, for example, since they pretty much standardized their wheel contours.

But if you have some rolling stock with smaller flanges, then the switches don’t work as well, as they are relying on the flange to keep your wheels from dropping “into” the frog.

Devon,

Greg’s advice is sound, as usual, but let me back up and point out some of the issues.

Instead of the outside of the flange resting on the bottom of the trough at the frog, the prototype way to support a wheel as it transitions from the point rail to the frog is by having the point rail close enough to the frog that the wheel tread is always supported by one rail or the other. Here’s a pic from the NMRA

Overview of scales-track-wheel-relationships

And then I suggest you back up a page and look at the photo I posted of the Bachmann switch - the one with the flange-bearing frog and special check rail spacing.

Clearly, if there is a big gap, then the wheel will fall in to the gap and bump significantly as it rolls over that gap.

I prefer more prototypical operation and a frog design that supports the tread of the wheel by the geometry of the frog design. Of course this requires better tolerances in the switches, and better control over your wheel gauge and back to back, but my experience has shown me that doing all of this has given me much more reliable operation.

Regards, Greg

Unfortunately, a switch that supports multiple wheel standards will be a compromise. My friend has a lot of LGB switches on his layout, which was fine until I showed up with my Accucraft cars and finer scale wheels. He now has some - and he’s wrestling with the problems or differing standards. Simply put, scale wheels don’t like toy switches.

I prefer reliable operation, so I’m with Greg. You have to control the wheel standards and back-to-back measurement. Which means: don’t mix fine scale and LGB!

Edit: In looking for a pic, I found this site. All the math that David could wish for! Including calculating the distances between tracks.

http://mysite.du.edu/~jcalvert/railway/turnout.htm