Large Scale Central

Track switches and curvature degrees.

Steve Featherkile said:

Devon, the only thing I can say is to reiterate what I said earlier. You can’t equate a radius with a numbered turnout. I’ll stop here, because I have a headache and I’m not making any sense.

Wel, you can, sort of. For example, I had the same questions s Devon a long time ago, so I worked out that a #6 switch is 7.5’ radus (approx) along the curved bit, then straight at the frog and curved again after that. There’s a table somewhere . .

You have to abandon the notion that the curved track of a switch is part of a sectional track circle. The prototype doesn’t work that way, and nor should we. If you really want a #6 switch to be in the circle with the straight track a diverging tangent, then use 8’ radius curves and adjust the circle for the 7.5’ curve switch+2" straight frog.

Also get hold of the Turnout Calculator on Da Trains - Rick Blanchard’s data page:

http://www.urbaneagle.com/data/index.html. That will give you a headache!

I read your description of the frog angle - be aware that it is only for calculating the angle - not the length of the frog. So a 1’ in 6’ frog (gradient of 1:6 or a #6) wouldn’t have a 6’ long frog!! The frog and point rails are only straight for as long as needed to get through the frog - then the rails curve again. In gauge 1 (or F scale) we use 1-2" of straight through the frog.

This PDF came from my drawing program (Visio) and you can print it and make a full-size #6 switch drawing by sticking the pages together. You’ll note the rails through the frog are straight, but only for a short distance.

http://gold.mylargescale.com/petethornton/Trackbits/switch-no6-visio-vsdfile.pdf

Finally, on the subject of ‘wheel hop’ and built-up frog passageways,once you’ve figured all this out, you realize that wheelsets don’t all come with the same back-to-back setting. Bachmann wheels and Accucraft wheels are different. If you want both to go through your switch, you set the check rails (opposite the frog) tight and the point rail extensions (along the sides of the frog) wide, so whatever goes through it is pulled away from the frog tip and guided through. Then you realize that Bachmann wheels will drop into a big gap like that, so you put a support in the frog gap.

The best example is the new Bachmann switch.

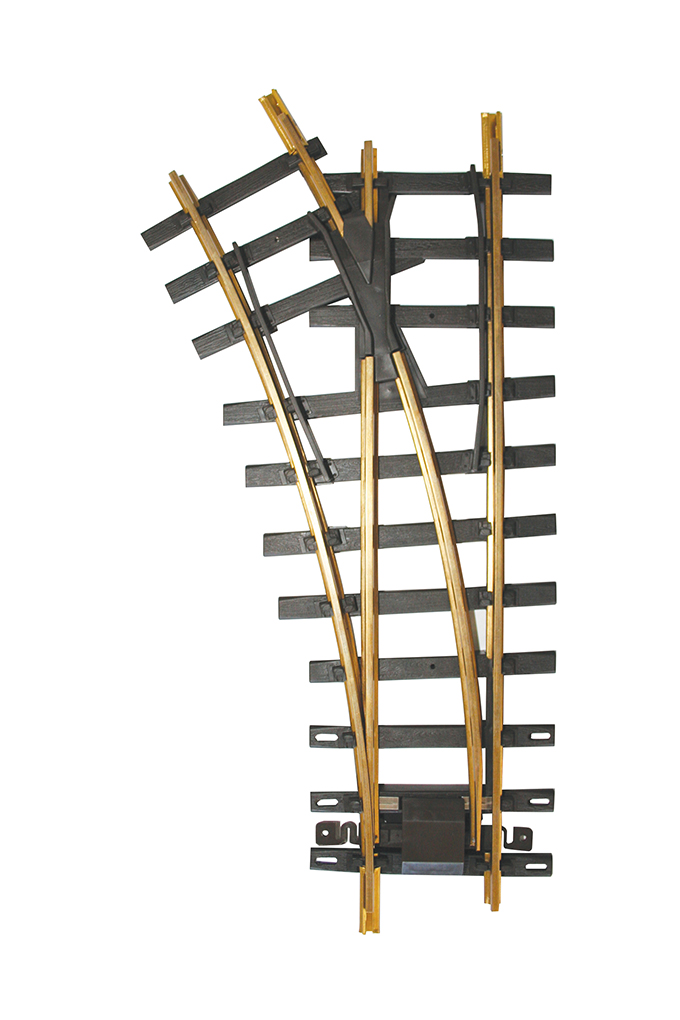
Note the check rails are opened a little at each end to guide the wheels tightly into the continous rail area away from the frog.

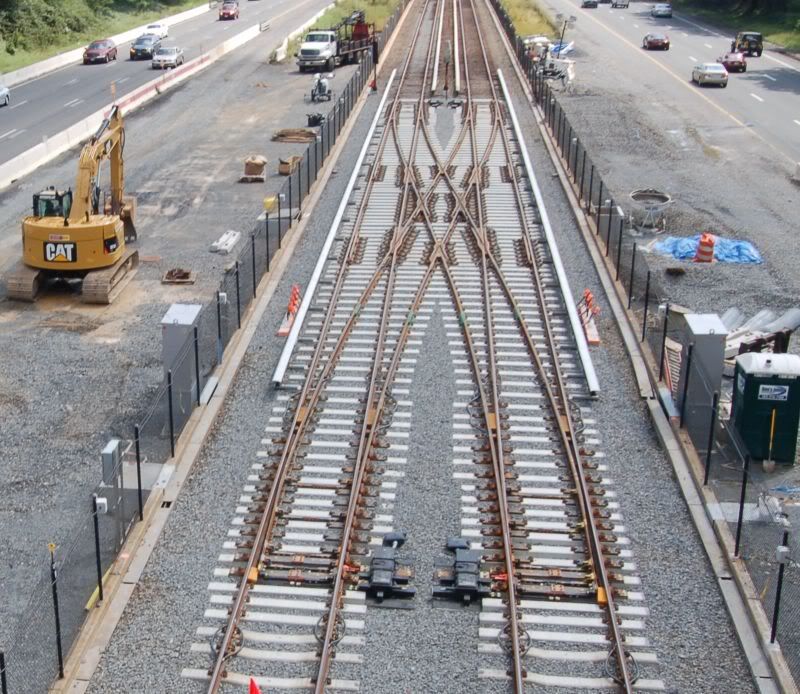
Finally - how about this for a good prototype example (Dulles Metro expansion, DC):

Devon;

Hobbyists have confused two terms or styles of track, goes way back to our toy train heritage.

A numbered switch can only approximate a radius for a short section of the switch. Outside it’s too easy to push or pull the track enough to make it appear to fit. So some innocently ask for that…, but Numbered switches belong with flex track so one isn’t bound by a pie slice of a curve. The better curves are elliptical, just like when you drive your truck from straight to the curve, you ease into it. At the very beginning of the ellipse the switch ‘matches’ the curve, hmm er hmm, so to say.

You might see it better if you establish a standard easement curve for your track, then you could over lay various switches to see where they land and how their degree of deflection corresponds to the track. Easements are my favorite reason to hand lay or use flex track. The lack there of is my biggest peeve with sectional. People compromise with sections of larger radii, but it’s not quite …for me.

If you’ll notice on Ken’s where the route diverges from the outer stock rail, it is an angle, only the moving points have a hint of curve to smooth the transition.

Toy switches have mostly a curved rail, tho’ there is a tad of tangent from points to rail joiners…

A wye looks like a Y, what the track does beyond doesn’t affect the name. Your 2 parallel with an X between them is a Double Crossover, Ken’s is a single crossover between the two most right tracks.

Quiz at 11pm, go to chat and let them drill ya! (http://www.largescalecentral.com/externals/tinymce/plugins/emoticons/img/smiley-wink.gif)

Are we having fun yet?

John

The question I have, regarding the points, is;

Is there some formula or ratio that is the accepted standard for how long the closure rail/point is for a given numbered frog? I could, for instance, use a number 6 frog, and have the closure rail/point rail straight right up to where it lays against the stock rail. It would be wrong, and it would jolt the cars onto the diverging route. Conversely I could bend the closure rail/point rail in such a way that the distance from the frog to where the point lays against the stock rail could be ridiculously long. So, somewhere there has to be a formula or ratio that is used to figure a reasonable amount of curvature for the closure rail/point rail.

As to the question about the manufacturers (like Aristo) making the frog higher then the rails, that was a manufacturing error. That should not be that way. The top face of the frog should be even with the top of the railhead. Sanding down the frogs even with the railhead was the first thing I did to tune up my Aristo switches. Then cutting the flange-way to a depth of 1/8th inch was the second step I did.

Ok I am starting to get it I hope. Thankfully I am a ways away from having to but theory into practice. At least a year before by empire can begin to lay track.

Now sorry for giving oyu a headache Steve. And actually it was that other website that brought the radius back into play. I will abandon that notion. It is easier to not think of it in that respect anyway.

John, what you describe is exactly how I determined switches in HO and in N. I simply had 1:1 templates of various switches and laid them down and went yep that one fits best. I have never used sectional track, never, other than things like switches and crossings and what not. for just plain track whether curved or straight I have always from day one even when I got my first train have used flex track. That is thanks to the old guy who started me off. That is what he did so that is what I did. Best part is you can push and fudge and tug to make things line up. So it looks like I will be using what I already know. Since I am hand laying my switches because I am cheap this should make it even easier to fudge.

OK my brain hurts. But I am much more in tune now than I was.

David Maynard said:

The question I have, regarding the points, is;

Is there some formula or ratio that is the accepted standard for how long the closure rail/point is for a given numbered frog? I could, for instance, use a number 6 frog, and have the closure rail/point rail straight right up to where it lays against the stock rail. It would be wrong, and it would jolt the cars onto the diverging route. Conversely I could bend the closure rail/point rail in such a way that the distance from the frog to where the point lays against the stock rail could be ridiculously long. So, somewhere there has to be a formula or ratio that is used to figure a reasonable amount of curvature for the closure rail/point rail.

. . .

David,

You’ve missed an important point - the frog sits in the straight part of the switch, and somehow the diverging track, which sticks across the straight rail at an angle is a fixed angle. The other rail is 1.75" away, so what curve do you need to make the diverging track snug up to the other straight rail and merge with it? There’s only one proper solution - if you assume the widest radius possible.

I get your point that you could have a really tight curve off the points and then a straight portion until you hit the frog, but that isn’t the objective. Maximum radius is what they are after.

Devon - I kept updating my prior post while everyone was adding to the thread! Check out that pic of the prototype.

David Maynard said:

The question I have, regarding the points, is;

Is there some formula or ratio that is the accepted standard for how long the closure rail/point is for a given numbered frog? I could, for instance, use a number 6 frog, and have the closure rail/point rail straight right up to where it lays against the stock rail. It would be wrong, and it would jolt the cars onto the diverging route. Conversely I could bend the closure rail/point rail in such a way that the distance from the frog to where the point lays against the stock rail could be ridiculously long. So, somewhere there has to be a formula or ratio that is used to figure a reasonable amount of curvature for the closure rail/point rail.

To keep it so it goes straight through the frog and not at an angle to it, there’s only so much length you can make it. It has to stay in gauge with the diverging rail. Where the straight point rail meets that diverging rail the distance to the frog will determine the length of the point rail for the diverging route on the opposite side. There may be some formula that someone wrote up but I haven’t seen one. I just use track gauges to determine the lengths of both point rails. Where they meet the stock rail is where I cut it to make the point rail. That may be completely contrary to the right way to do it, but it’s simple and works for me.

I understand what you are saying, but I do not think you understand my question. You are talking about the closure/point rail staying in gauge with the stock rail, ok, yea, but how do I properly figure the curve of that rail? Widest curve possible, yes, ok, but…

Someone needs to selflessly devote their spare time to do a switch building 101 webinar series… Volunteers??

Devon Sinsley said:
Someone needs to selflessly devote their spare time to do a switch building 101 webinar series… Volunteers??

I gave you the link to the best turnout building site that I’ve found. Have you read it, yet? (http://largescalecentral.com/externals/tinymce/plugins/emoticons/img/smiley-laughing.gif)

Hmm… some switches are curved all the way through the diverging route, as evidenced by the Bachmann switch. Most of the “tighter” switches were meant to be able to replace a curved track.

Certainly almost all LGB, the Aristo 4’ and the wide radius (10’), the smaller USAT ones, and most of the Piko smaller ones, and the smaller Train-Li (made by Train Line 45).

Prototype switches are not curved all the way through (except for “curved” switches), and of course are more “gradual” than most the the switches we use… we think #6 is a gentle switch, on a prototype it’s tight.

I prefer the more prototype type of switches, but I do have Aristo WR in some places. Trying to equate the more prototypical switches to a radius is really a bit misleading, since the “effective radius” depends on more than just the frog itself.

This is a typical set of questions, as newcomers try to “fit” a switch to match some curves… better to locate the “broadest” switch you can handle and work the track to smooth transitions to the switch.

Greg

Yes Steve you did and yes I read it and I am even more confused. Maybe switch 101 his to advanced. I mean seriously I think there is a part of my bran that runs off kicking and screaming when I try to understand it. I am getting it slowly I think. This maybe one of those things where I need build one with coaching then I will get it. Many times that’s what it takes for me. I struggle then poof I get it.

Devon Sinsley said:
Yes Steve you did and yes I read it and I am even more confused. Maybe switch 101 his to advanced. I mean seriously I think there is a part of my bran that runs off kicking and screaming when I try to understand it. I am getting it slowly I think. This maybe one of those things where I need build one with coaching then I will get it. Many times that’s what it takes for me. I struggle then poof I get it.

I’ve got one on the work bench now, come on over and I’ll show you how I do it…(http://www.largescalecentral.com/externals/tinymce/plugins/emoticons/img/smiley-wink.gif)

Haha Devon Im on your side. I sort of get it but yet I dont. Just give me a template for an Aristo wide rad switch and Ill copy that. Thats all I need to build. I want to keep it simple. Couldnt I just take an Aristo Switch and copy that into what Ken does? Thats how my mind thinks. It looks easy to my eyes but not my mind. I also have read all the switch building articles and my head hurts. I just want simple. I know someone went into this in detail with all these confusing numbers. I hate math and numbers.

Shawn Viggiano said:

Haha Devon Im on your side. I sort of get it but yet I dont. Just give me a template for an Aristo wide rad switch and Ill copy that. Thats all I need to build. I want to keep it simple. Couldnt I just take an Aristo Switch and copy that into what Ken does? Thats how my mind thinks. It looks easy to my eyes but not my mind. I also have read all the switch building articles and my head hurts. I just want simple. I know someone went into this in detail with all these confusing numbers. I hate math and numbers.

That’s how I built my first one. Just copied what was already out there. Needed a bit of modification since it was curved, but they’re all basically built the same way. Just make sure you have a good set of track gauges.

Devon Sinsley said:
Someone needs to selflessly devote their spare time to do a switch building 101 webinar series… Volunteers??

Ya just gotta look around (i.e. google.) The grandaddy of all is Saskatoon - their article on turnouts has been up for years:

http://members.shaw.ca/sask.rail/construction/lsbuild/lsswitch.html

Then there’s the 15 page PDF [says its 200, but it lies] that we produced to help Fred on MLS:

http://1stclass.mylargescale.com/mikereilley/Track%20roadbed%20trestles%20bridges/turnout%20building.pdf

Garden Railways Magazine has twice run detailed articles on making a switch. I wrote one which was profusely illustrated with photos in 2003, and they recently ran another, similar one. Back issues are available. Either could be turned into a webinar - you did search Youtube before posting, I trust?

David, I posted a link to the Turnout Calculator. It will give you every number you need to know.

Pete Thornton said:

Devon Sinsley said:
Someone needs to selflessly devote their spare time to do a switch building 101 webinar series… Volunteers??

Ya just gotta look around (i.e. google.) The grandaddy of all is Saskatoon - their article on turnouts has been up for years:

http://members.shaw.ca/sask.rail/construction/lsbuild/lsswitch.html

Then there’s the 15 page PDF [says its 200, but it lies] that we produced to help Fred on MLS:

http://1stclass.mylargescale.com/mikereilley/Track%20roadbed%20trestles%20bridges/turnout%20building.pdf

Garden Railways Magazine has twice run detailed articles on making a switch. I wrote one which was profusely illustrated with photos in 2003, and they recently ran another, similar one. Back issues are available. Either could be turned into a webinar - you did search Youtube before posting, I trust?

David, I posted a link to the Turnout Calculator. It will give you every number you need to know.

Thanks Pete, I will look at all of these. And no haven’t search Youtube yet. The comment was tongue in cheek as I knew or at least suspected that everything I need was there.

Everyone who is trying to help the helpless (me) and being patient, thank you. I swear I am an intelligent guy, even mechanical, but dang there is a road block. I tried to understand it in HO but it was just to easy to not worry about it. Different story here. I will learn and I will prevail. I am getting it though. I at least understand the parts of a switch and the number system and to stop trying to equate a regular numbered turnout to a radius. That helps a lot. Now it is understanding switch theory and application.

So thank you again. Thats why I love this site everyone is for the most part patient and willing to help.

Shawn Viggiano said:

Haha Devon Im on your side. I sort of get it but yet I dont. Just give me a template for an Aristo wide rad switch and Ill copy that. Thats all I need to build. I want to keep it simple. Couldnt I just take an Aristo Switch and copy that into what Ken does? Thats how my mind thinks. It looks easy to my eyes but not my mind. I also have read all the switch building articles and my head hurts. I just want simple. I know someone went into this in detail with all these confusing numbers. I hate math and numbers.

Shawn,

check out the link Pete posted for the Saskatoon hand laid switch. It is switch building for dummies. I have only begun to read it but the one nice thing is it takes a practical approach instead of a prototypical approach. I know we like to stick to prototype but right now for me I need to just undrstand what the heck is going on and make it fit my RR and this approach does that.

Thanks Pete

Yes, I read the Saskatoon directions back when I built my switch. But I figured the switch as a curved switch (on the diverging route) to match up with the curve I had to fit it into. So, while the switch worked really good for years, I know it wasn’t quite prototypical.

David Maynard said:

Yes, I read the Saskatoon directions back when I built my switch. But I figured the switch as a curved switch (on the diverging route) to match up with the curve I had to fit it into. So, while the switch worked really good for years, I know it wasn’t quite prototypical.

I never thought I would say this but damn prototypical. . . I am going to lay out my ROW like John suggested and then I will make my switches work. One aspect that is pointed out on the Saskatoon site that makes sense is that we want to be prototypical but we don’t have prototypical distance to work with… well I don’t anyways. Everything is compressed including switches. If that requires us to make curved switches that work then oh well we have curved switches. I understand that they have to function but if they can do that and have a curve to them to help fit a space well then so it is.

I like their approach. They simply state to make a template for your switch you lay out each leg of the track as if it were to exist alone and trace it or do a rubbing then move the track to the other leg and do the same thing and then build the switch to fit. Makes sense to me. They pretty much state they throw prototypical out the window and exchange it for practical.

Devon, I think that you will regret this decision. Toy turnouts take up more room in the long run, and they will give you more problems with derailments. But, its your railroad.