Large Scale Central

track laying

OK the conversation on standards got my brain spinning. Even though I am at least a year off from laying track I do want to be getting prepared for it.

Here is the track plan idea. Now I am strongly considering the Llagas 1:20.3 code 215 aluminum flex track. Seems to be highly regarded and it is probably what I will use (rails anyway) for my static display. No track power so the cost is better on the aluminum.

This plan is around 200 feet of track. That’s $700 bucks in track. Throw in 8 turnouts at $100.00 a piece and I am at a 1500 dollar bill not to mention the crossover. This isn’t even figuring the cost of the divorce attorney. Now I am only going to build it one loop at a time to help defray cost over a period of time.

But being a cheap SOB, but one that is handy, I am wondering about the cost/parctical effectiveness of hand laying my own turnouts and crossover. Is it easy to achieve tolerances that will match the purchased Llagas track and run my equimpent.

thoughts? I am not looking for a how to but rather a should I answer. That four switch/crossover affair seems like it would be a critical element to get right.

Devon,

It is definitely cheaper to make your own turnouts and I think they not only look better, but they work better as well. I build almost all of my own specialty turnouts, like curved ones. I build some of the more traditional turnouts as well, but also buy some pre-built by Switchcrafters.
Here is a link to a post about one of my latest curved turnouts:

http://largescalecentral.com/forums/topic/22559/new-curved-turnout

Here is the link to a post about the jig I use to build all of my turnouts on:

http://largescalecentral.com/forums/topic/21881/turnout-assembly-jig

You probably shouldn’t expect your first turnout to be your best. Be patient, skill comes with practice.

I 'll have to agree with Bob, and Steve too, for that matter.

Building your own takes practice and patience (and some good track gauges) , but the upside is you can build them to fit anywhere on the layout. I have a few curved ones and 2 3-ways.

Yup, I’d definitely hand lay my own switches, and have. Albeit only one so far. But it was a code 250 aluminum rail #7. Once done I “couldn’t” force a truck to derail going through it. I’ve hand-layed many in HO scale years ago including a scissor as you have in your plans. If it can be done by a 15 year old in HO than it should be a snap in G.

One thing to note when using the aluminum is that you cant solder together the two rails that form the point. For this I used JB weld. Seems to work fine.

Just assure your wife that the money is far better invested in your yard than at the bar every night.

Scratch building allows you to build the turnouts precisely as you need them i.e. you can get away from the strictly geometrical regimentation. Custom fitted turnouts save space and money, but you need to make sure that a) you follow a standard b) don’t try to fudge things c) take your time as in, if that first turnout is not up to “snuff” you forget about that one and build the next. When you’re almost done you go back to that first one and either correct (rebuild) or build it new from scratch.

Since we’re talking alu rail it will make for easier filing and fitting.

I have hand laid over 20 turnouts on my layout, built my own frogs using nickel silver rail and ground points out of the same, only a couple live outdoors but are doing well, most are #5’s as a compromise between #4 and #6. once you have done a couple it gets easy. I figure I spend about 4 hours per switch from start to finish.

Al P.

I have built a few, and yes it takes a bit of practice and attention to detail. It does free you from having to make a certain switch “fit” where it doesn’t quite want to.

So I vote Yes, build your own. But, as said, the first one may not be quite, right. So maybe your first one should be for a seldom used spur, just for practice, or maybe for your display shelf. Just until you get the knack.

I too have used JB weld to make frogs. In my case (track power) I needed insulating frogs, and JB Quick will insulate the rails from each other. Its also durable as all heck, but can be carved when its rubbery, just before it gets hard.

Steve Featherkile said:

You probably shouldn’t expect your first turnout to be your best. Be patient, skill comes with practice.

Steve I don’t expect perfection the first time. 99% of perfect is acceptable on the first go but by #2 I would probably have to fire the builder if it isn’t 100%

Hans-Joerg Mueller said:

a) you follow a standard

Which one? oh wait don’t answer that…:wink:

David Maynard said:

So I vote Yes, build your own. But, as said, the first one may not be quite, right. So maybe your first one should be for a seldom used spur, just for practice, or maybe for your display shelf. Just until you get the knack.

This is a good idea. The display will be first and no reason why I can add a switch or two to get the idea then if they are less than perfect it wont matter.

BTW something that I have never understood mostly because i didn’t care to understand is what is meant by a #6 or #7 turnout. I just always in HO and then n bought the turnout that looked right and flexed the track to make it work. So never took the time to understand the science behind the numbers.

For a number 6 turnout, the diverging rails are one unit of measure apart from the tangent, six units from the center of the frog.

Steve beat me to it.

Devon Sinsley said:

Steve Featherkile said:

You probably shouldn’t expect your first turnout to be your best. Be patient, skill comes with practice.

Steve I don’t expect perfection the first time. 99% of perfect is acceptable on the first go but by #2 I would probably have to fire the builder if it isn’t 100%

Good luck with that. :slight_smile:

Steve Featherkile said:

Devon Sinsley said:

Steve Featherkile said:

You probably shouldn’t expect your first turnout to be your best. Be patient, skill comes with practice.

Steve I don’t expect perfection the first time. 99% of perfect is acceptable on the first go but by #2 I would probably have to fire the builder if it isn’t 100%

Good luck with that. :slight_smile:

Yes Devon, that’s what you aim for and if you’re an absolute “born to lay track and build turnouts” guy , like myself, it will come true “just like that!”.

(Please note: the above smilies are called “tongue in cheek”, when they’re paired you need to add more than a grain of salt!)

Over the past 30+ years I have built “a few”, but just as often my buddies, friends and acquaintances wanted to know what was ailing their "beauties’ and how to correct it. That’s how I got “christened”, at least in one group, with the title “Mr. Micrometer Eyes”.

The 101 in turnout building: “If ain’t looking so hot, chances are it won’t work so hot either.”

I had started building my own switches as I have started conerting to 7/8th scale with its longer cars etc. It certainly saves bucks and they work pretty reliably. It does take a good bit of time to make each one…if it is a strictly financial vs time trade off think in terms of a good days work to make each one.

What tools are in your shop? Some thing that can cut or grind a long straight taper will go a long way to saving any sanity left…

John

John Caughey said:

What tools are in your shop? Some thing that can cut or grind a long straight taper will go a long way to saving any sanity left…

John

Very true John. I used a grinding wheel I rescued from the trash, chucked in my drill press. I used the side (flat side) of the wheel to make my (switch) points. I would have lost what little I have left of my mind, had I tried to file my stainless steel rails with a hand file.

David Maynard said:

John Caughey said:

What tools are in your shop? Some thing that can cut or grind a long straight taper will go a long way to saving any sanity left…

John

Very true John. I used a grinding wheel I rescued from the trash, chucked in my drill press. I used the side (flat side) of the wheel to make my (switch) points. I would have lost what little I have left of my mind, had I tried to file my stainless steel rails with a hand file.

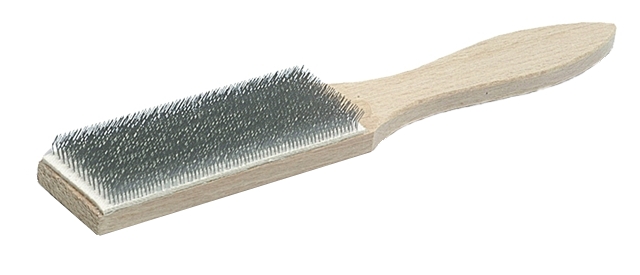
There’s a huge difference between alu and stainless or e.g. Llagas Creek nickel silver rail. Most important part with alu rail: new files and a good file card to keep the files clean. Don’t ask why they call them file cards, this is what they look like.

John Caughey said:

What tools are in your shop? Some thing that can cut or grind a long straight taper will go a long way to saving any sanity left…

John

I use a belt sander, turned upside down in its carrier. I’ve been told that I shouldn’t use a grinding wheel for brass or aluminum, though I suppose a special wheel can be had. I’ve been told that the soft metal gets into the wheel, and causes the wheel to fly apart. Ouch.

A disc sander would work, too.