Devon,
Prototype short hood top is not parallel to the bottom frame.
Your model it looks like the top of the short hood is parallel to the frame.
Devon,
Prototype short hood top is not parallel to the bottom frame.
Your model it looks like the top of the short hood is parallel to the frame.
I think I am glad I don’t live close to you 2!! I have been known to run my F3 with intermodal cars and wooden boxcars in the same consist, one of you(Devon or Craig) would have a fits! And I use 909 KaDees which well throw others into fits too!
We still like you Pete even if you do silly stuff like that! Lol
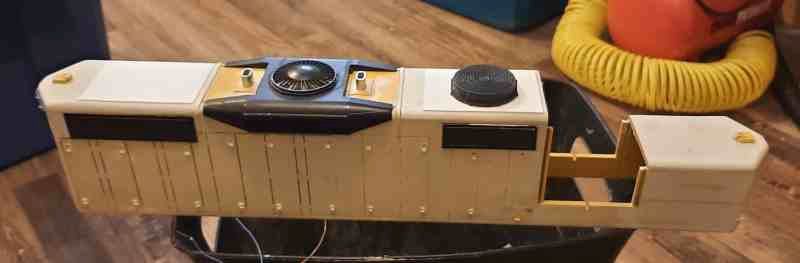
So a little more work on the Geep. Got the old fan holes covered with a hatch front and bac. Still need the bolt and washer details. Installed the 3D printed fan on the front. The rear will have the winterization hatch which is designed and awaiting printing. I installed the Dynamic Brake and its fan the exhaust pipes, and the grills. I also wired two flat top LEDS together series with a resistor and mounded them in the Pile light housing and installed that. I have new air tanks printed because I lost the old ones. I have a plow printed and a Nathan 3 chime horn also printed. New glad hands arrived from Precision Scale, a new vent for the hood, and some amber slow flashing LEDS also came in. I also got all my paint in so when the time comes I can start mixing and painting.
Craig Townsend said:
Devon,
Prototype short hood top is not parallel to the bottom frame.
Your model it looks like the top of the short hood is parallel to the frame.
If it were me building these with my own problematic health I’d say the half-degree off of flat looks it could be is close enough to flat to call modeling it flat close enough and move on to the next detail,
http://www.rrpicturearchives.net/showPicture.aspx?id=1063000
http://www.rrpicturearchives.net/showPicture.aspx?id=2774665
http://www.rrpicturearchives.net/showPicture.aspx?id=1424120
http://www.rrpicturearchives.net/showPicture.aspx?id=5172907
What scale glad hands did you order Devon? The O scale ones work pretty good for the MU glad hands.
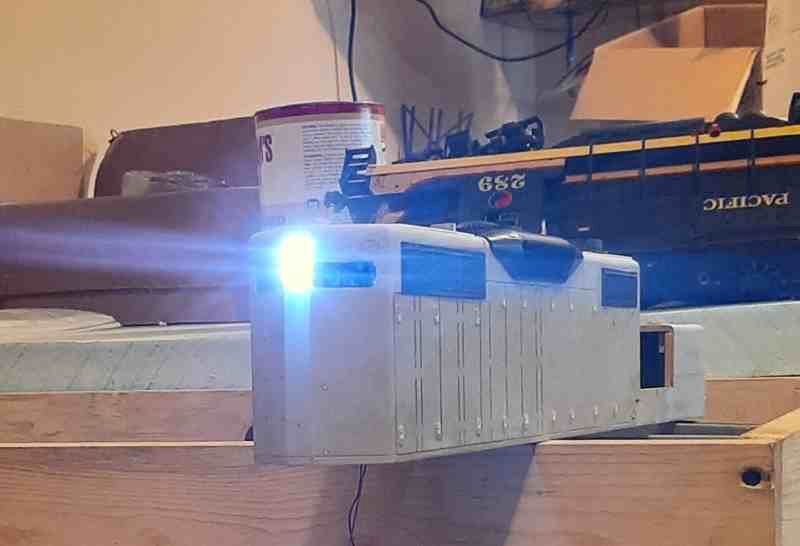
You must have used white LED instead of warm white ( more yellow looking). Either way they are nice and bright.
Is that NP peaking out in the background the next locomotive?
Forrest Scott Wood said:
Craig Townsend said:
Devon,
Prototype short hood top is not parallel to the bottom frame.
Your model it looks like the top of the short hood is parallel to the frame.
If it were me building these with my own problematic health I’d say the half-degree off of flat looks it could be is close enough to flat . . .
Exactly. I’m just glad I feel well enough to do anything.
Some great shots of the locos. I think the 101 is dead. Haven’t seen it in a few years. I am very loosely modeling the 102 now and the 103 will be the companion.
Craig Townsend said:
What scale glad hands did you order Devon? The O scale ones work pretty good for the MU glad hands.
You must have used white LED instead of warm white ( more yellow looking). Either way they are nice and bright.
Is that NP peaking out in the background the next locomotive?
I could have sworn I got warm white and thought the same thing when I fired them up. But the packing slip did say bright white. Oh well. I might try some orange alcohol ink. If not I can survive with it.
The ones I got are their G scale ones which are a bit big for 1:29. But again, only you will notice. 
And yes that is the sister loco. Was going to do them at the same time but thats still a runner so I think I will leave it alone until this one’s done then chop it.

I found it interesting after looking at the pictures Forrest linked that the Milwaukee version of the 102 had the 36 in fan up front. I was told this was done when the rebuild happened and the noses chopped. Guess not.
A little more progress. The 3D printed plow is installed as is the Kadee coupler box. i removed the offset coupler and used a spacer block and did some trimming to put a standard coupler box in. Also added some fish hook eyes for the coupler lift bar.
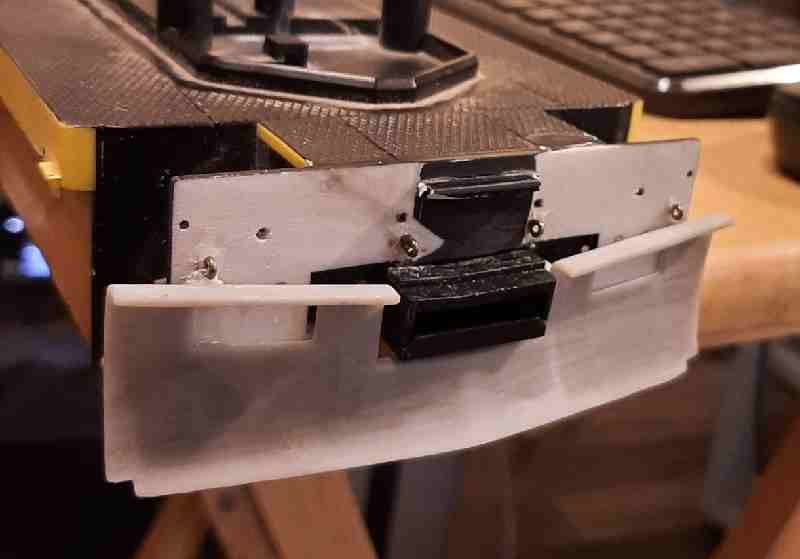
and I trimmed the side skirts to be more prototypical than the long ones the model had. The prototype has very short skirts ( I doubt this is the real name) only where the fuel filler is.
Looking good, Devon.
https://www.wplives.org/wphistory_wp_documents/WP_OPERATING_MANUAL_GP9_LOCOMOTIVES.pdf
I like page 230 figure 2-14
Wanna hear something dumb. Just discovered I did all that work to put the plow on the wrong end. Guess I will run long hood forward. No seriously its only a matter of taking the plow off. Everything else would have been done anyway.
Rooster said:
https://www.wplives.org/wphistory_wp_documents/WP_OPERATING_MANUAL_GP9_LOCOMOTIVES.pdf
I like page 230 figure 2-14
only you rooster. I am dumber for having went and looked (https://www.largescalecentral.com/externals/tinymce/plugins/emoticons/img/smiley-wink.gif)
So I designed and printed the cab filler piece. I didn’t get the design right and it doesn’t match up with the roof line. But nothing bondo won’t fix. Still needs curing. I know you are supposed to do that before taking the supports off but I had to see what it looked like.
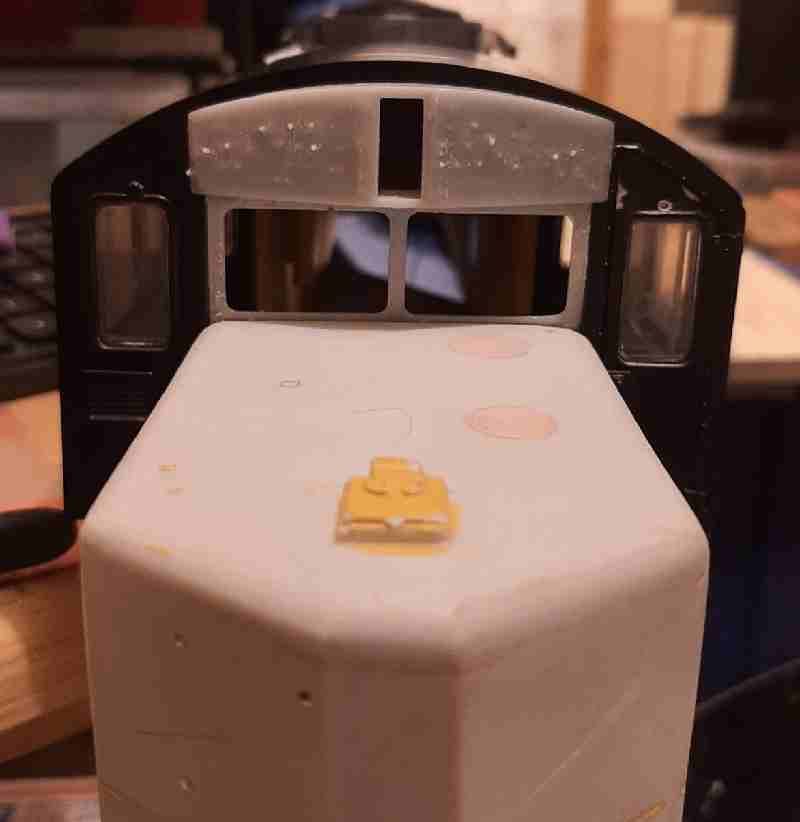
Does that thing have number boards as well? Just curious if you are planning on printing those as well.
Devon Sinsley said:
… I know you are supposed to do that before taking the supports off but I had to see what it looked like.
Devon, I think either way works, but I have found that removing the supports before curing is much easier. The supports are not attached as firmly prior to curing and generally need less post processing (cleaning/sanding) at that stage. Just how I do it (https://www.largescalecentral.com/externals/tinymce/plugins/emoticons/img/smiley-wink.gif)
It’s looking real good Devon . I always liked the look of the chopped nose geeps . Thanks for the pictures . Since the “freight shed” picture uploads here were ended I haven’t found a picture sharing site yet .
Craig Townsend said:
Does that thing have number boards as well? Just curious if you are planning on printing those as well.
Did it and will he ?
Devon Sinsley said:
So I designed and printed the cab filler piece. I didn’t get the design right and it doesn’t match up with the roof line. But nothing bondo won’t fix. Still needs curing. I know you are supposed to do that before taking the supports off but I had to see what it looked like.
Devon, I have never left the supports on to cure. In fact, I typically shave the bumps off with a hobby knife to reduce the amount of sanding after curing.
-Dan