Large Scale Central

Snow Plow needed

Eric Mueller said:

This ALMOST makes me wish we had snow! Thanks for breaking down all the sub-assemblies. There is a lot to learn from the techniques, even if “snowplow” is not on the Triple O’s list of “must haves.”

You do …just the volcanic type …now when will YOUR plow be finished ?

Jim Rowson said:

Interesting board by board detail on the snowplow… for some reason I was expecting it to be a single piece of metal…

And what are those things at the leading edge of the plow?

Pretty cool woodwork huh? can you imagine being the lead carpenter on that project and trying to make it come out right(https://www.largescalecentral.com/externals/tinymce/plugins/emoticons/img/smiley-surprised.gif)(https://www.largescalecentral.com/externals/tinymce/plugins/emoticons/img/smiley-laughing.gif)

The big arch looking things are lock downs for the leading edge, they swivel 90 degrees and let the leading edge lift up off the rails using the strap hinges shown. Notice the air (brake) cylinder and arm lever on the top of the car. A chain ran from the lever down to the leading edge blade so it could be lifted by air power instead of arm power. By lifting the edge they could move the plow around in dry conditions and not worry about creating sparks.

Thanks for the interest.

Ah, I see the hinges now. Interesting.

i assume you will be building a board for board model???

Rooster ’ said:

Perhaps you need a job to occupy yourself. You could be repairing the tire on the wheelbarrow you have from the 1970s instead of stirring up this crap!

(https://www.largescalecentral.com/externals/tinymce/plugins/emoticons/img/smiley-laughing.gif)(https://www.largescalecentral.com/externals/tinymce/plugins/emoticons/img/smiley-laughing.gif)(https://www.largescalecentral.com/externals/tinymce/plugins/emoticons/img/smiley-laughing.gif), Thanks David, laughing my a$$ off. Of all the pictures and notes I have posted over the years you focus on my pregenant wheel barrow tire yet again. Perhaps you should see someone about this inflated rubber tube thing(https://www.largescalecentral.com/externals/tinymce/plugins/emoticons/img/smiley-foot-in-mouth.gif)(https://www.largescalecentral.com/externals/tinymce/plugins/emoticons/img/smiley-laughing.gif)(https://www.largescalecentral.com/externals/tinymce/plugins/emoticons/img/smiley-laughing.gif)

As for a job, I have been out of work since 1998 but must confess I haven’t been busting my hump looking. As for stirring up crap, hmmmm, maybe the old thing about the kettle calling the pot, well you know.(https://www.largescalecentral.com/externals/tinymce/plugins/emoticons/img/smiley-foot-in-mouth.gif)(https://www.largescalecentral.com/externals/tinymce/plugins/emoticons/img/smiley-laughing.gif)(https://www.largescalecentral.com/externals/tinymce/plugins/emoticons/img/smiley-laughing.gif)(https://www.largescalecentral.com/externals/tinymce/plugins/emoticons/img/smiley-laughing.gif)

Thanks for the laugh

Back from the last camping trip of the year and got a little more done on this project.

The cabin and car are painted the base color, faded red/brown and the roof is done. For the roof I used white muslin cloth cut in strips and laid over a coat of Titebond III then painted with a second coat of glue after the first is dry. After everything is dry I trimmed the edges with an ExActo blade.

The finished roof after painting and a little weathering.

Coming together, not much left to do now.

Thanks for taking a look

That is a nifty technique for the roof. Have to try that…

Well we can stick a fork in this one, it’s done!!

Now on to the plow.

Horse crap …that ain’t a Snow Plow as the topic states! It’s a flanger that is missing ditch lites and HEP cabling ! You west coast guys seem to forget the Donner family and what CAN happen without the PROPER SNOW PLOW !

Nice work

(https://www.largescalecentral.com/externals/tinymce/plugins/emoticons/img/smiley-cool.gif)

Nice work, Rick. Gonna do a board-by-board snow plow?

Jim Rowson said:

Nice work, Rick. Gonna do a board-by-board snow plow?

Yea, probably, I’m still scratching my head on just how to resize from standard guage to narrow gauge.

Looking at the plans the 1 x 6 boards taper from 5 1/2 to 1/2 in the lencth of the blade, that’s gonna take some doing.

I am so looking forward to this!

Well it is finally time to get off the dime and start on the bucker plow.

A lot of head scratching and napkin drawings to get this converted from standard gauge to narrow gauge but I think I have hit on a plan to move forward with.

I guess what I really should do is move into this century and buy a cad drafting system, laser cutter and 3D printer then spend the next 10 years learning how to use them, well maybe not(https://www.largescalecentral.com/externals/tinymce/plugins/emoticons/img/smiley-foot-in-mouth.gif)

Think I will just keep sawing, gluing, sanding and doing things over like I always have(https://www.largescalecentral.com/externals/tinymce/plugins/emoticons/img/smiley-laughing.gif)

Anyway the start.

The basic frame was assembled from Cedar and let me establish the truck and coupler heights and locations. I first set this up with Delton (Aristo) arch bar trucks and Sierra Valley semi-scale wheels but soon realized that was probably going to be a problem. If this thing derails it will be a — to rerail as you won’t be able to even see the trucks and wheels. So I decided to go with the Bachmann wheels (much larger flanges) and Bachmann arch bar trucks as they will not be seen from any angle except upside down.

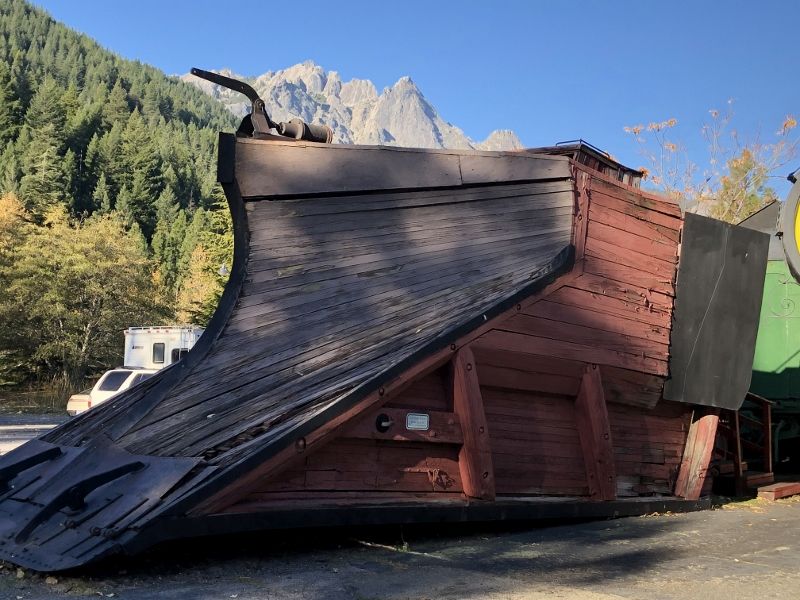
Once the base frame was complete I built up the support box to carry the blade assembly, the blade rises on a 25 degree angle from the horizontal and is about half the length of the frame. The support box or “shoe” bolts to the frame for easy removal, the bolts are epoxied in from the top so the nuts can be removed from below.

The start of the blade assembly, this just slides down over the shoe on the frame. Right now the sides are full depth but will be cut down later to allow for the offset in the cars exterior cladding.

Well it’s a start, can’t wait to see what happens next.

Thanks for taking a look.

Popcorn on order. Fun!

Next installment.

The plow head was glued up from blocks of Bass wood, and a couple of other kinds, rough cut on the band saw then shaped by hand with rasp’s and sand paper, came out prettty even on each side(https://www.largescalecentral.com/externals/tinymce/plugins/emoticons/img/smiley-laughing.gif).

The radiuses were filled with wood putty and sanded to shape.

I have had this box of really cheap (flimsy, rough, uneaven) coffee stir sticks kicking around for years and turns out they were just the right size for this blade cladding. Used Tight Bond III and small spikes to hold the boards to the curves while the glue dried. This took a while, waiting for the glue to dry, but I could work from side to side as glue dried in each area.

All laid up and rough sanded, I was worried the nail holes were going to be an issue but looks like I might be OK.

After some more sanding, I decided to throw some stain on the boards just to see what it would look like. The blade will be painted either silver or white, don’t know which yet, but I sure loke the looks of the stain job.

More later.

Fabulous! I love the stain. Shame to hide all that wood detail…

Well, Rick, I’m not sure how I overlooked this build when it first began but I’m all caught up now. What a great project. You’re doing some fine modeling, as usual. Thanks for taking us along on this journey. Patiently waiting on the next installment.

Out standing work, looks fabulous

Jim Rowson said:

Fabulous! I love the stain. Shame to hide all that wood detail…

I agree

“Patiently waiting on the next installment.”

Most definitely.

Love the built-up and boarded technique, unlike everything I’ve seen, and really beautiful.

Soldier on, Rick!!