“Perfect”, or “looks right”?
I took the chassis with the blade assembly out on the layout and “pushed” it around this morning and found that the blades were just a little low, they wanted to drag on the frogs and guard rails in the switches and on the rail in some of the tighter curves in the yards. So back to the bench and after a little trim and filing everything is good to go (https://www.largescalecentral.com/externals/tinymce/plugins/emoticons/img/smiley-laughing.gif)
Yay, with every test it gets closer to operational! (https://largescalecentral.com/externals/tinymce/plugins/emoticons/img/smiley-cool.gif)
Looking good R.W.!
Have fun,
Don
Thanks for the interest in this project.
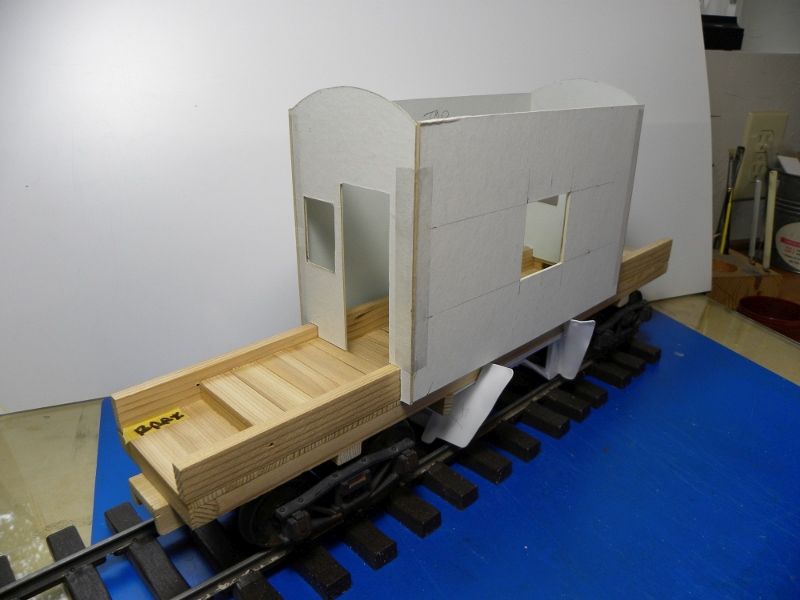
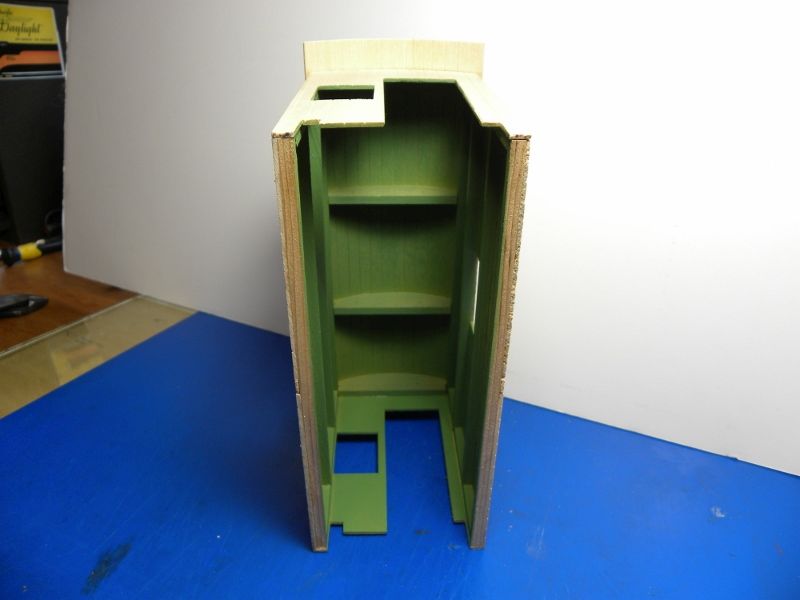
I did a couple of cardboard mock-ups of the cabin until I got one I felt that the proportions looked right on the car deck. I then laid out the car sides on some scribed wood siding and cut the door and window openings so I had measurements to build the windows and doors.
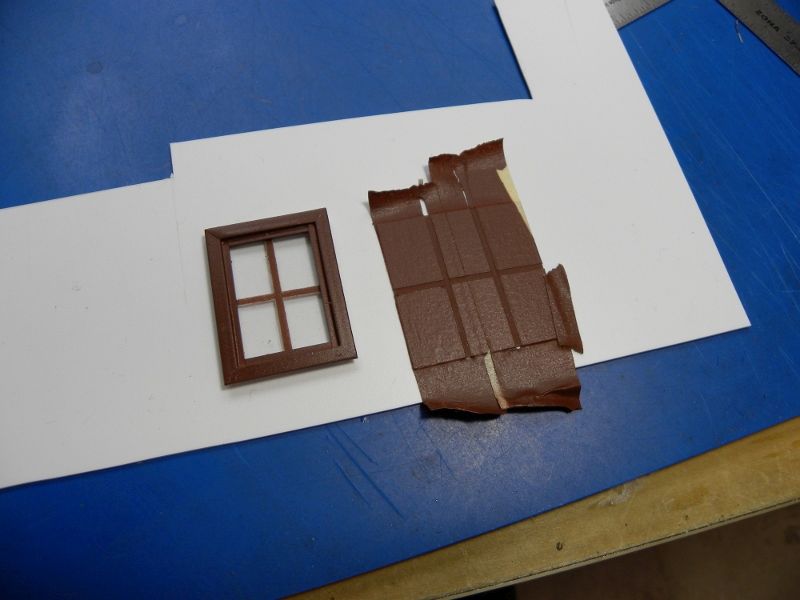
While the glue on the assembled car body was drying I started on the windows. The frames were built up using Styrene strips and the clazing is clear Styrene sheet. The mullions are done by masking the clear sheet and cutting out the strips between the panes.

After the spray paint dries I cut gently along the tape edges and lift it off leaving the mullion bars. I have used this method quite often with good results. On a couple of larger buildings I have used real glass and put the painted surface inside instead of outside to add additional weather protection for the paint, seems to work. I use the clear Canopy Cement to glue the glazing to the frame.
Thanks for taking a look
Rick
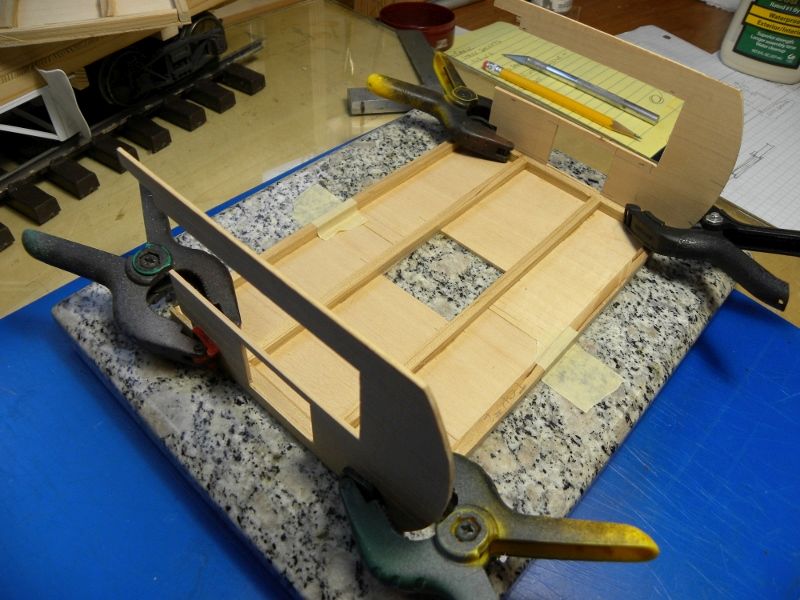
Building up the cabin from scribed wood siding and ripped Cedar framing. I am not detailing the inside so the framing is strictly for support not prototype realism.
A test fit to the car body, seems everything is going to work. I have the doors built up from Styrene and painted, also test fitting them.
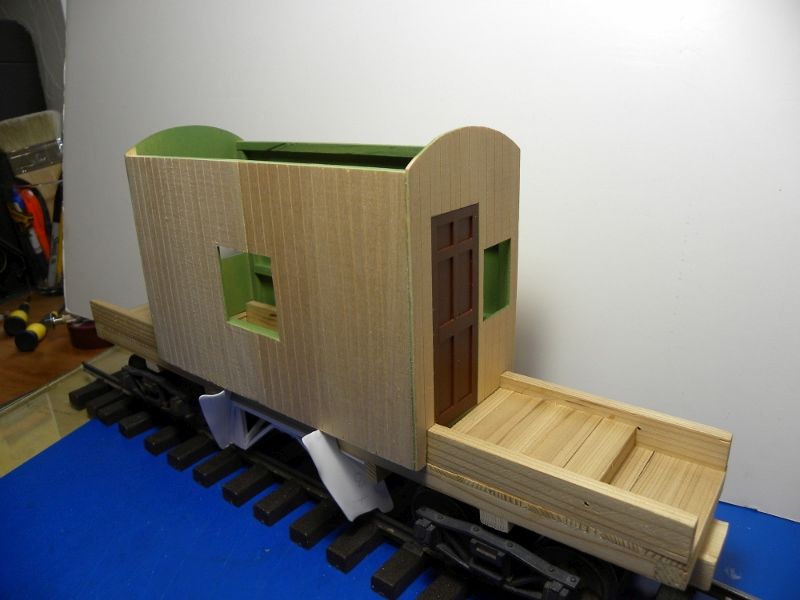
I masked the outside of the cabin and sprayed the inside a “railroad cab green” because it can be seen through the windows and I didn’t want bare wood showing.
Thanks for looking
Is that a marble work surface? Swanky!
Hurry up, Rick. Winters comin…(https://www.largescalecentral.com/externals/tinymce/plugins/emoticons/img/smiley-wink.gif)
Jim Rowson said:
Is that a marble work surface? Swanky!
A chunk of Granit from the counter top shop. I like them because they are flat, smooth, and stable. They don’t move around while your trying to work on them, they don’t warp and you can just scrape off any glue that dries on them. Counter top shop will usually just give you a scrap/broken piece but if you want the edges dressed its usually just a few bucks.
Ken, this RR has made it through 21 winters without any snow removal equipment so if it has to go one more winter, oh well(https://www.largescalecentral.com/externals/tinymce/plugins/emoticons/img/smiley-cry.gif)(https://www.largescalecentral.com/externals/tinymce/plugins/emoticons/img/smiley-foot-in-mouth.gif)(https://www.largescalecentral.com/externals/tinymce/plugins/emoticons/img/smiley-laughing.gif)
Rick Marty said:
Jim Rowson said:
Is that a marble work surface? Swanky!
A chunk of Granit from the counter top shop. I like them because they are flat, smooth, and stable. They don’t move around while your trying to work on them, they don’t warp and you can just scrape off any glue that dries on them. Counter top shop will usually just give you a scrap/broken piece but if you want the edges dressed its usually just a few bucks.
Ken, this RR has made it through 21 winters without any snow removal equipment so if it has to go one more winter, oh well(https://www.largescalecentral.com/externals/tinymce/plugins/emoticons/img/smiley-cry.gif)(https://www.largescalecentral.com/externals/tinymce/plugins/emoticons/img/smiley-foot-in-mouth.gif)(https://www.largescalecentral.com/externals/tinymce/plugins/emoticons/img/smiley-laughing.gif)
My favorite work surface is/was refrigerator glass. It’s usually tempered and thicker. Same pluses as counter tops.
I inherited a marble card table and it’s designated for the Ruby build … Jim is that too swanky?
John: Nothing is too swanky for you, I’m pretty sure. Rick: that’s cool (to touch even). Neither of these ever occurred to me. I’ll have to look into this. I’ve been using one of those self-healing mats…
[edited to add a missing word. doh!]
Well,Jim and John this is interesting.
My main work surface on my bench is an old Drafting board with a sheet of 1/4 inch tempered glass as a cover. On the glass is a self healing matt for cutting, when I do something like gluing up the cabin I get out one of the Granite slabs and sit in the glass or matt. I use the slab because it is smaller and easy to turn about as needed. Oh, I hot glued some small rubber bumpers on the bottom of the Granite so it won’t slide or damage the glass.
There more than ya ever wanted to know.
Rick,
Just tell them all to grow some balls and step up to the plate… I for one am ready to see some snow plow action while Ken who lost his balls watches on you tube in front of his wood stove this winter .
Rooster, I’ll help Ken(https://www.largescalecentral.com/externals/tinymce/plugins/emoticons/img/smiley-foot-in-mouth.gif)(https://www.largescalecentral.com/externals/tinymce/plugins/emoticons/img/smiley-laughing.gif)
A little more progress.
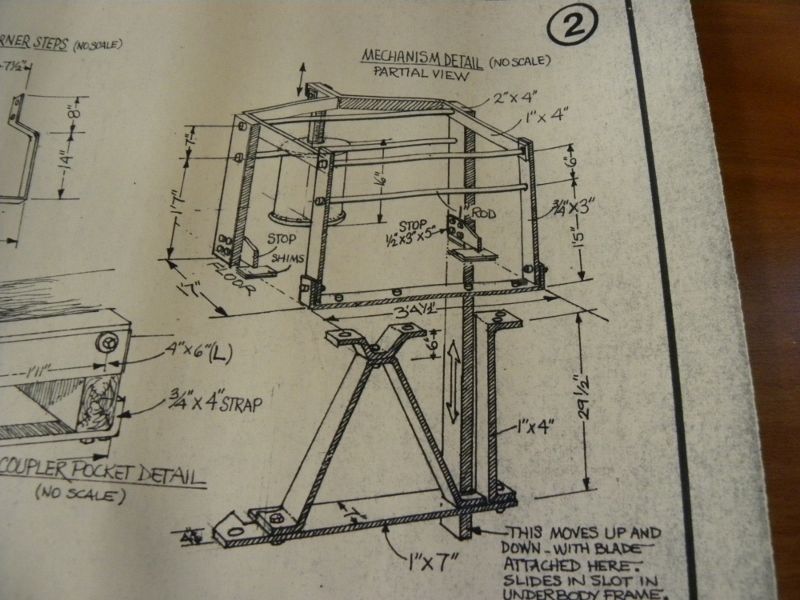
The design drawings for the lift mechanisms, they were made from pretty heavy material. The blades were raised and lowered using brake cylinders and train air pressure, there is a tank reservoir on board the car to maintain enough air, and the two cylinders were controlled by a manual valve.
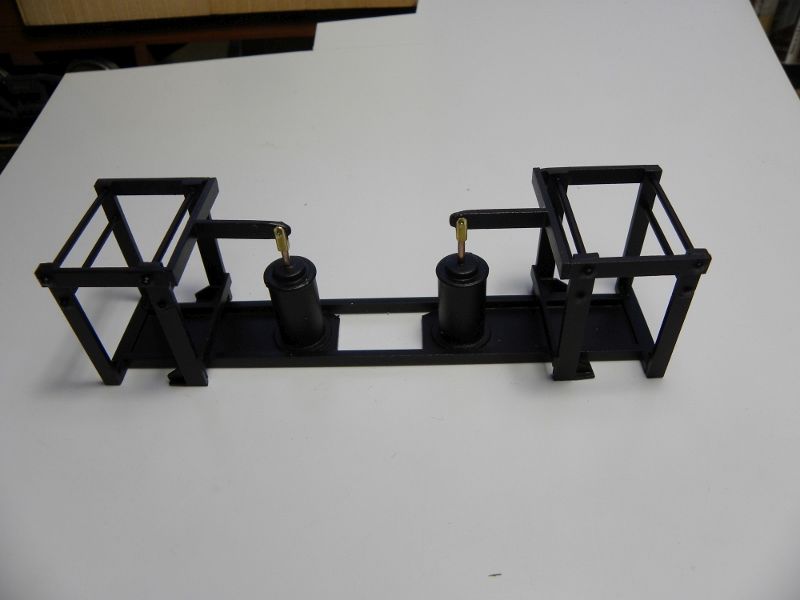
Here is my simplifies version that can be seen through the cabin windows. This is all the interior detail that I am going to mess with on this car.
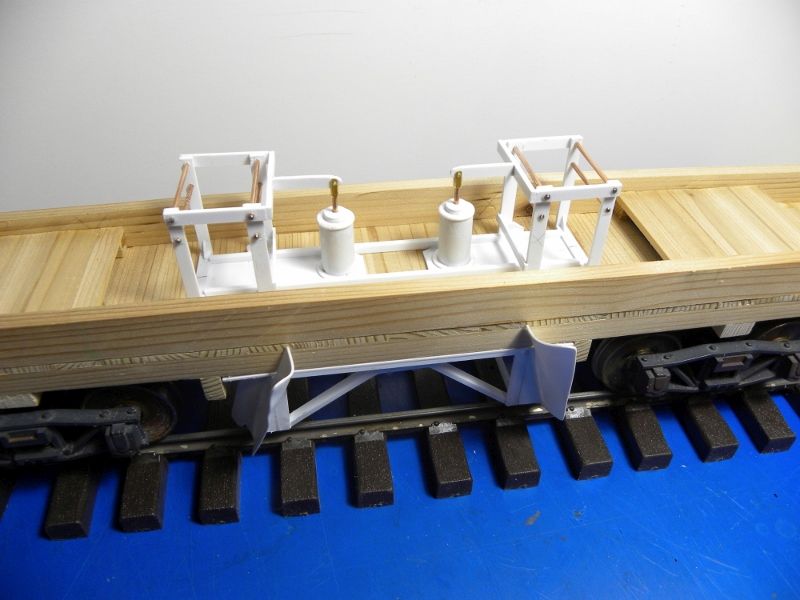
Painted and waiting wear/weathering and installation.
Hope to get some more done next week.
Thanks for looking.
Rick Marty said:
Rooster, I’ll help Ken(https://www.largescalecentral.com/externals/tinymce/plugins/emoticons/img/smiley-foot-in-mouth.gif)(https://www.largescalecentral.com/externals/tinymce/plugins/emoticons/img/smiley-laughing.gif)
Thank you for understanding his needs!
That’s cool, Rick!
This ALMOST makes me wish we had snow! Thanks for breaking down all the sub-assemblies. There is a lot to learn from the techniques, even if “snowplow” is not on the Triple O’s list of “must haves.”
No building update because I had to make a trip South over the last couple days. On the way home this morning we stopped at Railroad Park near Dunsmuir, CA and snapped a few pictures for our enjoyment.
I mentioned at the start of this build that the prototype flanger was on display at Railroad Park and here she is in all her dilapidated beauty. To me it is always a shame to see a piece of RR history in a sorry state like this.
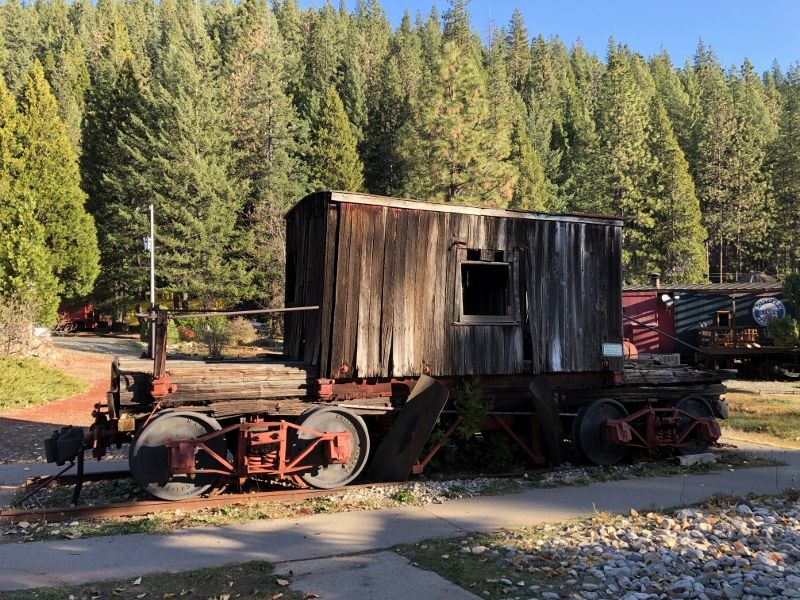
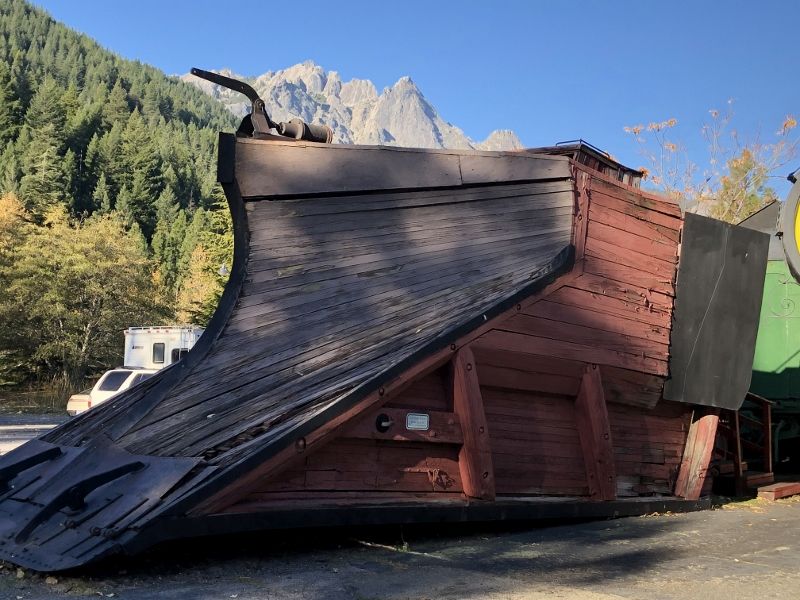
Speaking of sorry states, here is what is left of the snow plow that I showed the drawings 0f at the start of this thread. Stay tuned for breaking news on the whole snow plow build that started this thread, we will share that news as soon as the flanger is complete.
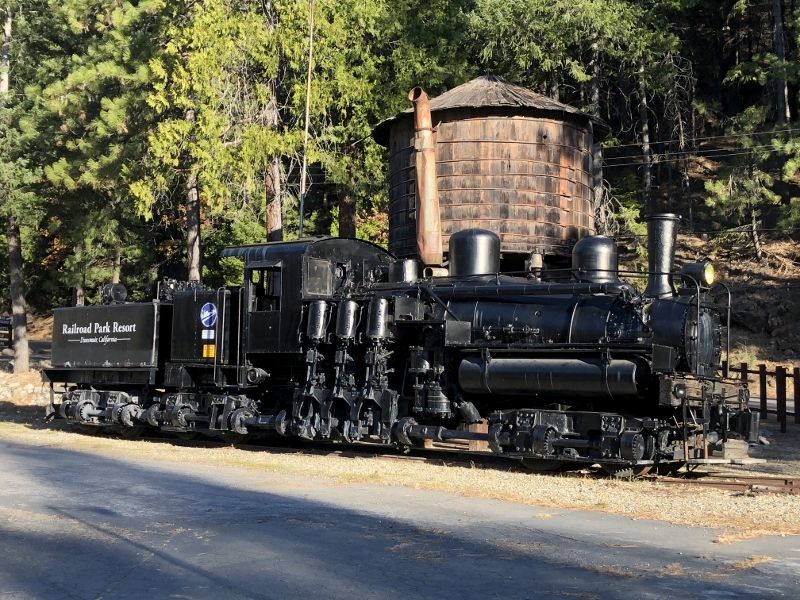
As long as we were at the park I had to snap another picture of #2 or maybe #7 depending “when” your talking about her. She is a Willamette geared locomotive, Construction#21, built in 1926 by the Willamette Iron and Steel Works of Portland, OR.
Willamette built 34 of these Shay look alikes between 1922 and 1929 and surprisingly 6 of them are still with us, one in private hands, stored, and 5 on public display. Number 2 served several Oregon lumber companies until 1965 when she was sold to the park and put on display. They make an effort to keep her in great cosmetic condition for our enjoyment, unlike the snow equipment. On a side note her older sister CN # 18 built in 1925 is on display at the Medford,OR railroad park and is in the process of complete restoration with the intentions of putting her back in service.
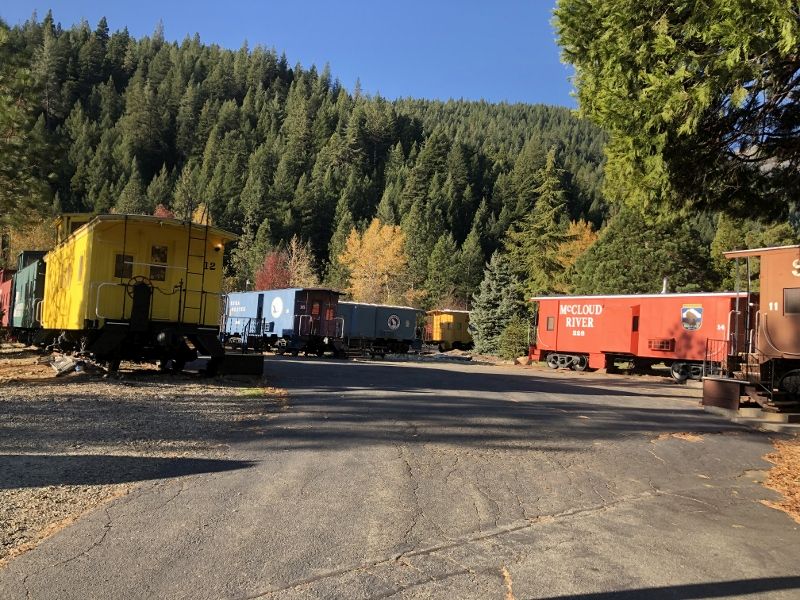
Railroad Park in Dunsmuir, CA is a pretty cool place to visit and stay. See here, https://rrpark.com/ They have maybe 15 Cabooses converted to hotel rooms and a great resturant in old dinning cars. and a lot of old equipment on display. If you ever have the chance it is worth checking out. No connection other than we really enjoy the place!!
We will get back to the Flanger build in a couple days,
Thanks for taking a look.
Rick
Interesting board by board detail on the snowplow… for some reason I was expecting it to be a single piece of metal…
And what are those things at the leading edge of the plow?
Rick,
Perhaps you need a job to occupy yourself. You could be repairing the tire on the wheelbarrow you have from the 1970s instead of stirring up this crap!