Devon, is your book at the publishers?
Jean-Gilles Durand said:
I am going eventually believe that it is easier to make of the total scratch.
This may be true. My first locomotive was a scratch build. In some respects it is easier. Trying to fit the pieces back together after modifying them is a bit of a challenge.
I like the locomotive. Same concept I am shooting for in an even smaller package.
Steve Featherkile said:
Devon, is your book at the publishers?
Steve,
I actually have postponed the book until after I graduate which is in Dec. I have to many irons in the fire. The book is for fun and for me and it was no longer fun. I was getting far to stressed out over it and was not enjoying it anymore. So it was time to set it aside. I only have so much that I can put into intellectual endeavors and between 40 hours a week at work and being a full time grad student, I can’t fit author in without hitting overload.
I have only so much free time and modeling is my escape and relaxation. I have even stopped worrying about imposing demands on my self here as well.
It just boils down to I needed to take some time to have fun.
OK I am done whining. I do miss my book research and writing. I will get back to it but on my time. I will miss an opportunity at Wallace this fall but at the end of the day it wasn’t like I was going to make a financial windfall there.
Devon,
You can raise up the cab to clear your drivers. An engine that small has a lot of vertical clearance to spare.
John
John,
Your going to be the death of me. So to raise the cab over the drivers means 1/2 an inch. I am looking at what it would take to get that half an inch. There are a couple of ways to do it and none are what I would consider easy. One would be to raise the entire boiler/rear deck section. But the rear deck is two pieces and that would take some real work to patch it all back together. Plus I don’t like the whole look of the boiler sitting up that high though I have seen it done in pictures. So scrap that idea. The next idea is to just raise the rear deck. That would be a pretty hefty task requiring removing all the old decking and then fashioning an all new deck. Something would then need to be done with the fire box because the stuff above the deck does not line up with the stuff below the deck at all. I could cut the fire box up half an inch as well and reconstruct something underneath to match. If I take this idea on this is the route I would go.
But leaving the cab exactly as is now and having a step up over the drivers is by far easier. I don’t even think it would be all implausible. Here is how I see this working. There are no front doors on this loco. The area just behind the front wall in the cab will be where all the plumbing, brake, Johnson bar etc will be going. No reason it can’t be sitting on a little platform.
I think I will steer away from that idea.
We covered this many moons ago I believe … let’s revisit the Argent 2-6-0 and notice the firebox sits low while the hogger sits on a box…

Leave the boiler and back plate low, just box up the sides…
All in fun!
John
I knew where you were going with it John. However on this style of loco it has a special brand of problems. With a separate tender the tender deck matches the sunken center portion and the cab can sit higher. This is what ended up being done on the 2-6-0. However where the tank and fuel bin are attached to the loco that means their deck must be the same height as the bottom of the cab. Go back and look at Eric’s WW&F 9 or 10 which are the loose prototypes for this loco. The cab is flush with the deck straight across. While I am not say it couldn’t be done with a raised cab or even was done with a raised cab forward of the door but I think it would look funnier than having the driver partially hidden.
Ergonomically I think the deck needs to be below the fire door and the cab needs to be sitting on said deck.
Speaking of all this, I got on paint and made a cab side template. I then transferred that image to my Cricut Explore Air machine and cut some light cardstock. I glued that to a piece of cardboard and made a mock cab side to see what it would look like and give me a length perspective.

Here is the image made in paint.

And the cardboard mock up.
Edit: After measuring this mocked up it is about 10 inches from the back (I am now leaving the little lip behind the tank) to the front of the smoke box. Leaving about a half an inch for the link and pin coupler that will be mounted to the rear truck That gives me 10 1/2 inches. I have 1 1/2 inches forward of the smoke box for the gypsy winch and front fixed coupler. I also have 3/8 under the smoke box back to the boiler support. Taking out 1/2 inch for the front coupler that leaves me 1 1/8th for the gypsy winch. Now with that. If I make it so the cylindar and rods are between the boiler support and steam chests then the only thing that needs to be in between the boiler support and the end of the pilot beam is the drum and associated drive gear and that sort of stuff. I think I got this.
Yes, but in front of the back wall of the cab (in front of door way) is where a step up is ok. Flat beyond.
How dare you do it your way??? Me so funny!
I hope you have mellow hogger, other wise keep the kids away when he’s oiling!(http://www.largescalecentral.com/externals/tinymce/plugins/emoticons/img/smiley-wink.gif)
Carry on.
John
Well I went to a train swap meet today. I bought a box of junk for parts. In it was a cheap scientific toys tender. I got to looking at its truck and it might work for this loco. It isn’t horrible looking and the size looks good to me. I still like the other Bachmann ones as well though. The thing with this one is the very small wheels it works for the height of this loco.

I am not totally sold yet but am keeping it in mind. A truck mounted coupler would have to be fashion on but I think I can manage.
I am try to mass some of the parts so I can see how I will need to put it together. I am going to build the cab before I do much of the frame and deck restoration. That way I know exactly what I am up against.
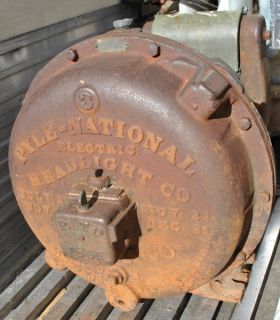
OK its ahead of its time but I was thinking about detailing parts. Seeing what I had versus what is available versus what I can make. One of those items is the dynamo. I have several of the B-mann ten wheeler ones in the parts bin. I also have seen some very nice ones listed, I am especially fond of the Precision Scale ones. But to be honest I am inspired by Jean-Gilles homemade details and remembered how rewarding it was to do the 2-6-0 details from scratch. So I figured what the heck I will give it a shot.
Here is the prototype. I like this one because it is different. It has a square side on the generator end instead of being bulbous. There are great views of this exact generator on the web so it was easy to model from.


And here is what I came up with. Comparing it to the B-mann
.jpg)
.jpg)
.jpg)
.jpg)
.jpg)
It still needs a steam inlet pipe fitting and of Course an electrical wire will be ran back tot he cab when its ready for that. I made the steam turbine side by using a hollow hole punch and cut out various disks and glued them together and sanded to shape. The bars between are I beam cut down. And the generator side is various bits of bar stock and tubing and the end is two piece of channel glued together. I am happy with it.
Bravo!!
But a thing saddens me: you would not have inverted turbine and dynamo? Because on the original, on the part where there are the inscriptions, it seems to me to see a kind of socket and not of exhaust there and which says entered vapor, says taken out. But maybe that I am wrong
That’s a lot classier! Nice job.
Funny I was thinking details too. This might help you design your Gypsy set up…

You can see the big gear on the front axle. There might have been an idler that shifted between the axle and the drum gear.
Falk gypsy.
John
Jean Gillis,
No I definitely have the turbine side and the generator (dynamo) side right. If you look at the original on the square side in other pictures you can see the coil and wire connections. So I am confident I have the exhaust on the correct side. However It is not in the correct location. I took a bit of artistic lisc and put it in an easy spot Other types have it in this location as part of the cast housing. This gave me a solid mounting spot.
Ok. Good job; I go to sleep
John that is a great picture for sure. An I had something very similar in mind but wasn’t quite sure how to pull it off. Now I do. Many of the winches have twin cylinders and quartered drive wheels on either side of a shaft that the drive gear that in turn turns the big gear and drum. Using your picture above I can run the cylinders down the side like this one and put the shaft with the small sprocket under the smoke box and then the big gear and drum in front of it. Very cool.
I also noticed on this one that it is capstan type where the rope is only wrapped around the drum for “traction” and the rope would be feed onto the ground or where ever, not wound onto a drum. While others have the cable or rope wound onto the drum. Some even do both. I am doing the drum style where the cable is spooled onto a drum. But same concept and would work great on the above set up.
Devon,
Nicely detailed dynamo! 
OK so John’s picture inspired me to work on the front of the loco. So added the front frame rails and a pilot beam. I started to fab up the winch. I am using gears out of an old VCR/DVD combo that quite working. The spool is from some fly tying thread that ran out years ago but kept the spool for some reason . . .now I know why. I also chopped of the headlight. I fabbed up a stack from the swap meet box of junk. Its a New Bright stack that I cut the pipe off and added another that matches the diameter of the old base. Not sure if I will use it but it is there now more for looks. I am going to order one from Bachmann that I like and see how it looks. I threw the dynamo on there to for perspective and I am glad I did. One very glaring thing that I do not like at all is the position of the stack. With the cab so far forward the stack looks way to close and to much smoke box is sticking out front. I am going to carve off the old stack base and make a new one and then flip flop the dynamo and the stack.
.jpg)
.jpg)
Looks great so far!
What are you using to cut up the plastic ?
That tender was cut so clean.
Devon,
With the steam dome inside the cab, how are you going to address the pop off valve(s) and whistle? (http://largescalecentral.com/externals/tinymce/plugins/emoticons/img/smiley-undecided.gif)