Large Scale Central

SD60f Build

Boy, what an impatient bunch. (http://www.largescalecentral.com/externals/tinymce/plugins/emoticons/img/smiley-smile.gif)Thanks for all the feedback. Now that summer has hit, there will be some breaks as I’ll be travelling a bit.

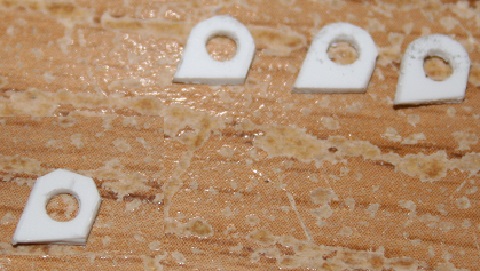
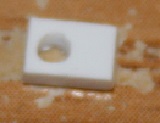
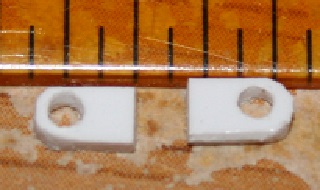
I am working hard on it. I’ll get another update complete over the weekend. It’s getting tedious with all the small details, so while progress might look slow, it’s not due to lack of work. It took an entire day to cut out and apply Burl’s hinges to the center section.

I made a trip to Roundhouse Sales in Edmonton last week and was saddened to discover that after 51 years they are closing their doors. Hobby shops are becoming a thing of the past. I scooped up $125.00 worth of brass rod for $37.00. (70% off).

Craig, are you talking about Aristcraft, or has somebody else gone out of business?

Sean will be happy to know that I’ve acquired some more green tape. (http://www.largescalecentral.com/externals/tinymce/plugins/emoticons/img/smiley-wink.gif)

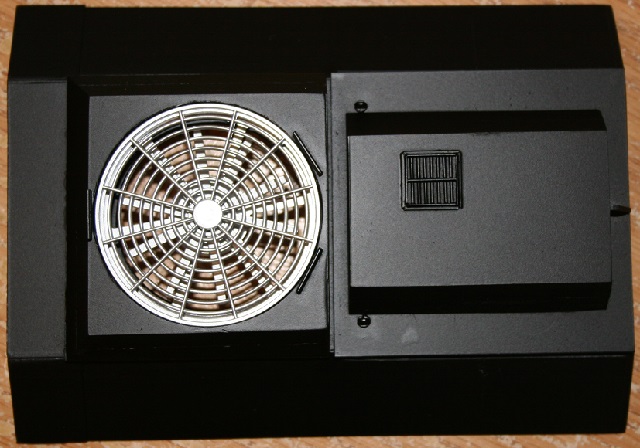
Here’s another teaser. I’ve ordered some screen that I hope will work for the tail end vents. Hopefully I’ll have it in a few weeks.

I was referring to Aristro, and there long promised, but never designed SD9…

I know how it goes with scratch building. Its a slow process, but worth it in the end. I’ve been grinding on my build for a long time too.

Yes Craig, it can be slow. Sometimes I get stalled because I come up with solutions that require ordering more supplies. (http://www.largescalecentral.com/externals/tinymce/plugins/emoticons/img/smiley-smile.gif)Scratch building can be a money pit.

Okay, let’s see if we can get the taper complete. We’ll start with 4 pieces of .02 x .25" styrene cut 2 1/2" long.

Divide them lengthwise into 3 sections measuring 1/16" | 1/8" | 1/16". On the fronts, mark 1/4" in from each end and cut off the corners to the first 1/8" marks.

Draw a line connecting the rear 1/8" marks.

Mount one in the bottoms of each of the two rear vents. These pieces overhang by 1/8", so the cut off corners end up flush with the fronts of the frames.

Take some 1/16" styrene and cut two 13/16 x 2 1/4" pieces.

Take your two remaining pieces from the previous step, and mount the above pieces centered and in front of the 1/8" lines you drew.

Now flip these over and mount one on each side as shown below. The tops will be flush with the outside of the frames just like the bottom, and the bottoms attach just like the tops in front of the 1/8" lines.

Now you’ll need a piece on each side to fill the top gaps. They should be around 1/8" on the one end to 1/32" at the other. Mount these at the very back of the tops.

Now the vents you took off of the SD45 should fit snugly between the top and bottom frames. The tabs will go through the holes at each side, but the pinch of the frame should be enough to hold them. You can permanently secure them if you want to, but I have kept mine removable. You can test fit now, but keep them off for now to facilitate painting.

Now on the inside of the front vents, we need something to keep the birds out, or I guess bugs in G scale (http://www.largescalecentral.com/externals/tinymce/plugins/emoticons/img/smiley-tongue-out.gif)I purchased some decorative ribbon called tulle from the craft store for this. I cut a chunk for each side, and glued into place. I glued a small piece of styrene on each side and the bottom to help it bond to the styrene below.

Now you can paint the taper and install the rear vents.

Now this is a good time to screw on the tail, and test fit the center. Sand if necessary so that the center fits into place. You want it snug, but not tight. If you need to sand, try to sand the taper and tail as shown by the green arrows. You don’t want to sand the middle section if possible as it will effect the gap between the sections.

When sanding, don’t grip the fuel tank too tightly or you may pop a joint like I did. (http://www.largescalecentral.com/externals/tinymce/plugins/emoticons/img/smiley-surprised.gif)

Now we’re going to move to the taper roof detail. Start with a 1/16" piece cut 2 3/4 x 2 5/8".

Mark it up as shown below.

Now we need 2 pieces of 1/8" styrene cut 1 7/8 x 2 3/8". Glue them together, and sand the long edges at 45 degrees to a sharp point. If the ends are rough, you can clad them with some .01" styrene, or sand and fill.

Mount this on top of the 1/16" piece between the lines you drew.

Mount this at the rear of the taper roof, 1/4" gap to the rear and 1/8" gap to the front. Leave a 1/32" gap at the rear of the roof.

This is a 5 Star thread. Thanks for all the work.

Thanks Steve. I’m glad you’re enjoying the build.

Let’s see if we can complete the taper roof. We’ll need a piece of .04 x .25" styrene cut 1/4" long. (square)

Cut off the right top corner 1/16" from the top left and 1/32" from the bottom right. Drill a 1/16" hole about 1/16" below the top, and centered between the two sides.

Mount this at the center rear as shown below.

Now let’s go fishing. we’ll need a couple of small fish hooks. You want the hook eye to be about 1/16". Cut off the eyes with about a 1/4" length.

These go on each side of the front of the panel. Keep them 1/4" back from the front of the raised center, and 1/16" from the 45 degree slope. The hole size will depend on your hook, so you’ll have to figure out what size to drill.

Insert your hooks. You will probably need to use some pliers, and mine took a bit of force. You will not hurt the hooks, but be careful not to slip and damage your styrene.

Optional - I added a base to the lift rings. I punched a 3/32" circle out of .03" styrene, drilled it, and applied to the hook before inserting them into the roof.

Now we need a small vent. We’ll build the frame with 3/64" angle. Cut four pieces with an inside length of 7/16" as shown below. All corners are cut at 45 degrees.

I glued these pieces onto a metal straight edge. This helps you glue everything square.

Now for the grate we’ll use .025"rod. Cut eight 7/16" pieces. Place 7 into the frame, soak them with solvent and get them all evenly spaced using the blade of your x-acto knife. When you are happy with the spacing, glue the remaining piece across the top.

Let it dry a little, and then carefully cut it away from the straight edge.

Apply this on the top 1/2" from the front, and 1/8" from the right side. I wanted the grate running front to back, but after getting it all set in place, I discovered that my grate was running from side to side. Bad Shane. (http://www.largescalecentral.com/externals/tinymce/plugins/emoticons/img/smiley-surprised.gif)

Now for the dynamic brake fan housing, we’ll need two pieces of 1/8" styrene and one piece of 1/16" cut 2 3/8 x 2 5/8". I decided to use the USA trains SD70 DB fan.

Glue the two 1/8" pieces together, and mark the long (2 5/8") sides as front and rear. Mark a center point as shown below. Notice that the rear measurement is only 1 1/16". Sand the sides and front at 45 degrees to sharp points which will bring them down to 1 1/16" to match the rear. Glue this on top of the 1/16" piece.

Place this on the roof 1/32" in front of the other section and drill a guide hole through the housing and roof. (DO NOT glue to the roof) Notice the sides of these panels overhang the sides of the flat roof by about 1/32". This is correct.

Drill a 2" hole in the fan housing, and a 1 3/4" hole in the roof. Your DB fan has two clips on the bottom which need to be cut off to give it a flat bottom. (not shown)

You can now glue the housing into place on the roof. Remember to leave the 1/32" gap at the back.

Now carefully sand the outside edges of the roof to match the curves on the cab and middle section. Remember you just want enough for a defined curve, nothing drastic.

Now we need some lifting points for the fan housing. Take some .03 x .1" styrene and cut three 7/16" pieces. Drill a 1/16" hole in the center as shown below.

Now if you look at your DB fan, notice how it is divided into twelve sections. If you place the fan with a section centered at the front, secure the lift points at the front, and in the sections to each side of the rear as illustrated below.

Now we need to add four panels, and then the top of the roof is complete. All panels are .01" styrene. cut two 5/8 x 1 1/4" pieces and two 13/16 x 2 5/8" pieces. We’ll start with the two small pieces.

Mount these on the front corners. Leave the overhang until dry, and then fold and glue around the curved edge. Once dry cut off the excess.

Now the long pieces attach on each side of the rear. Before attaching, using a razor saw, cut a dividing line part way through at the center point. (green arrow) Use the same technique you used when making the side doors for the middle and tail.

Now mount them centered with the rear panel, and centered on the sloped side of the roof. (red arrows)

Hopefully you now have a roof that looks like the one below.

It’s now okay to remove the fan and paint the top of the roof. DO NOT paint the bottom.

I could use some help from the minions. (http://www.largescalecentral.com/externals/tinymce/plugins/emoticons/img/smiley-wink.gif)Mind you, it may end up looking like a unicorn.

Okay let’s see if we can complete the center section detail. We’ll need some hinges from Burl. (Thanks Burl) This step is pretty time consuming. You’ll need to cut out all of the required hinges and then crazy glue them into place. It took me most of a day.

We’ll mark three lines on both sides. Measure from the bottom of the doors up 1/4", 1 1/4" and 2 1/4". DO NOT include the 1/16" space below the doors. The hinges are placed above these lines in the locations shown below. The space between the windowed door, and first four door set is too narrow for two hinges. I applied a hinge for the windowed door, and then filled the remaining space with a small piece of styrene for the lower part of the other hinge.

Now on the windowed doors, on the outside edge mark for drilling 1/16" in from the edge, and centered with the top/bottom of the door. Drill a 1/16" hole. Door handles will be added later to make it easier to tape and paint the stripes. You can see the modified hinges in this photo.

Now we need some lift brackets for this section. Take some .03" styrene, and cut four pieces as shown below. They are 3/16" wide, with one side 3/16" and the other 1/4".

Drill 3/32" holes centered on the square end.

Clip the corners as you see below on the lower left hand piece, and then sand to a nice curve like the upper pieces.

Note - These are a little taller then the prototype to allow the base to be reinforced.

Mark all four lower corners of the sloped roof sections 1/8" from the ends (not including the 1/16" end trim) and 1/8" from the lower edge.

Mount your brackets in all four corners. I added some .025" rod on both sides of the base to add a little more strength. (not shown) I figured they would look like a weld at the base. (This does not match the prototype)

Now we need some lift rings for the exhaust section. We’ll use some .04 x .125" styrene. We’ll need two 3/16" pieces with a 1/16" hole. These pieces are small, so it’s easiest to drill the holes before cutting the pieces off. Center the holes at one of the ends.

Make two.

Sand the ends around the hole into a smooth curve.

Cut them in half giving you four pieces.

On the front and rear of the exhaust section, mark 1/8" in from each side, and mount the above pieces to the insides of these lines.

They should end up flush with the top.

Hopefully you have a middle section that looks like the one below. I had to do a little filling and sanding on the sloped part of the winter hatch.

You can now paint the middle section. Paint inside and out.

Well it’s slowly starting to look like something.

were you at all tempted to make a door open? of course that would mean having a detailed inside, which would be difficult

Awesome job, I keep saying with these instructions I could do one too… except for time tools and dexterity and paitence involved. Keep up the work and the pictures.

“I/6” from the edge" is beyond my eyeglasses at this point, but I sure enjoyed seeing this build!

Fantastic!