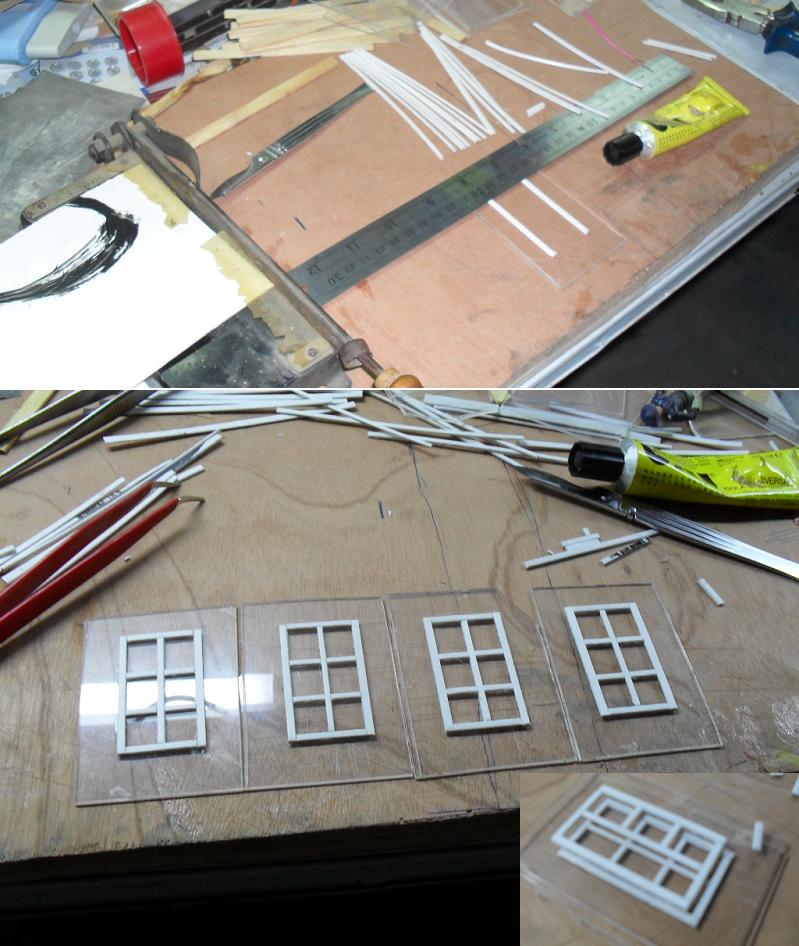
Why Yes, Pete, he (I) did. Here’s one of the original photos, plus some new ones. OK, Jake, to your questions. In reverse order–tools. An xActo number 11 hobby knife, Northwest Short Line Chopper for cutting and replicating the size of various pieces and for cutting angles for corners and such, various grades of sandpaper or sanding sticks (for when things come out a teensy bit too long), something to work on that preferably your work won’t stick to when the “glue” oozes out (I use a large sheet of glass, as most things don’t stick to it), a set of small metal squares (available from Micromark) to keep the corners true, a steel ruler (available at art supply stores), something to hold your work in place (sometimes I just use the inside of one of the squares). Of course, you’ll need some styrene strip and “glue,” which is actually solvent cement that melts the styrene and welds it together. I use MEK a lot, but it’s no longer sold in Southern California (I stocked up). Plastruct and other outfits sell cement and I’ve read that Testor’s works good. I also have three giant right-angle blocks, which can double as a square as they are machined to be true. Because they weigh about two pounds or more each I use them to weigh things down when stuff starts to flex. Not windows, but wallls, if you get into that. As for the size of the strip, I use whatever size styrene strip looks right for the building in question, and is appropriate for the scale–1:22.5 in this case. In other words, ya don’t want windows that have a frame that is, say, 15-inches wide, as the real thing ain’t that big. Mostly, frames are between two and four inches wide. Because I have a huge supply of styrene strip I sometimes just mess around until I pick one that looks prototypical. Of course, if you’re working from plans, then the choice is made for you. Pick the size that matches the plans, which you’ll want to enlarge on a copy machine to large scale if you’re getting them from a magazine such as Model Railroader, where plans are usually in HO scale. The windows shown here have inner surrounds, which position them in the window hole when you get around to that part. The outer frames are attached to the top edge of these guys (see photo). On my latest project, my two-story house, I measured and cut .030 x .156 strip to size and used the window hole as a jig, being careful not to let the cement spill onto the styrene wall and stick the frame in place for-evah. Putting the inner frames aside, I next made the top/outer frames using .060 x .188 strip These are pretty easy and I just used the inside of my square as a guide. First you measure and cut the top piece, then the sides, which must be identical in size (this is where the Chopper comes in). Stick 'em all together and attach the bottom piece (the sill), which is the same size material turned on edge and cut a little longer so it overlaps a bit–just for appearances. Now for the hard, or harder part, the sash, which is the framework that holds the glass and fits inside the frame. Because this is a simple window, I just repeated what I did making the frames, using .080 x .125 strip for all sides and using my small square as a jig. When the little squares were completed, I added the muntin, which is the thingy in the middle that divides the two panes of “glass.” Because this is a simple window, I merely fitted the tiny piece of .060 x .080 stip into the surrounding sash and positioned it until it looked centered. I have a pretty good eye and can kinda nail the center without measuring to find the halfway mark. Again, this is a simple window. If you want a window with lotsa panes–like the ones Bruce and others have made, you’ll need a jig. As I recall, Bruce made his of wood, which is cheap and easy. But if you’re a sloppy gluer like me, you’ll find that solvent cement and melting styrene will stick to wood, so you might consider something else. I thought about getting small pieces of glass and actually had a glass guy cut some small pieces for me (you’d need a bunch of these little squares to make a nine-pane window), but so far I haven’t used them. I’ve also been thing of using Lexan, which I could cut myself. BTW, make sure you have something to keep your work stationary, 'cause it’ll start sliding around and drive you to drink (it did, I do). How’s that, Jake? Meanwhile, some photos.
(http://freightsheds.largescalecentral.com/users/joerusz915/_forumfiles/Windowframe1.jpg)
Using the window hole as a jig to fit the pieces of the inner frame together and hold 'em in place while I nail them with some MEK.
(http://freightsheds.largescalecentral.com/users/joerusz915/_forumfiles/Windowshowto1.jpg)
The inner frame and the outer, which is pasted on top of the former. I made 18 of these puppies.
(http://freightsheds.largescalecentral.com/users/joerusz915/_forumfiles/Windowshowto4.jpg)
My workshop, which is actually our kitchen and dinning room. I’m not very neat, but at least I know where everything I need is located. By the way, those large blocks on the counter are those giant squares I mentioned. I’m using them to keep the porch roof of my house from flexing until the Weld-On 16 (the syrupy stuff I use for bigger work) sets up. Best left to sit overnight.
(http://freightsheds.largescalecentral.com/users/joerusz915/_forumfiles/Windowshowto2.jpg)
The finished windows installed in the front wall. The pieces running across the wall will support the porch roof and the porch floor.

