Large Scale Central

Scratch Building a Switch

[quote]The plans in GR has 2 strips of wood underneath that run the length of the switch to give it strength. On my layout I have all my switches on patio blocks that give them a solid base and helps to keep the dirt out of them. The placement of the switches I want to build will be on a elevated bench where a yard will be located so I can’t do the strips but I was thinking about a piece of thin plexi to keep them rigid. [/quote]

Todd,

I’ve made a few switches in my time, and I agree with all that has been said here - especially the bit about satisfaction. Once you have some confidence, you can build a 3-way or curved switch that will uniquely fit your railroad but can’t be acquired commercially.

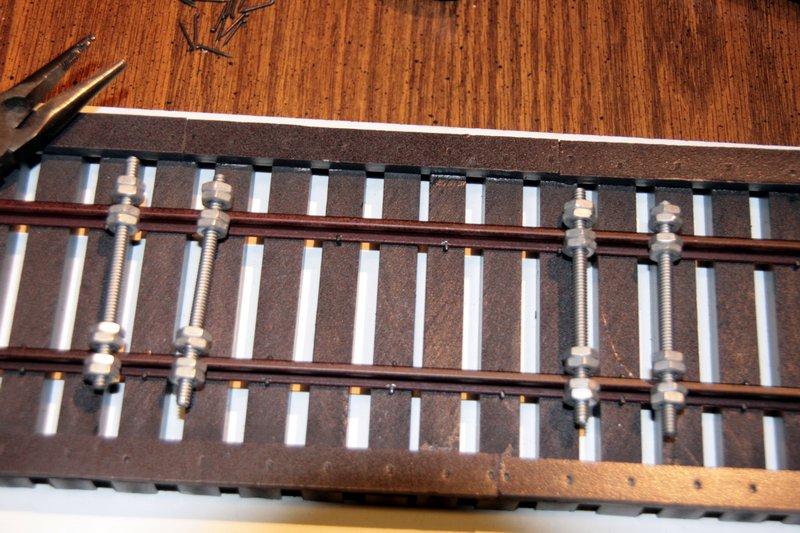
The battens/strips underneath hold the ties in place while you are making the switch - until you attach them to the rail there is nothing to stop them moving. Once it is done, they can be removed (although some strength will be lost.) You could make the switch on a flat piece of plywood using double-sided tape to hold the ties in position. Or use plexi.

I have plans for a variety of switches, including D&RGW ‘official’ drawings, showing the number and sizes of the ties. But they are ‘scale’ drawings, and if you want it to match your existing track, then (as suggested) copy an existing switch.

I HAVE TO place a full size piece of wood or other material underneath my switches.

The ants make little mounds that will clog both the switch stand, and the rail movement!

YMMV

Source for the “bits” like spikes.

I had a look and at switchcrafters the UPS shipping was more money than the bag of spikes. Is there another source for switch building parts like the snap gauges and 3/8th medium spikes? Does anyone make a plastic frog for a number 5 or 6 turnout?

Hey Todd,

I haven’t found anyone cheaper than Switchcrafters. I know that the shipping might sound high but I know that Bruce only charges what it actually cost him to ship it. Beside remember if you’re getting the 3/8 med spikes, you might as well get the “Spiker” too. You won’t regret it!

As far as gauges you could make your own out of a hardwood like Oak, I’ve done that. Infact I still use them when I spike my track on my bridges. I’m not sure if Llagus Creek has code 332 gauges, but maybe someone else can chime in.

I don’t know of anyone making switches thats going to sell them for under $50.00.

Chuck

Todd Haskins said:

Source for the “bits” like spikes.

Does anyone make a plastic frog for a number 5 or 6 turnout?

Somebody used to. I remember seeing one but it was awhile ago. It may have been C&OC RR but I don’t think they’re around any more.

I made my own awhile ago out of a chunk of styrene all glued up to about a 1/4" high and about 1x1 1/2 ". Then filed grooves in to it for the flangeways. Used that as a master and cast a bunch more. Stull use them on occasion.

That’s them at the bottom of the pic:

(http://rgsgardenrailroad.com/2013/switchtools01.jpg)

I will have to check back with switchcrafters. One bag of spikes was $9 and the cheapest UPS shipping was $13. $22 for little nails is kinda steep in my mind. Maybe shipping USPS would be cheaper but I don’t want to insult Bruce by telling him how to run his business.

Nice frogs Ken. I could make my own gauges.

Thanks guys.

If you’re going to make more than one or two switches, you may want to buy the big bag. I think the little bag will only do about 2 switches using that spiker - 4 spikes per tie per rail.

When I did my switches, I got a bunch of cast frogs and points from somewhere…I’m thinking perhaps Clem at Warrior Run - http://www.warriorrunlocoworks.com/ Clem is a nice guy to deal with; he’s usually at the ECLSTS.

I like the three point track gauge and have two that I use when making my switches.

Todd Haskins said:

I will have to check back with switchcrafters. One bag of spikes was $9 and the cheapest UPS shipping was $13. $22 for little nails is kinda steep in my mind. Maybe shipping USPS would be cheaper but I don’t want to insult Bruce by telling him how to run his business.

Nice frogs Ken. I could make my own gauges.

Thanks guys.

Well, I’ve done it to other sellers. As a Canadian I have come to the conclusion that many US sellers think sending stuff by courier is cheaper and faster than USPS, they figure they’re doing the customer a favor, and they’re surprised to learn a few ugly truths.

Sending stuff by UPS or Fed-Ex up here to Canada is a nightmare!

These Companies charge the Canadian receiver a minimum of $60.00 at his front door. That’s for Customs Brokerage, an expense that doesn’t exist for Stateside shipments. That’s on top of the extra “overseas” charge.

I ask US suppliers always to use USPS. That comes with additional expenses tax and ‘service’ charges imposed by the Canadian Gvt., but not quite as bad as those brokerage fees.

In any case, as the customer, who is after all paying for the shipping and who knows how urgent or not urgent the shipment is, you’re quite within your rights to request your seller to use whatever shipping method you prefer, and in my experience he will be happy to accomodate you.

Your request, if it’s

a) politely worded, and bonus:

b) includes an explanation, may even teach him something he didn’t realize before. I’m convinced many of these sellers make their shipping decisions automatically, without giving it much thought.

These days shipping costs are a major consideration for everyone, every customer is different, and sellers realize that accommodating special requests is just part of the job.

The snap on track gauges are Micro Engineering products. I got mine when I purchased two #6 switches many moons ago. Suspect the spikes are also Micro Enginnering products as well. Stretch did make some plastic frogs at one time, but as said his business is long gone. Personally I do not mind making up the frogs from Nickel silver rail, the points can be fun however.

Switchcrafters will send whatever way is cheapest. I’ve gotten things from him USPS and UPS.

Terry

Also living in Canada, I have to agree with John, most US dealers are unaware of the charges that courier services levy on cross border shoppers. I have found over the years that almost every dealer, when asked politely and accompanied by a short explanation have been quite willing to ship via USPS. I can only recall one who refused and I just simply told him, no thanks, and took my business elsewhere.

Ron

Bruce Chandler said:

When I did my switches, I got a bunch of cast frogs and points from somewhere…I’m thinking perhaps Clem at Warrior Run - http://www.warriorrunlocoworks.com/ Clem is a nice guy to deal with; he’s usually at the ECLSTS.

I like the three point track gauge and have two that I use when making my switches.

I used Llagas Creek cast nickel silver frogs on one or two switches. They are nice and save a lot of work. They also make point blades (probably what Bruce found at Warrior Run.)

I made track gauges by cutting a yard stick into smaller pieces - about 3 inches - and slotting the stick at 1.75" for the rail head. Three of them could hold the switch in position.

(http://gold.mylargescale.com/petethornton/Trackbits/OldGR4%20locating%20frog.jpg)

I made some quick ad dirty gauges from threaded rod and nuts. I used my micrometer to set them and tested on factory track…

(http://lsc.cvsry.com/Post2/E-Escap-e_34.JPG)

Very clever Jon!

:slight_smile:

Very clever, once again you guys are showing your ingenuity with those home built track gauges . Where there is a will there is a way.

The switch project has been pushed back to simmer. I got my GR mag yesterday and there is a article about building a jig to make a standing seam metal roof that looks really neat. My windmill tank project is just about done except for the small doghouse on the side and a seam roof would look really neat on it.

I will try again at getting the spikes.

Todd

I use three of Kadees coupler height gauges. They have little tabs underneath that are set at the correct distance.

I have three because I couldn’t find one when I needed it, so I bought another one. Then I couldn’t find either…

It’s a good thing I don’t have four of them. :slight_smile:

Here’s the way I build my turnouts. http://www.rhb-grischun.ca/html/tra.html

Nice write up Hans Thanks. Your switch building technique looks like it makes for a very sturdy and robust turnout.

Good advice at the end. I have ordered the spikes and will be trying my hand at this soon.

Thanks for all the advice guys.

That’s a really good writeup Hans. Todd, follow this man’s advice and you won’t go far wrong. He even tell you to do the curved closure rail first; he’s right, that does make it easier, but most writers probably wouldn’t think to mention that detail…

On page 3, Hans says, and I’d emphatically underline: “Double check the position: Proper gauge to stock rail, proper flangeway clearance, proper alignment with frog! Once all of these dimensions are correct, solder rail to anchor screws.” As Hans says, and I agree totally, you really must get these things right.

When you make that all-important bend between the closure rails and the wing rails, get that angle plus the frog angle to make 180 degrees exactly. I know I did mention this earlier, ha, ha…

Don’t compromise on it, and the rest will fit easily. Get it wrong and no amount of fiddling will make it all work. In making my small-scale code 70 switches I started this bend with a vertical file cut inside the angle that also went through, say half of the railhead. I’d want to do the same with these large track profiles, and I’d also saw a matching cut through the railbase outside the angle. My reason would be to insure that the bend occurs 90 degrees to the running surface. I have had the experience of sighting down the top surface of one of these bent pieces to discover that the guardrail sloped away at an angle up or downwards. That’s no good either. Place this bent piece on a flat surface to make sure it sits flush. Your bend should be sharp. If the bend is ‘rounded’, you can expect to experience some bumping at the frog.

We’ll be watching…:wink:

Beautiful, HJ!

Could you provide closeup photos of notched in frog, filed point rails and guard rails, just so we can see what you’ve described making?