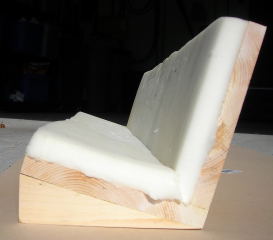
Anyone have any examples of what they use as a “repair cradle” to keep the detail parts in place while “manipulating” the goodies?
HJ, I took a scrap of 1” x 6” lumber and drilled holes for common wood pencils. The holes gave a snug fit, and a square pattern 3 1/2” x 10” was very useful. The pencils were cut off so that the ferrules holding the erasers were about 3/8” inch above the board. That worked well for holding boxcars and reefers inverted for changing couplers and oiling axles. Other hole spacings and pencil lengths worked well for cabooses and tankers. There are stronger, fatter pencils available which could be used. By cutting pencils judiciously, cars and engines could be held in various positions. Cheap and easy to make. I liked that the rubber erasers contacted the cars so the paint was protected. Sorry I don’t have a photo.
Here is mine, Hans. Completely adjustable as to angle. Built by Chuck Inlow of this forum.


Thank you, Gentlemen.
Now if Chuck could furnish a drawing complete with parts list … ![]()
![]()
JB I think what Chuck built is right on and if he could provide drawings etc. that would be great. (I think he did already many moons ago on this fora). No need for details and drawings of HJ manipulating “his goodies” though. 
Sorry gents but those carriers are cut out on my CNC Router and assembled for paying customers. I’m more then willing to assemble one and sell it to you, but I also understand that some people like to build their own.
Chuck
Chuck does the knob lock the plywood, at a point that is not the pivot?
I have a page on my site on these things, and I have some older information, if you want me to update or correct your information, just email me [email protected] with what you want changed, and you can send me more pics… high resolution please.
Here’s my page: http://www.elmassian.com/trains/misc-train-stuff/tools-aamp-accessories
Also I am starting a page on loco carriers, and would be happy to post pictures, contact info, etc.
Regards, Greg
Damn, I thought you only did Electronics, track and wheels.
I made a U of plywood and put foam in it. Works very well.
T
Ha ha John, you gotta get inside to put in the electronics. Have a mill, lathe and a few other toys in my shop.
first time I actually worked on trains was re-wiring my Lionel layout 4th grade or so, I determined electrical problems were my dad’s poor solder joints. From about that age on, I did all the soldering in the house, including house electrical. I was taking stuff apart and putting it back together before then. By that time, I had unscrewed everything and taken it apart except for the transformer. I
I was so little I could not swing the layout down out of the wall myself…
Been working on trains since then…
you gotta have a cradle unless you want to snap all the detail parts off…
Greg
Greg E Said "you gotta have a cradle unless you want to snap all the detail parts off…
Greg, the board and pencils I briefly described above allows placing the pencils so that detail parts are not touched. That’s one of the pluses of the approach, in addition to being cheap and easy to make.
I tried getting the quote thing to work, but need to study more to master that.
I have one similar to Johns but I bought mine. Later RJD
Oops we showed the wrong type of cradle sorry…
OK, basic design done.
I need to get some 3/4" ply in any case to line the tunnel from the garage to the outside. The height has been increased to allow for raised pantos.
I have some of that gray foam, and just pile blocks of it on my workbench to hold what I am working on. It got it free from some packaging, and the blocks are tossed up on top of my paint cabinet when not in use. Its a quick and dirty solution for me, and a cheap one too!
Hey Greg,
I don’t understand your question, “Chuck does the knob lock the plywood, at a point that is not the pivot?”
The knob is the pivot point and lock’s the cradle into the angle that you want to work in.
Chuck
Right, pretty much figured that out.
I have a cradle with a different locking system that works well too, I’ll shoot a picture this weekend.
There are 2 pivots at each end, they are just pivots.
There is a curved slot in the cradle and a knob that tightens from the base, where the bolt shaft rides in the curved slot. Since the knob is offset away from the pivot, it enjoys more locking for less tightening, and also you only lock on one end with one knob.
I’d like to show you this and see if you can duplicate it.
Thanks, Greg
Two foot pieces of 1x6 pine, and a small square of the same cut diagonally for the wedges.

Used in the angled position for motive power and rolling stock upside down.
Used on the flat side for motive power and rolling stock on its side.
I love the adjustable feature, so often you have to “peer down inside” something and getting the angle right really helps, although I will admit most time the loco is dead upside down.
The angle is sometimes easier to get the shell screws off.
Another thing I learned with diesels, example USAT, is that you have to hang the end of the loco out past the end of the cradle to swivel the trucks to clear the screws that are usually under the trucks.
Greg
I do not have a cradle, I use soft foam 1 inch thick. Details press into the soft foam and do not break.