(http://largescalecentral.com/externals/tinymce/plugins/emoticons/img/smiley-tongue-out.gif)
I finally made the grade…crossing.
While the Altoids tin seemed to be the ideal track support,

I was really having a difficult time getting to the Altoids. So, the time has come to make a proper grade crossing.
First, I dug out the area beneath the track:

I lined the bottom of the trench with landscape fabric and gravel. Then, I leveled some concrete block for the foundation. I had to make a diagonal cut at each end for a tight fit:

I made the grade crossing out of some grey composite deck material. I ripped the composite material so that it was slightly lower than the rail height. That way, it will not interfere with track cleaning (either with my LGB track cleaning loco or with the pole sander and Scotch Brite pad). Then, I cut a rabbet along the edge so that the composite material would fit closer to the rail.
The composite decking material does contain wood fiber and the process of ripping and rabbeting does expose the core of the material. So, just to be safe, I sealed the exposed bottom of the material with some Rustoleum rubberized sealer that I had. It might be overkill, but better be safe than sorry. I also added a re-railer between the rails. The grade crossing and re-railer are attached to the block with Tapcon screws:

Afterwords, I had to raise the level of the surrounding grass slightly, for a smoother transition.
-Kevin.
Nice addition Kevin(http://largescalecentral.com/externals/tinymce/plugins/emoticons/img/smiley-cool.gif)
Women’s work!
Thanks, guys! Oh, and shut up Rooster.
-Kevin.
Looking good Dude 
Ken must have sent you the hat. Looking good.
Thanks, again! I drove over the grade crossing for the first time with the riding mower yesterday. All is good! Leaf mulching season is right around the corner.
-Kevin.
Welcome to this weeks edition of “Mountains in Minutes.” Or maybe I should say, “Mountains in Hours.” Here’s a quick recap of the show…
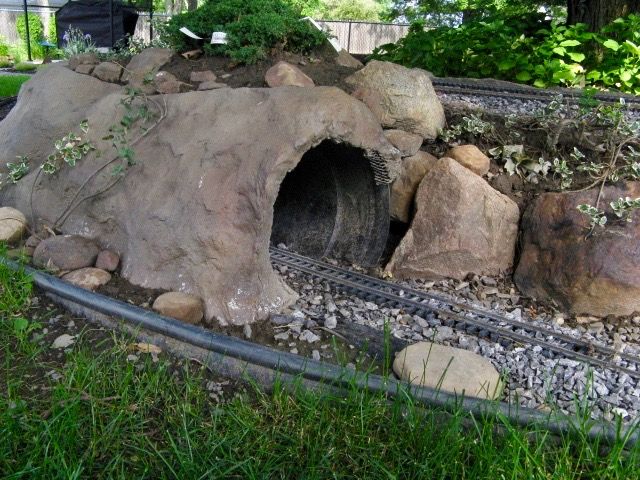
The lower line tunnel between Maple Curve and the new grade crossing looked too much like a piece of black plastic culvert material. Pretty much because it was a piece of black plastic culvert material. So, the time has come to change that.
Before starting, I pushed back the dirt and plants that covered the top of the culvert. Then, I covered the plastic culvert with metal lath material. I cut the lath to fit and then shaped it around the culvert. In order to get rock like shapes in the lath, I formed it around several different objects. The most important one… actual rocks.

The exposed edges of the lath are pretty sharp and gloves would have been a good idea, but where’s the challenge in that? Besides, in order to become one with the mountain you really need to feel the steel and get in touch with your bloody self.
Moving on…
I used Quikwall fiberglass reinforced surface bonding cement for my rock surface. I applied it to the lath with a small trowel then shaped and smoothed it by hand where necessary. Scraps of cardboard protected the track and surrounding area.


These action shots show the cement in its “green” phase. When it fully cures, it should dry to a light grey color, which is normally a great color for rocks. However, the other real rocks around this area are not very grey. So, when all is cured, I think I will try and wash over the concrete with some other colors to help it blend better. Once I’m done coloring, I’ll push back the dirt and plants and act like none of this ever happened.
Oh, and I’ll probably make some tunnel portals over the winter and stick 'em on in the spring.
-Kevin.
I use stucco tints to pre-color my cement. I mix it dry in the cement in larger batches so the whole building/project matches in color. Weather here can chip cement and having the color in the cement reduces touch up time.
John
Excellent idea, John. I was going to add some “Buff” color to the mix, but the tunnel is kinda short, so I skimped out (I know- poor excuse). I’ll try my luck at color washing the “rock” and do my best to color match to the surrounding area. The nice thing about your method is that the color is instant. I’ll have to wait 30 days or so for the cement to cure before I can color it. Oh well, color me patient. (http://largescalecentral.com/externals/tinymce/plugins/emoticons/img/smiley-foot-in-mouth.gif)
-Kevin.
Kevin
Great example of non "Devoning " (http://largescalecentral.com/externals/tinymce/plugins/emoticons/img/smiley-yell.gif)
A new word, Devoning, has been added to the LSC lexicon.
Kevin, I love How you put your BLOOD , sweat and tears into your work !(http://largescalecentral.com/externals/tinymce/plugins/emoticons/img/smiley-cool.gif)
Thanks, Sean. It certainly does prove that you can get blood from a stone.
Meanwhile, my green loaf of a mountain is starting to turn grey- fifty shades of it. I can’t wait to see which shade it finally settles on. It’s about as exciting as watching paint dry. Stay tuned.
-Kevin.
Don’t forget to mist it as it dries …
…Aaaaaaand, we’re back. Didja miss me?
Well the mountain did finally cure. Then winter set in. Then spring came. And it rained and rained and rained.
So, finally a bit of progress…
I wanted to try and blend the color of the concrete with the surrounding rocks. I started by sealing it with a concrete sealer (made to prep concrete for paint). Then I grabbed some rattle cans and went to work. I did my best to blend it with the surrounding natural rocks. Afterwords, I placed some plants on and around it with the hopes that they will grow on to the surface of the concrete.
Looks like this…

And the other side…
With any luck, the plant on top will grow downwards and the plants on the bottom will grow upwards. I should probably cut the tags off of my plant. Might give it less of a Minnie Pearl look.
I still need to make some portals. That was supposed to be the winter project. Oh, well.
Tune in next time… I’ve been moving dirt again.
-Kevin.
Kevin
Can we get some pics of the railway …how it looks now… trains on it would be a plus!
Sean McGillicuddy said:
Kevin
Can we get some pics of the railway …how it looks now… trains on it would be a plus!
Well, we can certainly get some pics of how it looks now… that is, if you like more construction pics.
The wet spring that Mother Nature sprung on us, has caused me to run a bit behind on the schedule. So, while I was able to run trains earlier in the season (in the rain), I cannot anymore. And for good reason…
More DIRT!
We had a dry spell last week and I was able to haul in what I hope is the last 12 yards of Holy ground. Yep, more cemetery dirt (hey, its free, what can I say). It is the start of the end… of big projects, anyway. The plan is for two large mountains at the north end of the layout.
The first mountain will be Mt. Keverest (you figure it out). It will be the starting point of our water feature. I dug out the waterway and the collecting pond at the bottom and lined it with the EPDM liner from the old layout pond. Mother Nature filled it for me (did I mention that we’ve had a lot of rain this spring?). All plumbing is in as well. The mountain is currently about three-ish feet high. The cinder blocks at the front are just temporary. I needed something to hold back the dirt while it compacts. I’ve got some bigger plans for the actual top and front of the mountain (stay tuned).
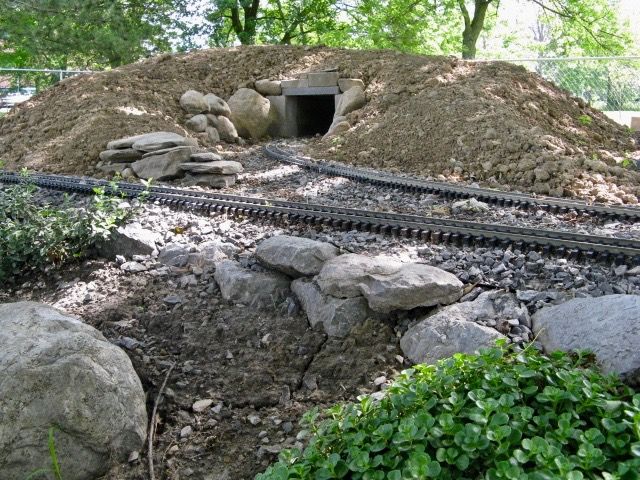
As you can see, the big black bridge was removed for construction. So, running trains on the upper two loops is not currently a good idea. I guess I could go point to point for a while. Anyway, if you look to the bottom right of the mountain, you can see a tunnel entrance that leads through the back side of the mountain. One of the upper loops goes through Mt. Keverest, the other goes around the back (sorry, no pics… yet).
The other mountain is behind Mt. K. And once again, one of the loops goes through the mountain and the other goes around the back. Here’s a shot of the tunnel.

This mountain will eventually get a different top as well.
-Kevin.
I love your progress!
Thanks Sean. You are too kind… or desperate for entertainment. I’ll go with “too kind.”
-Kevin.