Large Scale Central

RailBoss in a Bachman Side-Tank Porter

I brought my new (Spring ECLSTS) Porter with me camping this weekend with the intention of adding a trail-car connection and converting the LARGE/NMRA switch to a track/battery switch.

I spent Saturday drinking beer and thinking about the job at hand. You all know that the more you think about it , the bigger a job gets. I decided that since the Porter was destined to be the Yard Goat, negotiating the tight areas that my Connie can’t go, that it needs to be self-contained.

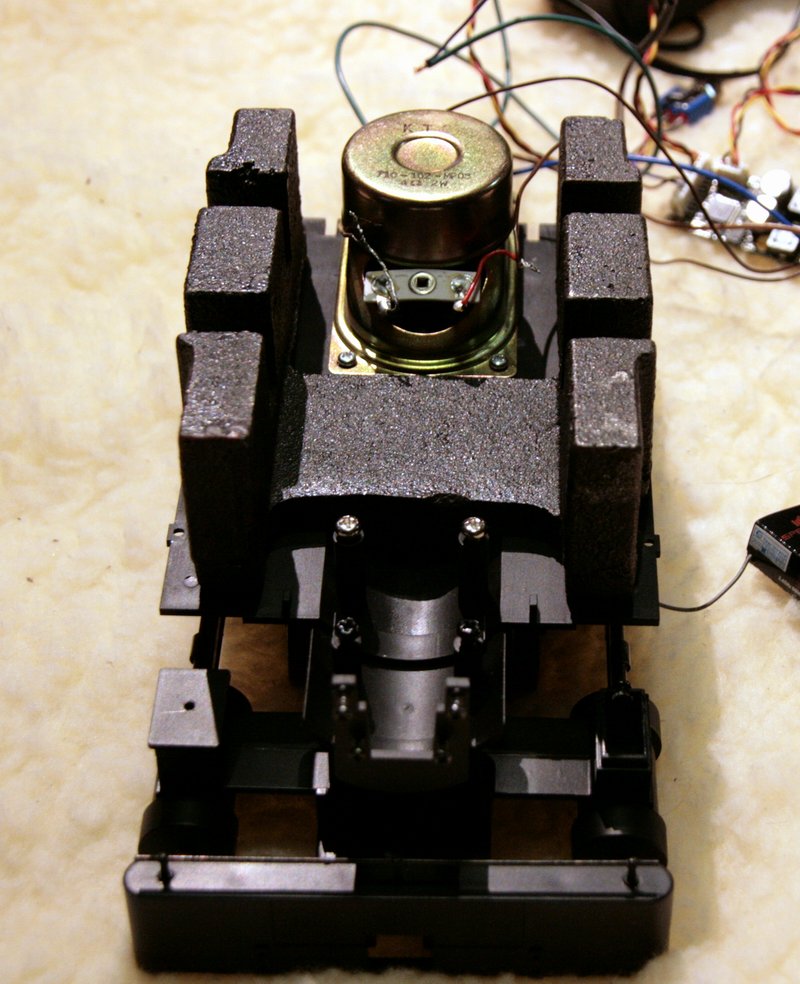
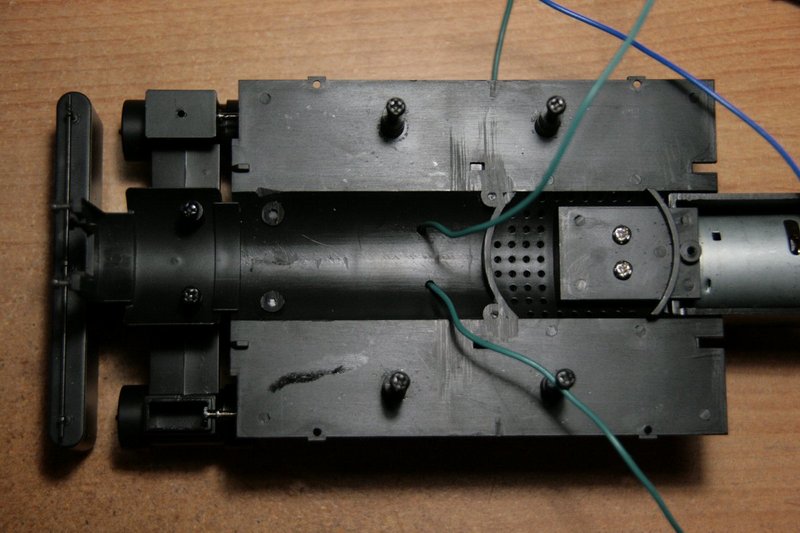
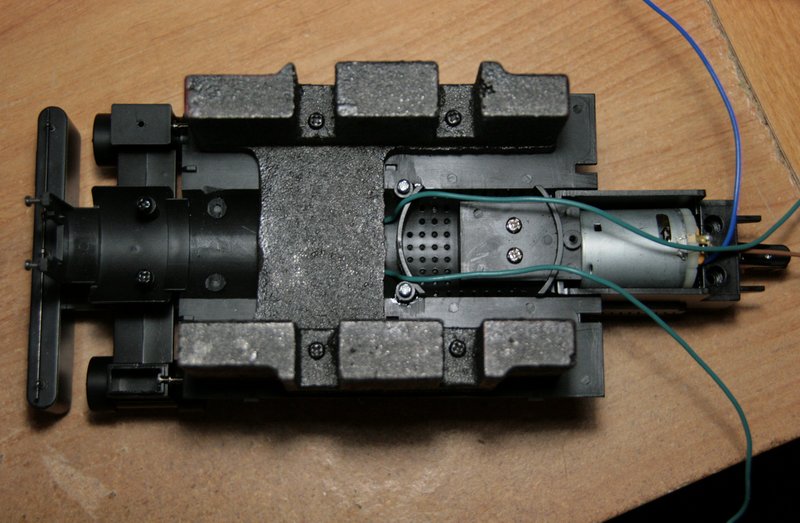
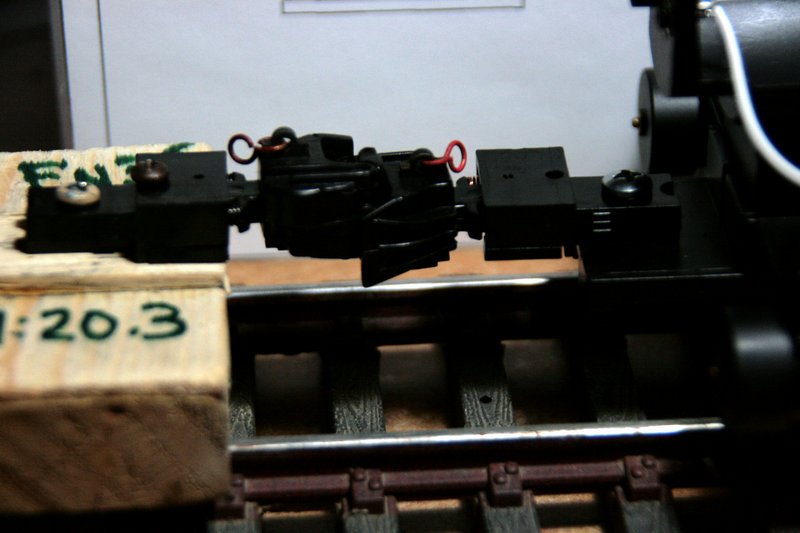
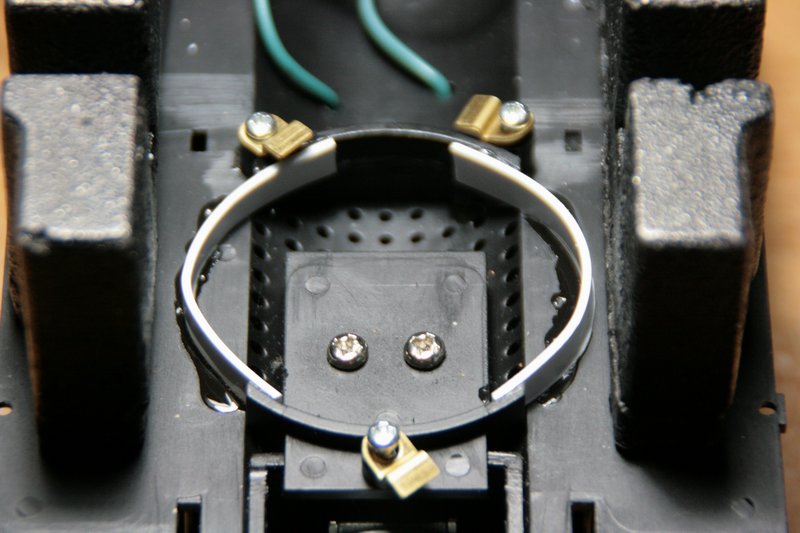
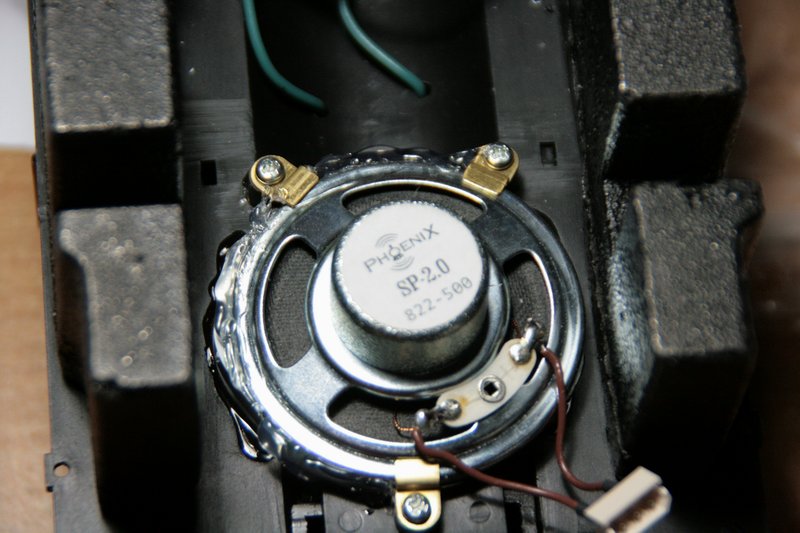
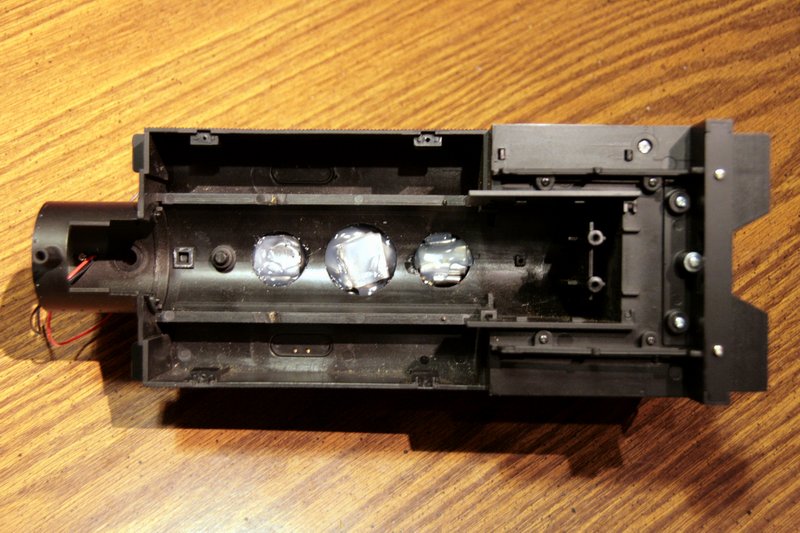
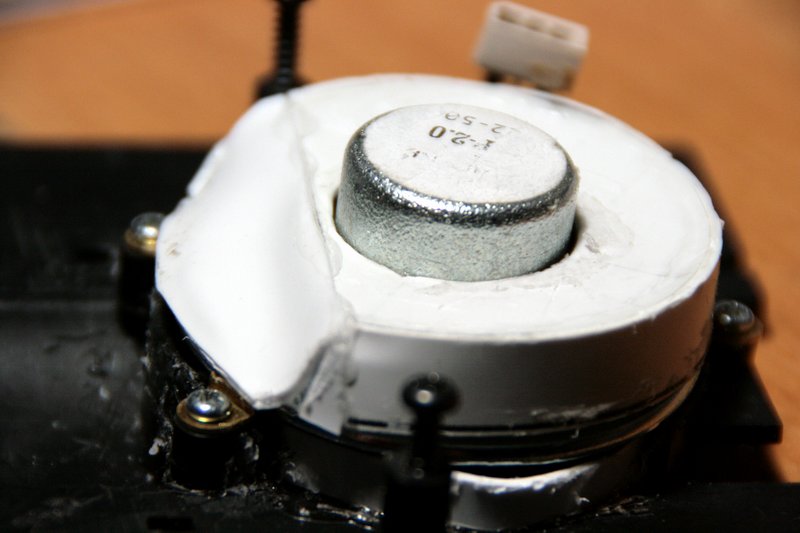
Sunday after breakfast I began disassembly of the Porter. Had I downloaded and read the shell removal instructions first, I could have saved a lot of time and had less parts to put back on. Once I got the shell off It didn’t take long to decide that the best strategy for wiring was to gut the electronics leaving only the motor and headlamp leads. Strange that this loco has a sound trigger drum, but there are no wires from it escaping the gear box. I remedied that situation.

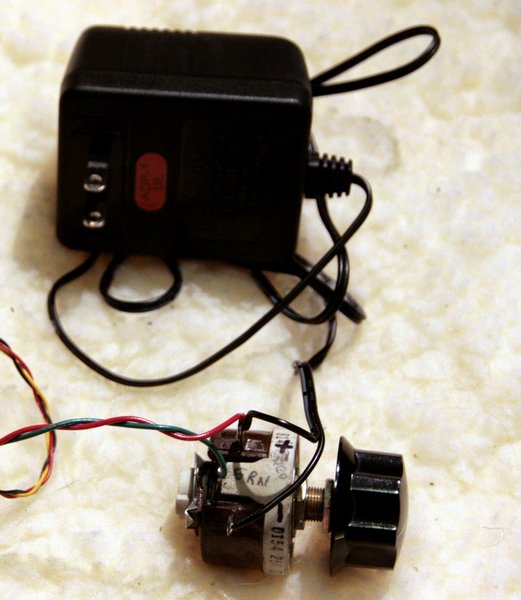
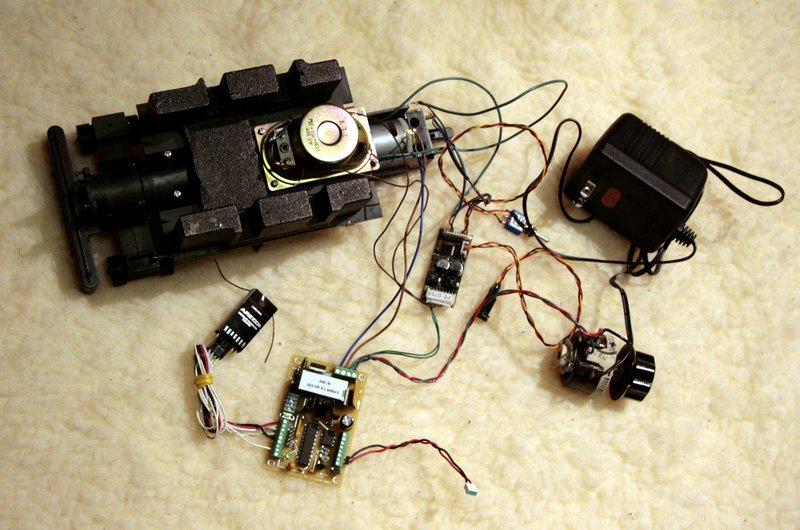
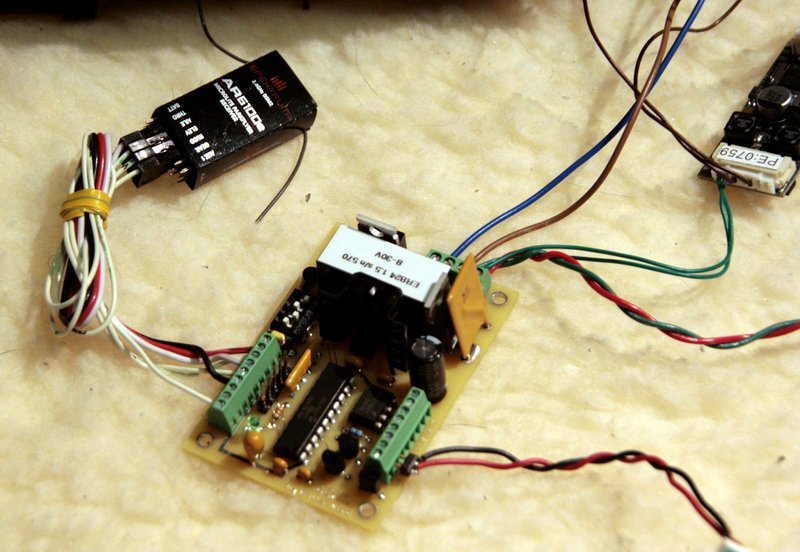
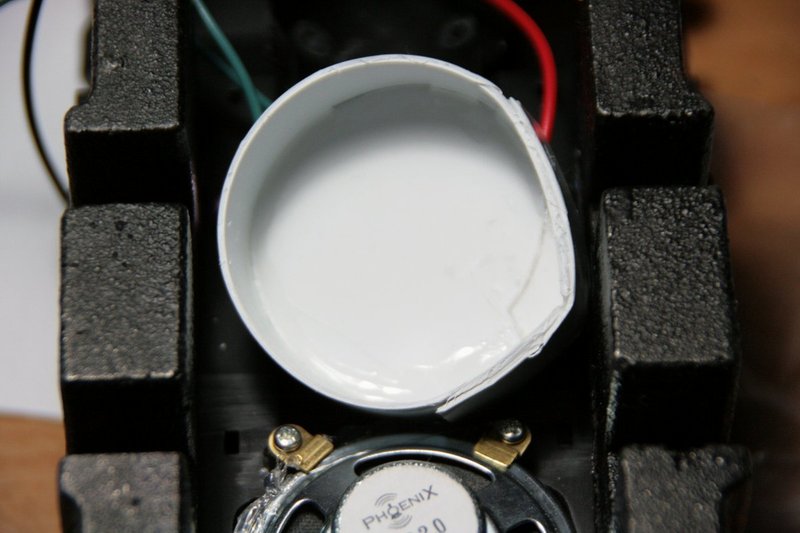
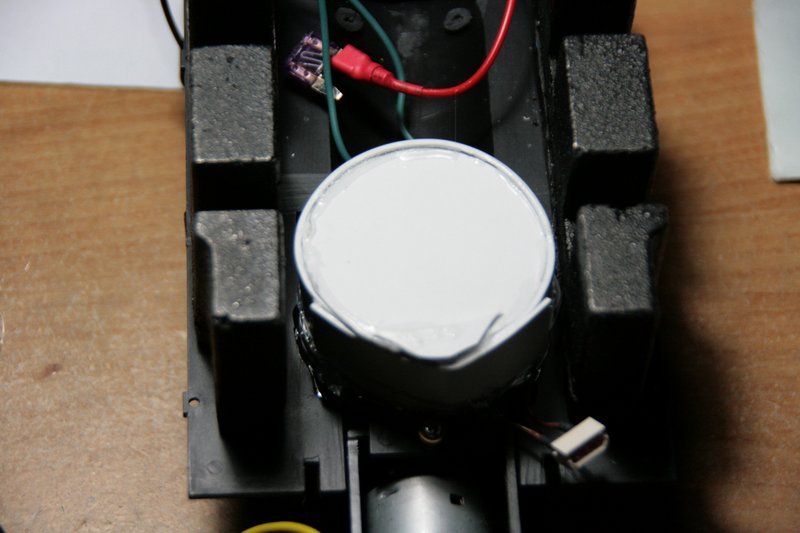
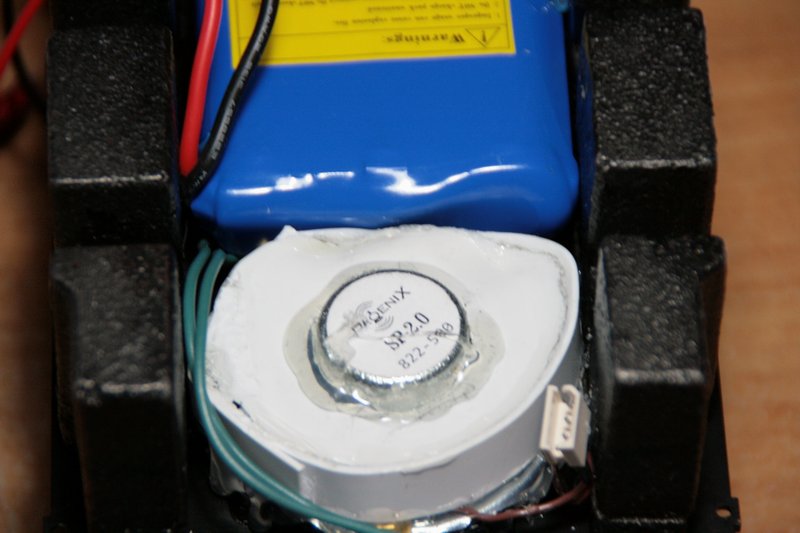
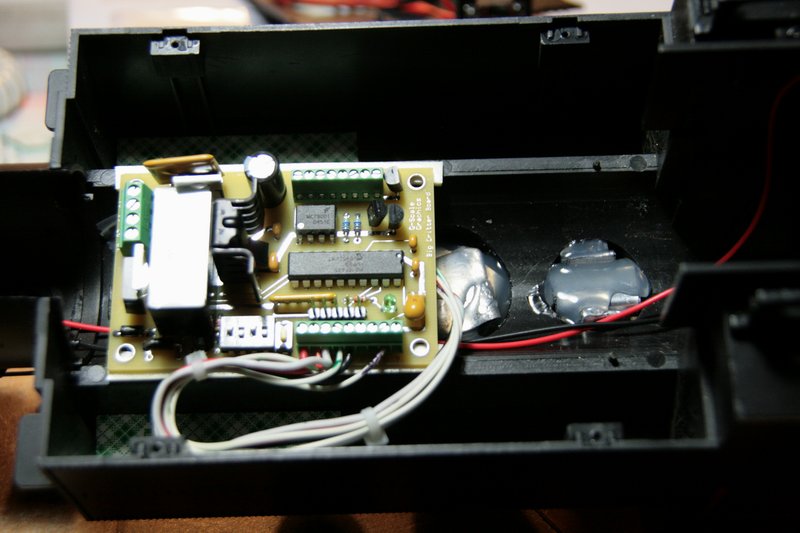
It looks like I will be able to get the RailBoss, Phoenix P5 and some Li-Ion batteries inside the boiler with room to spare. I test connected the RailBoss to the Porter, the P5 and a Spektrum receiver using a wall-wart for power. The check-out went well - everything worked as advertised.

Last night I hooked up the P5 to the computer and programmed a sound I liked (C16) and tested the second trigger for manual whistle. I’m going to pass on adding the P5T expansion board just to get manual bell. I suppose I could use the motor outputs of the RailBoss for Voltage regulated chuff and use the two triggers on the P5 for Bell and Whistle, but I like triggered chuff a lot better.

Now I just need to scape up a few bucks to order batteries and a charger. When this is done it will be my first independent battery operated loco.

Pictures to follow once something is actually mounted in the loco.

Jon I think you can assign one of the two chuff inputs to another function. Whistle?

Tony - Yes you can. Did that tonight. I was trying to come up with a way to get chuff, manual whistle and manual bell out of the P5 without the accessory board. Not going to happen as voltage driven chuff isn’t an option. I don’t need manual bell enough to spend $45 for it.

I’m not too happy with the chuff trigger drum in the Porter. I get some false/double triggers which makes it sound odd. I’m thinking about magnets and a reed switch as a cleaner option, but will try and tweak the drum first.

I had one once. I had to tweak the drum too. Worked just fine then.
You could always use the voltage controlled bell.

Finally some pictures… My MRC power pack is buried somewhere in the kid’s room, so a quick & dirty DC bench supply was needed. Made from a wire-wound potentiometer and a wall wart, I can get output from 0 to about 14 volts… [url=lsc.cvsry.com/Post2/Porter_RC-002-1200.JPG]

(http://lsc.cvsry.com/Post2/Porter_RC-002-800.JPG)

[/url][color=blue]FF: Click to Enlarge - IE: Right Click Photo and select Open Link in New Window to Enlarge[/color] All the components wired together for bench check-out before installation. Top left-to right: The Side-Tank Porter chassis, Spektrum AR-6100E Receiver w/antenna, Enhanced RailBoss, Phoenix P5 and the test supply [url=lsc.cvsry.com/Post2/Porter_RC-003-1200.JPG]

(http://lsc.cvsry.com/Post2/Porter_RC-003-800.JPG)

[/url][color=blue]FF: Click to Enlarge - IE: Right Click Photo and select Open Link in New Window to Enlarge[/color] Close up of the receiver, throttle and sound board… [url=lsc.cvsry.com/Post2/Porter_RC-001-1200.JPG]

(http://lsc.cvsry.com/Post2/Porter_RC-001-800.JPG)

[/url][color=blue]FF: Click to Enlarge - IE: Right Click Photo and select Open Link in New Window to Enlarge[/color] The porter is partially set up for sound. It has a sound trigger drum which has no wires conected to it, an a molded in place with hardware for a very small speaker. The speaker that came with my used P5 was too big. I had a pair of small oval speakers with big magnets I salvaged from somewhere long ago. Two screw holes line up exactly and it sounds pretty good, so I’ll probably use it. [url=lsc.cvsry.com/Post2/Porter_RC-004-1200.JPG]

(http://lsc.cvsry.com/Post2/Porter_RC-004-800.JPG)

[/url][color=blue]FF: Click to Enlarge - IE: Right Click Photo and select Open Link in New Window to Enlarge[/color] The only problem is that at the cab end it might interfere with the cab wall. If I can squeeze it in I’ll use it, otherwise I’ll have to go with a 2 inch round from somewhere. Another thought is to carve the weight enough to fit the Phoenix speaker. [url=lsc.cvsry.com/Post2/Porter_RC-005-1200.JPG]

(http://lsc.cvsry.com/Post2/Porter_RC-005-800.JPG)

[/url][color=blue]FF: Click to Enlarge - IE: Right Click Photo and select Open Link in New Window to Enlarge[/color] I want to retain all of the weight, so batteries will be an 11.1V LiIon pack from All-Battery. I need to save a few more quarters before that and a charger gets ordered. In the mean time I’ll work on coupler conversion and the speaker mount.

Progress is slow, but I think I finally have a workable plan. I didn’t like routing the sound wires under a drive axle and around the motor, so I located a “safe” spot and drilled through the drive compartment and the bottom of the boiler shell and routed the wires that way… [url=lsc.cvsry.com/Post2/Porter_RC-006-1200.JPG]

(http://lsc.cvsry.com/Post2/Porter_RC-006-800.JPG)

[/url][color=blue]FF: Click to Enlarge - IE: Right Click Photo and select Open Link in New Window to Enlarge[/color] Notice that in the photo below I’ve sawed off the built in speaker mount in an attempt to make the oval speaker fit. Unfortunately it was too tall to fit under the boiler, so it’s been put back in the parts bin and a 2" speaker ordered from Phoenix. Of course, I had to glue the mount back in place, it’s just a tad shorter now :slight_smile: [url=lsc.cvsry.com/Post2/Porter_RC-007-1200.JPG]

(http://lsc.cvsry.com/Post2/Porter_RC-007-800.JPG)

[/url][color=blue]FF: Click to Enlarge - IE: Right Click Photo and select Open Link in New Window to Enlarge[/color] The green wire is visible in the air space between the drive and the boiler, but unless you know to look, it shouldn’t be noticed… [url=lsc.cvsry.com/Post2/Porter_RC-008-1200.JPG]

(http://lsc.cvsry.com/Post2/Porter_RC-008-800.JPG)

[/url][color=blue]FF: Click to Enlarge - IE: Right Click Photo and select Open Link in New Window to Enlarge[/color] I was able to get the weight back in place with the wire tucked under, but when I test fit the 11.1V battery pack mock-up, it was too high, so the center of the weight has been eliminated. Whatever they cast this weight from it sure is tough. It took a half hour or more with a Sawsall to cut the center out… [url=lsc.cvsry.com/Post2/Porter_RC-009-1200.JPG]

(http://lsc.cvsry.com/Post2/Porter_RC-009-800.JPG)

[/url][color=blue]FF: Click to Enlarge - IE: Right Click Photo and select Open Link in New Window to Enlarge[/color] While I wait for more parts to arrive, I thought I’d look at couplers. The stock coupler is about a mile too low. I built up a quick-and-dirty coupler height gauge to the C.V.S.Ry. standard. Even with the draft gear temporarily mounted above the pilot it’s still too low… [url=lsc.cvsry.com/Post2/Porter_RC-011-1200.JPG]

(http://lsc.cvsry.com/Post2/Porter_RC-011-800.JPG)

[/url][color=blue]FF: Click to Enlarge - IE: Right Click Photo and select Open Link in New Window to Enlarge[/color] I’ve seen a few Porter bashes with wooden pilot beams. I think that will be my only option to get the coupler high enough. I haven’t even tried the rear yet. Mounting places back there are about nonexistent.

Slow progress continues. On Saturday FedEx showed up with my 11.2V Li-Ion and charger. Thanks for the B’day present Marilyn! I charged up the battery Saturday evening, and once chores were finished on Sunday I did some experimenting with the Porter. The battery is just slightly larger than the specifications. I may still have a hard time cramming it into the boiler. I’m still waiting on a speaker from Phoenix to make the final fit-up.

I utilized the existing Smoke On/Off switch as the system on/off and found a panel mount coaxial jack in my junk box that I was able to fit where the NMRA/LS switch once lived. A little carving of the inside of the smoke box cover and I’ll have easy access to these hidden components

The Porter ran as a self-contained unit for the first last evening. Running back and forth on a 5ft. section of track gets boring pretty quick, but it was a good test of the RailBoss. I’m very impressed with the throttle response. It is better than anything I have tried to date. Y’all may dislike stick radios, but there is no comparison with pressing buttons and waiting for response. You are in full control at all times (unless the Momentum is on).

I’m also pretty impressed with the Porter. It’s slow speed performance is excellent in both directions and running light the chassis will climb a 20% grade !!!

Now if I can only figure out the couplers. I’m convinced that I am going to have to scratch build new pilot beams on both ends to accommodate couplers at F Scale height.

"Now if I can only figure out the couplers. I’m convinced that I am going to have to scratch build new pilot beams on both ends to accommodate couplers at F Scale height. "

Interesting thoughts on coupler height. I think, I’ll start a new thread about this.

http://www.largescalecentral.com/LSCForums/viewtopic.php?pid=134428#p134428

My parts from Phoenix finally arrived. The invoice came last week with a “ship” date of 10/25. The package, mailed First Class, arrived 11/5 with a postmark of 11/1. Very odd, but they are here so all is well :slight_smile: Bachmann’s speaker mount leaves a lot to be desired. I decided that it needed to be corrected if there was any hope of getting acceptable sound from this tiny 2" speaker. First, the mounting circle was completed with some scrap styrene liberated from the trash at work… [url=lsc.cvsry.com/Post2/Porter_RC-012-1200.JPG]

(http://lsc.cvsry.com/Post2/Porter_RC-012-800.JPG)

[/url][color=blue]FF: Click to Enlarge - IE: Right Click Photo and select Open Link in New Window to Enlarge[/color] The three point mount didn’t hold the Phoenix speaker very securely, so some hot glue was added… [url=lsc.cvsry.com/Post2/Porter_RC-013-1200.JPG]

(http://lsc.cvsry.com/Post2/Porter_RC-013-800.JPG)

[/url][color=blue]FF: Click to Enlarge - IE: Right Click Photo and select Open Link in New Window to Enlarge[/color] Then I fashioned a cover from some more scrap styrene. I found that since I didn’t need precision, a scissors worked fine to cut the styrene. Without a jig it was impossible to get a true circle, but for the application it doesn’t matter… [url=lsc.cvsry.com/Post2/Porter_RC-014-1200.JPG]

(http://lsc.cvsry.com/Post2/Porter_RC-014-800.JPG)

[/url][color=blue]FF: Click to Enlarge - IE: Right Click Photo and select Open Link in New Window to Enlarge[/color] The cover was attached with more hot-glue… [url=lsc.cvsry.com/Post2/Porter_RC-015-1200.JPG]

(http://lsc.cvsry.com/Post2/Porter_RC-015-800.JPG)

[/url][color=blue]FF: Click to Enlarge - IE: Right Click Photo and select Open Link in New Window to Enlarge[/color] Unfortunately, when I checked the clearance, the cover was a good 1/8" too high to allow the shell to go back on. The cover was carefully removed and modified to fit lower, allowing the magnet to protrude. A test fit of the battery showed a conflict with the cover, so some heat was applied to distort the cover to make more room for the battery… [url=lsc.cvsry.com/Post2/Porter_RC-016-1200.JPG]

(http://lsc.cvsry.com/Post2/Porter_RC-016-800.JPG)

[/url][color=blue]FF: Click to Enlarge - IE: Right Click Photo and select Open Link in New Window to Enlarge[/color] Moving to the front of the locomotive chassis, here is is a shot of how I used the stock smoke switch as my On/Charge switch and an old-school coaxial jack from my junk box as the charge jack… [url=lsc.cvsry.com/Post2/Porter_RC-017-1200.JPG]

(http://lsc.cvsry.com/Post2/Porter_RC-017-800.JPG)

[/url][color=blue]FF: Click to Enlarge - IE: Right Click Photo and select Open Link in New Window to Enlarge[/color] Lastly, here is a wider view of progress-to-date… [url=lsc.cvsry.com/Post2/Porter_RC-018-1200.JPG]

(http://lsc.cvsry.com/Post2/Porter_RC-018-800.JPG)

[/url][color=blue]FF: Click to Enlarge - IE: Right Click Photo and select Open Link in New Window to Enlarge[/color] I was determined to keep as much of the factory weight as possible. At this point it looks like that wish will not come true. A test fit of the boiler/cab assembly didn’t go well. the battery is about 1/8" too high at the speaker end and won’t allow the pieces to mate. I’m also left with an area that’s not big enough for the RailBoss circuit board. I think the battle to save the weights has been lost. I’m still not sure that this 11V pack plus all the electronics can be made to fit in this loo with or without the factory weights :frowning: The experiments continue.

hey Jon, all your pictures in this topic are now just Boxes with Red X’s in it… but your avatar and signature block show as the actual pictures…

Looking good Jon. Keep plugging away at it. I’m sure you’ll get it to fit

Andy Clarke said:
hey Jon, all your pictures in this topic are now just Boxes with Red X's in it... but your avatar and signature block show as the actual pictures..
That would be my hosting service again. The photos are there, but sometimes they are too slow to serve them. The two you see are probably in your cache from other posts. All I can say is "please try again later" :(

When you go for cheap, you get cheap.

Just a thought Jon…if weight is a concern and you need too remove some of the factory stuff. You could always add stick on Automotive wheel weights in just about any space.

David Russell said:
Just a thought Jon...if weight is a concern and you need too remove some of the factory stuff. You could always add stick on Automotive wheel weights in just about any space.
The chicken beat me to it! it's looking good btw! You'll be surprised what nice sounds can come from one of those little speakers. I did the P-nut whistle from Sierra, and it sounds super cool!

cale

David Russell said:
Just a thought Jon...if weight is a concern and you need too remove some of the factory stuff. You could always add stick on Automotive wheel weights in just about any space.
Good thought. I could visit my friendly tire guy, drop off a container, and come back the next day for a full bucket of discards - then Mr. Hot Glue gun can put then anywhere :)

There’s also the buckshot in a plastic bag idea - conforms to any shaped space.

That factory weight is just so nicely arraigned directly overt the wheels, and heavy too - but it has to go :frowning:

At the moment I’m working on a replacement cover for the speaker while watching a Peter Frampton concert from 1995 on streaming Netflix. Coming out nice and round this time :slight_smile:

This project isn’t dead, just delayed. I gave up on trying to fit the three cell pack, the RailBoss and the Phoenix P5 and a speaker all in just the boiler shell.

I decided to go with two 7.4V packs; one in each tank. I think I can still fit some weight in the tanks with them. I did a test run with just the chassis last night and after re-programming the start voltage and top speed, I was very happy with the performance. Even without any weight on nearly level track I was able to pull 4 F scale cars including an AMS caboose with the power pick-ups still attached (lots of drag).

I’m just about done modifying version two of the speaker enclosure to allow just a bit more clearance. Once that’s done, if it works, I’m ready to start mounting electronics and batteries. At this point it looks like everything will be attached to the cab / boiler / tank assembly. I’ll use some plugs for the motor and sound leads to the chassis for easy removal in the future.

One thing I did notice while testing last night - The back-to-back wheel gauge is very narrow. I wonder if there is any way to extend this just a bit.

With two new 7.4 2-cell LiIon packs in hand, I finally came up with a component layout that would work The layout did require eliminating all of the factory weight, so I borrowed a page from Kevin Strong’s playbook and added weight in the dead space of the domes. I had some lithographers leading for hand setting type that I rolled this up and dropped the in the domes. I used hi-temp hot glue to secure it… [url=lsc.cvsry.com/Post2/Porter_RC-023-1200.JPG]

(http://lsc.cvsry.com/Post2/Porter_RC-023-800.JPG)

[/url][color=blue]FF: Click to Enlarge - IE: Right Click Photo and select Open Link in New Window to Enlarge[/color] Test fitting the components I found that my Version II speaker enclosure still caused a conflict. Here is Ver. II as built… [url=lsc.cvsry.com/Post2/Porter_RC-019-1200.JPG]

(http://lsc.cvsry.com/Post2/Porter_RC-019-800.JPG)

[/url][color=blue]FF: Click to Enlarge - IE: Right Click Photo and select Open Link in New Window to Enlarge[/color] A little surgery with the razor saw… [url=lsc.cvsry.com/Post2/Porter_RC-020-1200.JPG]

(http://lsc.cvsry.com/Post2/Porter_RC-020-800.JPG)

[/url][color=blue]FF: Click to Enlarge - IE: Right Click Photo and select Open Link in New Window to Enlarge[/color] Then a new sheet of styrene was attached and after the glue dried, it was shaped using heat… [url=lsc.cvsry.com/Post2/Porter_RC-021-1200.JPG]

(http://lsc.cvsry.com/Post2/Porter_RC-021-800.JPG)

[/url][color=blue]FF: Click to Enlarge - IE: Right Click Photo and select Open Link in New Window to Enlarge[/color] Here is the enclosure test fit on the speaker. Later it was attached and sealed with hot glue… [url=lsc.cvsry.com/Post2/Porter_RC-022-1200.JPG]

(http://lsc.cvsry.com/Post2/Porter_RC-022-800.JPG)

[/url][color=blue]FF: Click to Enlarge - IE: Right Click Photo and select Open Link in New Window to Enlarge[/color] Moving on, I decided that it was simplest to attach the electronics and batteries to the boiler and tank shell rather that trying to mount them on the floor and determine all of the complex clearances. For most connections I added plugs to make removing the superstructure and electronic easier. Here I’ve placed the receiver at the top pf the boiler… [url=lsc.cvsry.com/Post2/Porter_RC-024-1200.JPG]

(http://lsc.cvsry.com/Post2/Porter_RC-024-800.JPG)

[/url][color=blue]FF: Click to Enlarge - IE: Right Click Photo and select Open Link in New Window to Enlarge[/color] Next the RailBos board is attached to the bottom edge of the boiler with foam tape… [url=lsc.cvsry.com/Post2/Porter_RC-025-1200.JPG]

(http://lsc.cvsry.com/Post2/Porter_RC-025-800.JPG)

[/url][color=blue]FF: Click to Enlarge - IE: Right Click Photo and select Open Link in New Window to Enlarge[/color] At this point my documentation effort failed. There were no more pictures taken before the loco was buttoned up. The 7.4 packs were fit in the front of each tank. You can see the foam tape in the above photo. A Phoenix P5 board was attached to the top of the boiler at the firebox end. The remainder of the tank space was used to stuff in wires and a primary fuse. There is room for some additional weight in the rear of the tanks if I find it’s needed. Today I utilized the Porter for an inspection / maintenance run. It performed admirably with a single gondola. I don’t expect it to be able to handle more than a few cars on my grades. I may test tomorrow with a few more cars if I can get out before the snow arrives.

Jon, I don’t know how much of a difference your specific speaker enclosure makes, but I found that simply putting the shell and tank back over mine made a world of difference in sound quality. If it works to be even more profound of a difference with the enclosure, them even better.

BTW, I got about 5 hours continuous running the other day out of a 2200 mAh pack.

Later,

K

Thanks Kevin. Before I went to the bother of making yet another version of the enclosure, I tried it with and without. To my ears it sounded better and louder with the enclosure. I also increased the number of holes in the boiler bottom, and enlarged the existing ones.

Good news on the run time. I’m not doing continuous running, but I’ve had it powered up for several hours now still on the first charge.

I’m not sure how in depth you want to get and by no means have I experimented with sound systems but ya’ know I have never seen a split system with separate’s meaning a woofer and a tweeter. Back in my car stereo building days highs were fired up or out and lows were fired downward. However these were set up and tweaked on a pink noise generator.
Ok I’m rambling but just a thought that may increase your depth would to be line the shell with automotive car stereo soundmat or kevlar batting …but if ya’ really wanna be cheap pillow batting works but it can’t take the internal heat. As for the highs …whistle ect…why not a split system with a crossover. I really cannot believe none of the manufactures have tried this or maybe they have and failed? You could be the first to blow out your neighbors windows here Jon! A good speaker is only as good as the enclosure it resides in theoretically…
Just a thought
:wink: