Large Scale Central

plumbing tutorial

Okay so I was asked about plumbing and I think this is a valuable tool to have in our arsenal. I created a PDF write up with pictures. You can download it HERE

Here are the pictures

The PDF goes into detail and has pictures of the process. But its really pretty simple. First Let me thank Rick Marty for the wire idea and expanding on it. I had done it before but I took what he taught me and ran with it.

My goal is to make complete runs of plumbing as one unit. By soldering the wire for Tees and what not and sliding the pieces of insulation on as you build you can make a very rigid plumbing run that reliess on the solder joint and not glue for the joint strength. Use super glue gel. It not only glues the insulation in place but is a gap filler as well.
Spray accelerator into a cup and apply with a pick to the gel, in place. Speeds up assembly. Can be filed or sanded when cured.

Nice write-up Devon.

Sub assemblies are the only way to go when plumbing,

a boiler for instance.

I have to build everything first and assemble it then take it apart for painting then re-assembly, if everything is in sections

it makes it way easier.

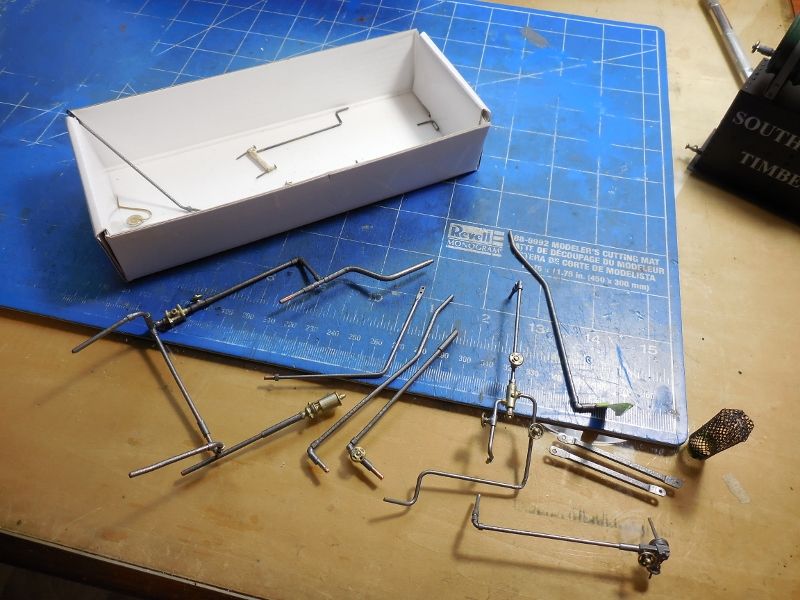
Not to butt in on your thread but here are some completed sub-assemblies done the way your tutorial describes.

Rick

By all means butt in. You are a master at this.

Thanks Devon. Nice tutorial. I think I like your way better than mine. I printed my fittings and they work well, but they are way too oversize due to the limitation of the printer. I could probably print them smaller, but it would be a PITA.

Cool - Have you ever seen the CD “Straight Talk about Bent Pipes” ? It’s a pretty dry read but explains all of the plumbing on a steam loco. I have a copy somewhere.

Jon Radder said:

Cool - Have you ever seen the CD “Straight Talk about Bent Pipes” ? It’s a pretty dry read but explains all of the plumbing on a steam loco. I have a copy somewhere.

No but sounds like something Id like to watch

Rooster,

Thats cool.

Devon Sinsley said:

Rooster,

Thats cool.

https://www.largescalecentral.com/forums/topic/28587/a-coach-for-bob/view/post_id/380228

Jon, is that the series that ran in the Gazette for a few years? I’d love to have that all in one spot. That’s a great series, pulled from old Railroad Cyclopedia articles.

Later,

K

Yep, I googled it and at the top of the page; It’s copyrighted, not to be shared.

Property of Benchmark Publications.

I will look for it. Not sure of the source or copyright. It’s too big to post in any case - but CD’s by mail among friends?

Devon have you thought about or tried using the heat shrink tubing as your “connectors“? it would give a tight fit, and would probably be closer to the size of an actual fitting , and if neede a second layer could be added to give some more bulk to the fittings. And by sliding it over a bend and shrinking it you would probably eliminate the need to glue the pieces in place.

Pete the idea was tossed out elsewhere by Rick. I have not personally done it but it has intriguing application. As you mention a nicer profile on the 90s for sure. Used in-conjunction with only a small ring of insulation it could give a better profile of the fatter ends that are reinforced/thicker metal for placing the pipe wrenches. Will have to give it a try. I just happen to be moving on to a plat car that I want to give an undercarriage detailing job to.

I haven’t used heat shrink tubing but have used evergreen plastic tubing with wire, paperclips, etc. shoved up in the tubing to keep it from collapsing when bending, have even used a coat hanger in 1/4" tubing. For fittings I use 2/56 small head nuts and drill out the center till it will just slide over the plastic tubing and secure with super glue.

tubing on sawmillsandhouse tubing

Bill never once had I thought about actual metal nuts. Plastruct hex rod yes but never a real nut. Good plan

Devon and all,

Here is a shot from the Marion Shovel I built several years ago it uses just about all the methods being discussed here for piping.

Styrene tubing filled with brass rod, 12/14 gauge house wiring, shrink tubing, drilled out nuts, ACC glue filler, dress snaps and commercial castings.

Oh yea, and lots of head scratching trying to make it all fit(https://www.largescalecentral.com/externals/tinymce/plugins/emoticons/img/smiley-laughing.gif)

That really shows what can be done. Excellent job

Nice plumbing job, Rick. Fittings look very realistic. I can see why all the head scratching (https://www.largescalecentral.com/externals/tinymce/plugins/emoticons/img/smiley-wink.gif)