Large Scale Central

Photography Ignorance

David Maynard said:

I guess I should have photo shopped out the fence. But even though the fence had to be a good 25 feet from the lens, its in focus enough that you can see its a chain link fence. And the cylinders on the C16 were 2 or maybe 3 inches from the lens. And that is with a standard lens, nothing fancy and nothing up my sleeves.

That a great point from 3" to 25 feet in focus… seems pretty good to me.

jerry bohlander said:

And use a Tripod and cable release, and turn off the stabilizer on the lens when using a triopd.

Jerry

Jerry this is something I am looking at (cable release/ remote trigger device) for under five bucks I can get a knock off infrared remote. I am thinking of trying this route.

Daktah John said:

My Cannon Rebel Xti has a A-DEP mode which is Auto depth-of-field. I use it quite regularly when photographing my railroad. It will force the smallest aperture setting that can be accommodated with the metered light conditions and ISO setting If there is enough light it’s possible to take hand-held photos that have good depth of field. This is an example; notice the track and the watch tower in the foreground have crisp focus as do the trains in the background. Well, at least they do in they uncompressed original :]

(http://lsc.cvsry.com/post4/FallRun2014-04.JPG)

Not saying you shouldn’t try the manual route, just suggesting an easy option for when you just want to snap a few pics with good depth-of-field.

Is yours the 400D. Mine is a rebel xti 400d and see that it has the A-Dep mode. I will have to play with that as well.

No, just an EOS Rebel Xti. It was the entry level Xti at the time. I think yours is a few steps above and newer.

Devon Sinsley said:

jerry bohlander said:

And use a Tripod and cable release, and turn off the stabilizer on the lens when using a triopd.

Jerry

Jerry this is something I am looking at (cable release/ remote trigger device) for under five bucks I can get a knock off infrared remote. I am thinking of trying this route.

Cable release is fine, but if you have a timer, it will ‘fire’ the shutter after you have pushed the button and walked away, so a cable release is hardly necessary.

Devon - you’ve got a lot of good info here. The only way to figure it out is to shoot a lot of pictures but do it scientifically. Change one parameter (e.g. ISO setting,) then take a bunch of photos at increasing f-stops. Then compare what you have got and make a note of what worked and what didn’t.

You don’t need a train for that - a lawn and a few bushes (or snowmen) will give you things to take pictures of.

Finally, you need to worry about the digital post-processing. Obviously you need a decent computer so you can see the results as they might be printed. [I have a 1920x1080 display on my laptop.] I sometimes print the best pictures on my cheap epson printer - but on ‘photo’ paper at photo setting. I also use Adobe Photoshop Elements to ‘enahnce’ the photos. It has all the usual features, but also some really useful ones, like the ‘lighten shadows’ option. This is what it did to the photo you liked:

(http://api.viglink.com/api/click?format=go&jsonp=vglnk_14211682738598&key=7a1484a4a0d32e1d679ba647e9329354&libId=d08b170e-4517-42c3-966f-54741a5ec6c9&loc=http%3A%2F%2Fwww.largescalecentral.com%2Ffreightshed%2Findex%3Fp%3Dhome%26d%3D_forumfiles%2Fmisc-2015%2F&v=1&out=http%3A%2F%2Ffreightsheds.largescalecentral.com%2Fusers%2Fpetert%2F_forumfiles%2Fmisc-2015%2FMW7.jpg&ref=http%3A%2F%2Fwww.largescalecentral.com%2Ffreightshed%2Findex%2Fuploadfiles&title=Large%20Scale%20Central&txt=MW7.jpg)

In most cases, a dark photo can be lightened to bring out the details. An over-exposed one will not respond - so always go dark! You’ve gotta try these things and get some lernin’ in yer.

Ansel Adams was right. “Photograph for the shadows, and print for the highlights.”

John, I think you and Devon have the same camera. The XTi (aka 400D) was the model that replaced my Canon XT (aka 350D). Alas, I had a magazine deadline which hit one month before the XTi was to be released, so I had to “slum it” with the older model. (I got the price break, at least.)

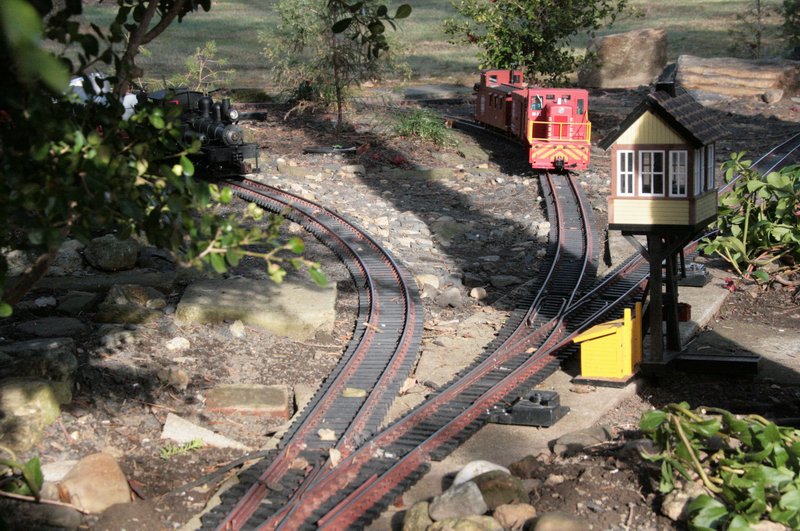
The A-DEP setting on the Canon is nice, but it requires auto focus to be turned on. I’m a control freak when shooting my railroad, so I do everything manually. With my lens, f22 seems to be great for getting respectable depth of field in the foreground and background:

You can’t really see the fence clearly (by design), but where you can, it’s still in pretty good focus, and it’s about 50’ from the camera. Typically, my shots aren’t nearly as “deep,” but proper depth with respect to the foreground is still important.

One thing to keep in mind with depth-of-field; it works in thirds. For example, if your focal point of your photo is 5’ in front of the camera, and your DoF is 3’, then everything from 4’ to 7’ will be in focus. (1/3 in front, 2/3 in back of the focal point). If you increase your DoF to 6’, then everything from 3’ to 9’ will be in focus.

The advantage to knowing that is you can “cheat” your focal point if you want to blur certain elements in the background (a fence, neighbor’s house, etc.) Often, I’ll shift my focal point forward from the subject a foot or two, knowing that with the DoF range I have dialed in, the bulk of the photo will still be in focus (including more of the foreground), and the background will begin to get a bit soft. You can use the Depth-of-Field preview button on the side of the camera to engage the iris on the lens, so you can actually see in the viewfinder what will be in focus and what will not. (On the Canon, it’s the button below the lens-release button on the left hand side.)

I also like to limit my DoF to highlight particular subjects:

Here, I’ve limited my DoF to just the length of the locomotive. (Wider aperture = less DoF) It’s good for “portrait” type photos like this (or of people). Here, you can see the “thirds” rule if you look closely. My focal point was the number plate of the locomotive, and the distance to the front of the cab is about 12". The area about 6" in front of the loco is also in focus.

Later,

K

Practice in sunlight, artificial light can turn black engines blue…

Black engines will mess with your light sensor something fierce! It sees a big black blob in front of it, and thinks the majority of the image is a shadow that needs to be exposed. The result is a greatly-overexposed image of a grey locomotive. Ugh! You can adjust the camera to tell it to underexpose for dark subjects. I usually shoot at about -1, which seems to work well. (That’s a Canon setting, your specific camera might be different.)

Later,

K

Pete Thornton said:

Change one parameter (e.g. ISO setting,) then take a bunch of photos at increasing f-stops. Then compare what you have got and make a note of what worked and what didn’t.

This is known as “bracketing” the shot and many cameras have the ability to alter the light level without actually changing the F stop or the speed.

On our Nikon D50 there is a ± button and thumb wheel that perform this task. I find that is is usually better to go 1-2 steps under the cameras automatic exposure selection to slightly underexpose the picture. This aids contrast and keeps from washing out the color, and you can always make it a bit brighter in post processing.

On our Nikon D750, the camera can be set to “bracket mode” and it will automatically step through the settings changing to the next at each click of the shutter so you don’t have to remember if you’ve already “done that one.” The number of “steps” and “range” are programmable.

Guys,

Thanks for all the help. This is some very practical info on the specific nature of photographing our models. The stuff on the net, while great information, is based on smaller scales. They are talking about depth of fields of 2 feet not 50. I hope to begin playing with this idea. Its one aspect of the hobby that I really notice. I enjoy photo of trains (or car models) that put you in the layout not looking at it. Perspective shots I believe is the technical term.

You all have contributed greatly and as Pete said I just need to start doing it. The other nice part of this aspect is in the digital age it is a cheap way to engage your models when you don’t have the money to build.

Devon

Todd Brody said:

Pete Thornton said:

Change one parameter (e.g. ISO setting,) then take a bunch of photos at increasing f-stops. Then compare what you have got and make a note of what worked and what didn’t.

This is known as “bracketing” the shot and many cameras have the ability to alter the light level without actually changing the F stop or the speed.

On our Nikon D50 there is a ± button and thumb wheel that perform this task. I find that is is usually better to go 1-2 steps under the cameras automatic exposure selection to slightly underexpose the picture. This aids contrast and keeps from washing out the color, and you can always make it a bit brighter in post processing.

On our Nikon D750, the camera can be set to “bracket mode” and it will automatically step through the settings changing to the next at each click of the shutter so you don’t have to remember if you’ve already “done that one.” The number of “steps” and “range” are programmable.

My Canon has a bracketing feature that shoots at what it deems right then one setting over and one under. That is a great feature but much like Kevin I am kind of a control freak and I will likely set everything to manual and just work through the process in the name of science and education, though the automatic bracketing will be nice in the beginning to get a feel of what it looks like.

Fun stuff.

If you don’t have a cable release…I sure dont…use the self timer…even the shortest time allows you to let go of the camera so that it is still when it records the image.

Excellent pictures Kevin. I agree about the auto-focus requirement of A-DEP mode. I’ve been using manual focus more and more. Aperture mode will let you set the desired F-Stop while using Manual Focus then adjust the exposure length based on ISO setting and metered light.

A Cable Release for a digital cameras is a lot more involved then they were pre-digital. They are basically an extension of the shutter button including the half-press focus/metering position. They are still needed for Bulb (manual time) exposures. I found that they are fairly simple (if you solder) to make from a few SPST push button switches, a length of 3 conductor cable and a connector to fit the camera.

Kevin’s “rule of thirds” is easy to understand, but is there an easy way to calculate the depth-of-field for any given F-stop? I’m pretty new to this manual control stuff myself.

Per given f-stop, depth of field depends largely on the point of focus. At point of focus of infinity, the depth of field will be close to infinate. At the lens’ closest POF, the depth will be very shallow, sometimes measured in inches. Your best bet is to check with the information that came with the lens.

I played around a little this afternoon with my little pocket Olympus Stylus Tough. it is several years old now waterproof and drop proof takes OK photos and video. it is what I use for everything from trains to adventures on the water.

I set up the ISO to 80 which is low and used the self timer and a cheap tripod. it was cold out and the sun setting. I only have auto focus.

I got good sharp shots and good depth of field, but the shots all came out kinda blue…

departure was blue

I think I had the white balance set for florescent lights. OOPS! Photoshop fixed that with the “remove color cast” under color balance:

arriving at sunset

Actually I kinda like the blue.

I use Photoshop elements to fix a lot of my pictures. Indoor pictures of my projects tend to have a bit of an orange hue to them, from the lighting in my shop, so I do the colour correction and the shadow/highlight correction to bring out the details.

As stated, its better to slightly underexpose then to overexpose a shot. The picture I posted of the C16 was actually one step darker then the camera wanted it to be. What I mean is I kept bumping up the F stop until the display went red. That means I went too far, but only one step. Then I took the picture. That gave me good contrast and depth of field, without washing out the colours.

As for depth of field, to state it very simply, oversimplifying it, the smaller the aperture, and the longer the exposure time, the more depth of field you get. Yes, there is a bit more to it then that, but that basic idea will help get you going in the right direction. As for focusing on a black something, it helps if there is something not black to aim at in the center of the picture. Like the number plate, or the headlight, or whatever. You can always crop the picture to get just what you want, even if the subject was off center in the raw picture, just so you could have something for the camera to focus onto.

John,

If you and I indeed have the same camera and I believe Kevin is right that we do then instead of a cable release you can get and infrared remote. While the timer should eliminate need for this a remote would be nice. And on Ebay there are knock off brands from around $5.00. At least worth a shot. I will pick one up when I do decide to really start messing with this which will be pretty much now.

Devon Sinsley said:

Maybe I need to talk to John. He lives in my backyard and some of his photos are exactly what I am talking about

http://largescalecentral.com/forums/topic/22820/the-official-winter-run-photo-th

Note the background blurring Devon

(http://i45.photobucket.com/albums/f72/Shortybear/ECLSTS/RydersShots150.jpg)

So I started playing around. I took seven pictures in my dinning room with just the ambient light which isn’t bright and is pretty warm. I then played with my camera in full manual mode. I set the Picture quality to highest megapixel and fine shooting in both Jpeg and Raw. I set the shutter delay and used the mirror hold up function. I set the focal length to 18mm the lowest it would go. I set the aperture to f22 the highest it would go. shot the first four with an ISO of 100. For shutter speed I started with one setting below the lowest acceptable one which was 6 sec and then 8 sec 10 secs and 30 secs. I then changed the ISO to 400 and again at one setting below the lowest which was 1.6 sec and then 2 and then 2.5. As mentioned the higher ISO was always worse and the lower ISO produced. It would take some low light to need a higher ISO. So the four JPEG pictures were taken to the generic Microsoft Office program and all I did was auto enhance and reduce the size. Here is what I learned. Like expected the faster shutter speed underexposed and the 30 sec over exposed before enhancement. But when enhanced the color saturation was much better in the faster shutter speeds. it was washed out in the 30 sec exposure.I also noticed when I reduced the size I lost some of the color. Here are the results of the edited photos.

All in all I liked the second and third pictures the best for color, contrast, and brightness. The deth of field is muh better than I expected. The lens was about 8 inches from the figure and everything is in focus all the way to the back wall about ten feet away. Since that was all the farther could shoot I don’t know how far it goes back.

Not a bad first experiment. I would like to get out doors n good light and play with setting the camera up at different distances to see what I can do with depth of field.