Large Scale Central

Pepper's Ice Co. - Devon's 2020 MIK

Well I have been obsessing about this since it was I woke up. I had two ideas that made my short list for the MIK if they fit the theme. Given that we have a chimney one rose to the top; an ice house/loading facility. As someone who remain nameless (Craig) pointed out on Facebook where I always post my progress for my non LSC friends and family to follow “an ice house with a chimney??” well this is for that new fangled hot ice. No, the employees need a place for the coffee pot.

I have a spot on the layout at the tail of my Wye where the Howe truss lifting bridge is that Has a 32" piece of dead end track that also serves as an elevated crossing over the double mainline. The spot where the two cars are parked. In my “givens and druthers” two of my givens were to have an elevated crossing and to have and a Wye for turning locos. This led to this little basically useless space. Early on I decided it needed a large structure or combination of structures associated with a tunnel over the mains to create a visual break and add to the perceived distance of my mainlines. This will separate two distinctive areas from one another. The tunnel will be a separate beast to come later and will be an all log retaining wall affair that was very indicative of structures built in the narrow canyons this line ran on from Wallace to Burke, ID. The ice house will be built over the tracks on this log tunnel. Believe it or not there was a hotel called the Tiger Hotel in Burke that was built over the tracks. So they did do it on this line. So the whole theme works.

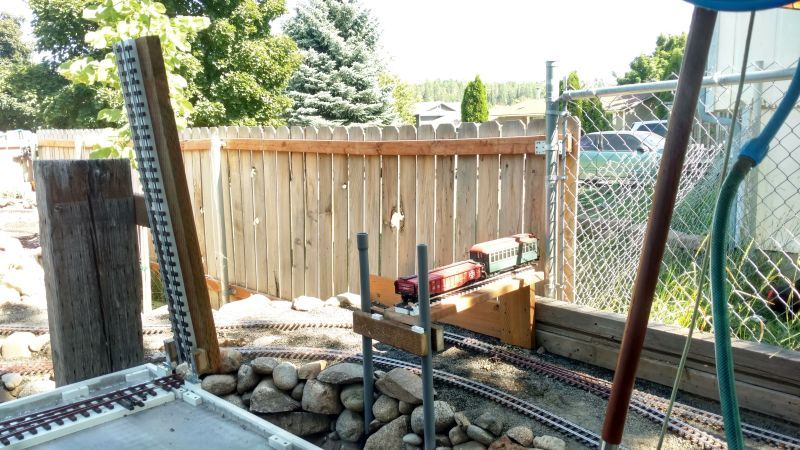
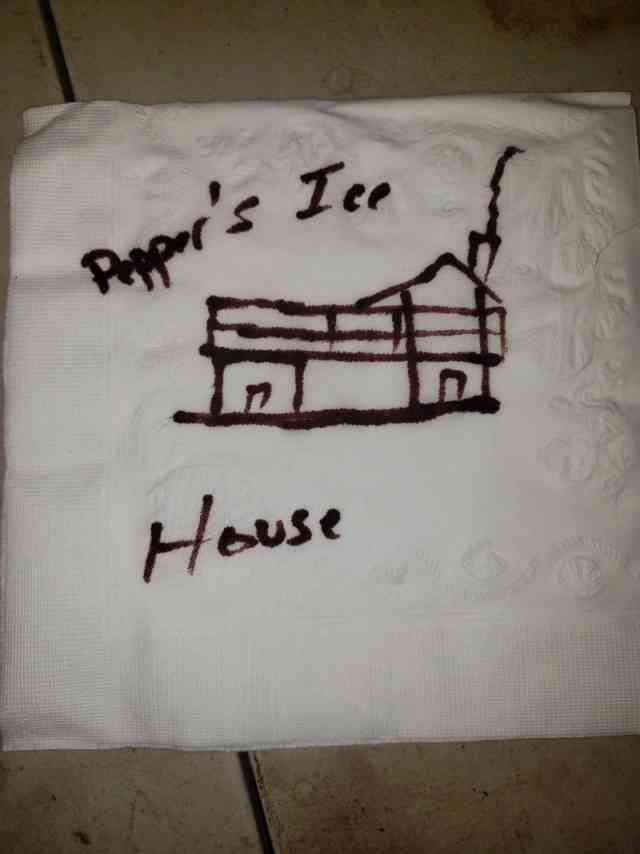
The space from the grey pipes to the fence is 32" and I gave myself about 24" of width to play with. I will make a platform that the entire scene will be built upon that will rest on the top of the tunnel structure. The ice house will be removable to store inside. It will be “Pepper’s Ice Co.” in honor of my little friend.

And here is the napkin

And here is the inspiration. Photo credited to its source: Railroad Line Forum and owner of the photos and the maker of the model Troels Kirk of Sweden http://www.railroad-line.com/forum/topic.asp?TOPIC_ID=23034

when I saw this it was almost exactly how I saw it in my head when I started thinking on this.

I jumped on Sketchup and tweaked the design to fit my space and needs and came up with this

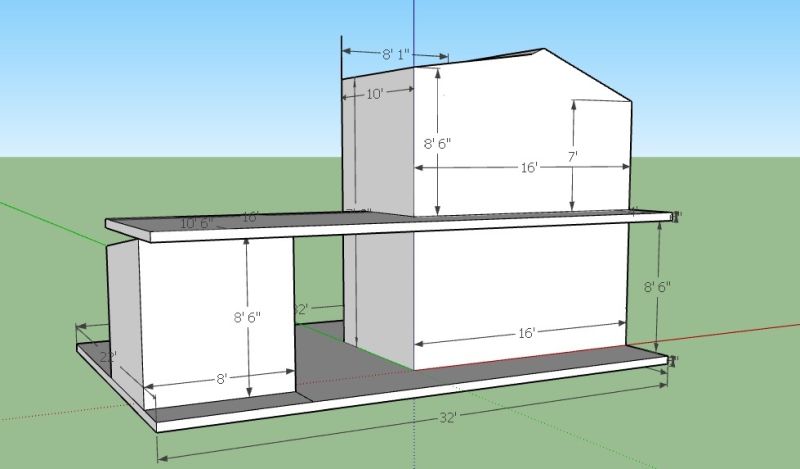
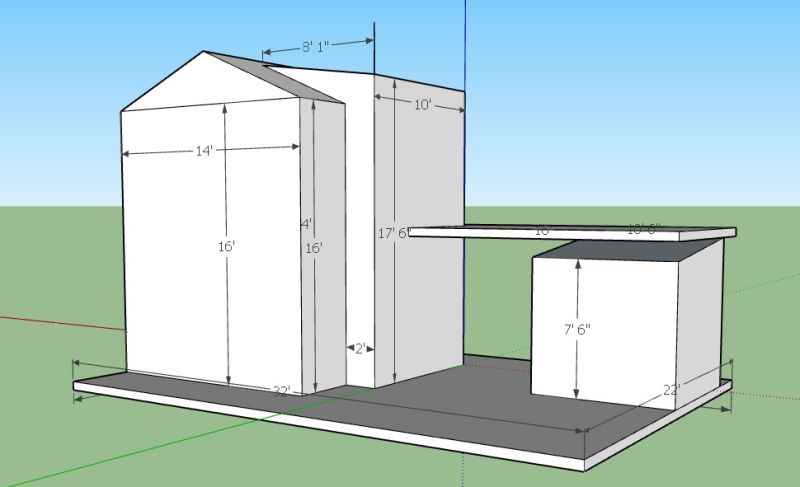
Should be a fun build

Pepper looks like an excellent companion to name something after. Nice!

Jim Rowson said:

Pepper looks like an excellent companion to name something after. Nice!

Jim, I have always loved all of my dogs. I had one very special one as a kid that went with m everywhere, Lobo. My sister obedience trained him fr 4H and he was a champion. They even competed in a tough competition where once they entered the ring no spoken commands could be given, it all was done by hand signal. Great dog. When she went in the Navy he became mine. I am 7 years younger than her and I think he was three or four when she left. He was mine for a long time. I took him everywhere and since he was so well behaved I never put him on a leash. I built a harness for him and he either pulled a wagon or a sled and helped me on my paper routes, he was half husky half Australian shepherd. He would stand of other dogs and protect me, just a cool dog. I never thought I could replace him in my heart. But dang it if Pepper hasn’t come along and at least joined him. She is my animal version of my other half. In all reality I spend more time with her than I do my wife. Other than when I am at work she never leaves my side. Except on rare occasions. I take her everywhere, she sleeps with me, lays in the bathroom when I shower, and watches me when I do my business. As I have said chronic pain and my stupid head have made me a lonely person while being surrounded by people. Pepper takes care of that. She is truly a gift from Heaven at a time when I need it most. We got her specifically to be my companion. The other dogs (we have two others, Oakley and Cayman) who gravitate to others in the house. But Pepper knew her role and bonded with me. She is crazy smart and she can tell when I am out of sorts even when I am sleeping. She lays at my feet most all the time. but when I am really hurting, even when I am asleep I swear she can sense it and will come lay almost on top of my head. I have had a few nights where she has even went and gotten my wife up and made her come check on me. It really is almost creepy. But at any rate she is one “cool” customer and as such she get an ice company.

Looks like that is going to be a cool build, Devon. Love the story about Lobo and Pepper.

Wow computer sketch already? I’m still contemplating how I’m going to get pics from my phone onto my album.

Vic,

How long can it take to design an outhouse

Having not yet built a building for my outdoor RR I am wondering about materials and methods. Keeping in mind I am trying to use what is on hand. Here is what I am thinking. I have quite a bit of scrap PVC board from the layout construction. I have enough for the base for sure and I am thinking since it has a wood grain and I like the looks of it on my grade crossings and it is holding up well in that use, I will use it for trim and stuff. For the main walls and roof base, George W. Bush was kind enough to donate a very large corrugated plastic sign to my modeling cause. And for the roofing I was think wet/dry sand paper to simulate rolled roofing. Will these materiel’s hold up well and not warp and be weird? I do have plenty of cedar for trim if not the PVC. I have epoxy, CA, and Titebond III.

Are these reasonable materiel’s? Any other ideas? Tips for making stuff last outdoors? I will take them in for winter so their main exposure will be sun and rain.

DEVON. We all love our Titebond III, cause its waterproof.

I have had great success building the basic structure form ( walls, roof etc ) from common wood, including plywood, and then waterproofing all edges and sides with a thick painting of TitebondIII over the entire surfaces before assembly.

And then another coating after assembly and before the details ( siding, windows, doors etc.) are then added.

It has worked for me…

Dave

Huh, never thought of using TitebondIII as a water proofer. I mean I love it as a waterproof glue and use it in all sorts of stuff from modeling to repairing my boats. but never occurred to me to use it as a sealer. Do you thin it so you can “paint” it on or do you just lather it on and smear?

Lather on and smear works, I use a cut down disposable “Flux” brush, so it is stiffer to spread it around…

Just get a good coat …it doesn’t have to be thick, I have found that the first , pre assembly, coat tends to soak in, and give a good penetrative coat. If i’m using a plywood, I will give the edges a extra heavy coat to seal the plies, as marine grade ply is no longer available in our region. On assembly, I glue the adjoining edges, as in normal assembly. Then the second coat, after basic assembly, I do it all over again, and paying extra attention to all corner edge joints, to keep moisture out of the joints.

Put a fan on the building, and it dries to handling in short order…

Dave

That’s awesome Dave, thanks.

(https://www.largescalecentral.com/externals/tinymce/plugins/emoticons/img/smiley-wink.gif)

Well slow start today. Got the walls for the main building cut. I thought I had some 1/4" plywood. I don’t, but I do have enough scrap 1/4" Masonite. I got it cut and and mocked it up to make sure it all will fit and look like I want. It does. So now I will slather some Titebond III on the raw sides.

East Wall

West wall

North wall

South Wall

The start of a new project always seems like it is simultaneously going slow and going fast to me. You have something to show but you just want to be finished and you can start to see all the steps it is going to take to get it done. Sigh.

Good start, Devon

The PVC base

Whoa there big guy, remember, you have 30 days, not 3 (https://www.largescalecentral.com/externals/tinymce/plugins/emoticons/img/smiley-wink.gif)Looking good.

So when the boys at the shop ordered that Taylor stone for the snow shed they ordered way too much and we have had it on hand waiting for a project. So when it came tim to build the ice house they made a deal with the contractor’s building the foundation and sold it to them. They used it to build up the building so that it would have loading docks and be the right height above the tracks. The will cap that with a wooden platform.

In reality when I got the Taylor stones I made a mold of them with permission of Dave. So any time I had a little extra resin I poured some. I had more than enough to ring the PVC base.

I can see Dave’s wheels turning and thinking about next years challenge already: must incorporate all parts from previous challenges, door, stone, tin, 2x4, imagination, chimney, etc. (https://www.largescalecentral.com/externals/tinymce/plugins/emoticons/img/smiley-wink.gif)

Dan, Devon: y’all gotta stop giving Dave hints and ideas!!! He has enough “meanness “ already

I really like your proposal, it is going to be a good looking building.

It really is amazing how our fur buddies can worm their way into our hearts. We had to put down our 15 year old Cocker Spaniel this past year and he was such a good dog and really my best bud.

When building for outdoors tightbond 3 is the way to go with wood and other materials but if you have something odd like plastic to wood you could try E6000 which glues everything. I have built plywood boxes and then clad them with siding using tightbond and pin or brad nails and they have held up very well. I have started using pvc wood for a foundation to prevent the eventual rot if a building is to be placed on the ground.

On some smaller buildings like sheds I have used coffee stir sticks to make a board and batten look. I glue the back of the stick, a couple of pin nails hold it and when the glue is dry I smear on more glue to seal the edges of the battens like Dave T suggests. When dry the tightbond 3 can be painted.

On some roofs of small buildings like my setout cabins I have been using black duct tape and then spraying it with a flat clear to dull the shine. Just an idea.

Keep up the good work.