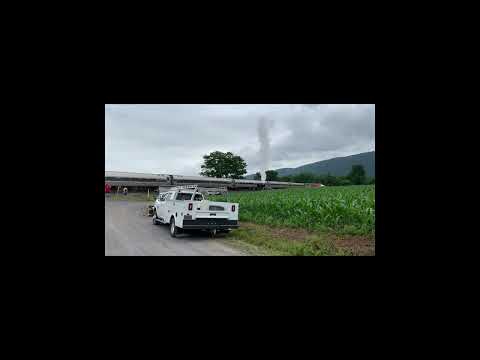
Took these at the Musselman plant while on a Gettysburg RR excursion trip in 2007. Thought you might like the weathering. They are vinegar vats but the same bird.


1 Like
Thanks Rooster. I have saved those pics for future reference. The pickle car will belong to “Miss Martin’s Orchard”. I have long thought about doing a facility for it.

A ventilated boxcar would be a nice edition as well.
OK, so I messed up the paint while fitting the first ring. Turns out the salt brine crystals (dry brushed white paint) was super thin. The layer of clear matte did not provide any protection from the floral stem wire as I wrapped it around the tank and then tightened it into place.
Take two. I have brushed on a heavy coat of water based gloss varnish. Hopefully this will protect my decades long build up of salt brine proving the longevity of this car’s service.

The coating is now dry and tomorrow I can try wrapping the rest of the bands. Those of you with delicate constitutions should probably cover your ears between the hours of 9:00 am - 4:00 pm. Not trying to be fatalistic but I anticipate a difficult task ahead. One down. Fifteen more to go. What could possibly go wrong?

1 Like
Nice to see you in the saddle again cowboy!
Varnish is dry and it is time to put the tension rings on. Part of the paint scratching problem before was wrapping the wire around the tank to shape it. To eliminate the possibility I found that a Bmann tank was close to the same diameter. I made a bend in one end of the stem wire and poked it through a screw hole in the tank. Then I wrapped it around the tank and made a bend in the other end. The excess was cut off.

Working my way from the tank bottom to the top The wires were installed in sequence. The first end was inserted into the hole in the tank and twisted back on itself with some needle nose pliers. This keeps the first end in place and snug against the tank body. Working my way around the tank I held the wire to the shape of the tank until I could push the other end into the same hole. Once it was started I pulled it tight from the inside using the pliers again. Both ends were torqued to take up the slack. If you do this technique make sure the wire is where you want it. It will be to tight to move easily.

In fact this worked so well that I broke the center seam on one tank. Delays were imposed while I waited for superglue to cure.

This turned out to be an easier job than I thought. The varnish worked great to protect the paint job and the stem wire has a nice natural sag and rise as it circles the car. Looks like it has gone through years of expansions and contraction with irregular maintenance.

Next I had to figure out how to make the tightening mechanism on each ring. In real life these are made of metal and tighten from both ends. This stye is more modern. It is mostly used for straps.
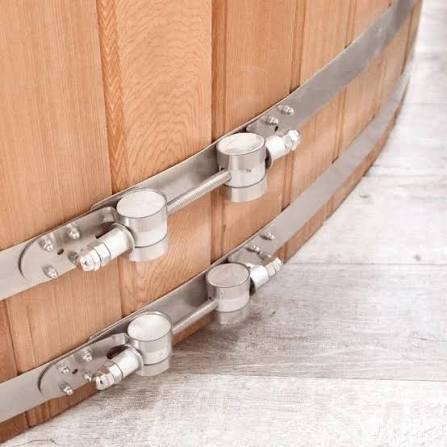
This bow tie style is a much older design. Here it is on a wooden hot tub.
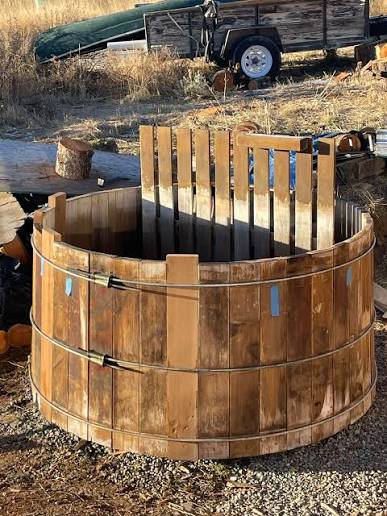
The second design is certainly more common on the prototype but if you look closely at the base of the tank in the first picture it looks like a strap style.
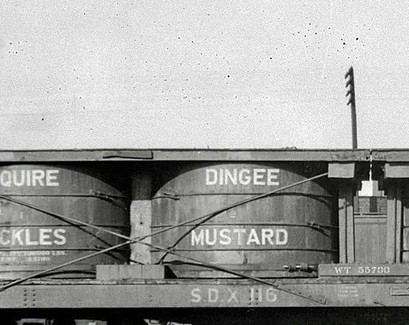
Since I am already committed to round rods I will go with the bow tie. No mistaking them on this car.

The good news is Ozark Miniatures makes this item in 1/20.3 scale. The bad news is they are out of stock and Dave has no idea when or if he will make more. Time to get creative.
I was able to buy a bag of these Chama water tank strap style double tighteners. The cylinder with the NBW was cut off and I glued them on to each side of the tension rods covering the hole where the wire passes through the tank body. A little Milliput to make them look like a single piece and I will be in business.
To hold them on I first tried Gorilla Glue Gel. It was to runny. Next was Gorilla Glue Clear Grip. It worked great although I could have used E6K or any of the industrial paste glues.

All four tanks done.

I will give them overnight to cure and then shape the tensioners with a little Milliput. Paint on some rust and fix a few alibis and this part is over.
1 Like
Alibis my ass you acted alone so don’t drag us into this!
Milliput is now sanded to shape. The tensioners were painted black then dry brushed with some rust red. I did a coat of brown ink over the tensioners and bands. Then a little black ink on the tensioners just to bring out the detail. The bottom band got some white lightly dry brushed on to represent salt crystals building up from the bottom.

Aside from being a little more clubby than the real thing they look pretty good.

To finish the tanks I need to add the pickles to the one tank. A support made of foam core was glued in. A disk for the fake bottom was cut from card stock. Finally a seal of TB3 was added to keep the water from running into the tank.

Wish I had set this a little lower in the tank but the wire from the top ring is in the way. It will have to go like it is.
While the glue dried I finished the frame on the car body.

Tomorrow I will do pickles and start adding the details on the car.


Now my friends I would love to regale you with the successful tale of my pickle vat completion. I really would love to. However I cannot so instead bare witness to the tale of sorrow and pity, that is…
The Pathetic Pandering of the Pickle Predicament.
It was a bright and sunny day in Boomer Land. The kittens were playing, I was full of pancakes and all was right with the world. The pickle vat with it’s false bottom installed was painted black. Next a few faux pickles were painted on the bottom to help hide the lack of depth in the car.

The top layer of pickles were made of brown rice mixed with “evergreen” green craft paint. They looked magnificent and after a solid stirring were soon dumped into a cardboard flat. As they sat in their stunning greenness, I admired their beauty and perfection. Congratulating myself on a clever choice for cucumber impersonna I picked up a wooden coffee stir and broken apart the clumps. Once separated the individual pickles were shaken until completely dry. The paint stuck lightly to the cardboard leaving a nice variegation to the sides of the cucumbers. No need for dry brushing. I am a brilliant and inspired modeler I though to myself.

For the brine I prepared some Woodland Scenics E-Z Water. Once liquefied it was poured into the vat and allowed to spread evenly over the cukies, filling all the nooks, crannies and hollows. Here is where things went wrong. I failed to account for the fact that being an organic substance the rice would contain air. The E-Z water screaming hot coming fresh from the stove top, foamed and frothed as the rice vented its captive expanding gasses. Once cooled I was left with something resembling carbonated cucumber soda.

What was a Boomer to do? I considered abandoning this part of the build and leaving all the hatches closed. No one need ever know of my abysmal failure. Once I stopped frothing (and cursing) the decision was made to rip out the cucumbers and resin, and start over. Since the goo was still warm it came out fairly easily pulling the rice off with it. The gooey gobs were flung into the trash and thrice cursed to the pits of Hades. I felt better afterwards having blamed the inanimate objects for my mistake.
With touch up on the false bottom and a new load of cucumbers glued in I was ready to resume. This time I chose my old standby water based varnish. It will take several coats but I will eventually get the water level high enough to look right. It, like the E-Z Water will dry completely clear.

Lesson learned. I am reminded of the wisdom of Hollywood who often said to me, on at least one occasion, “It is OK to make mistakes just don’t tell anyone about it”. Oops! Guess I should have recalled that wisdom a little sooner.
Well at least we are all wiser for this experience, and the only thing left, is to figure how to blame Rooster.

While I ply on multiple coats of varnish I will return to the main car body and it’s many detail parts.
1 Like
The pickles look great, Boomer! And if someone questions their color, or that of the liquid, that might be an opportunity to demonstrate superb research behind the model. For example:
- That vat’s pickles are in the third stage of pickling, which gives them a nice, darker color. Next stage is moonshine.
- Those greener pickles came from a farm having low PH. Lime will be added by the customer, to complete the pickling. Either that or some Vat 1 pickles, and he won’t care then.
- The white fluid? That’s just off-gassing from the Rooster pickles. It’ll settle down and turn chartreuse.
Just need some Hines 57 decals and it will be perfect.
Just my opinion FWIW, I think custom decals should be for either
“Rooster’s Unconglomerated Enumerated Pickles” or
“Boomer’s Premium Pickle Products”
Or just Rooster’s Boomer Pickles, or Boomer’s Rooster Pickles, and call it a day. 

And your name’s all over it! Awlsome job Bill! !
OK Bill, I’ll attempt to crawl up to your lofty threshold of AI greatness… 

A sequel…

And another…

And finally…

1 Like
Hollywood would be proud my friend!
He would have probably called me several times about this thread by now. I would say I know old man you told me the last time you called! He would say: well I’m telling ya’ again anyway with that (northern draw) cause he was a wanna be Southerner!
Pretty sure about (101%) that the Ma & PA RR hauled pickles. The old man loved that line between York and Baltimore!
Just saying…

I miss the hell outta him!
1 Like
Put those cool murals on the side of one of your buildings.
Especially the bottom “Pickels” one.
I love those!
1 Like
Once I got to looking at the car body I decided it needed one more change. I partially covered the open ends. I could not find a picture of this on any of the prototype cars but it is fairly common on other models.

I cut some Popsicle sticks to length using an Easy-Cut tool. First time I have used it. Worked great on the soft craft wood. Its a Boomer build, you knew Popsicle sticks were going to be involved at some point. Glued the pieces on the inside frame and sanded the ends smooth.

While the glue dried I sorted and prepared the metal details for the ends. I think these are Ozark miniatures but I have had them so long I cannot be sure where they came from. Some measurements and marks were made on both ends of the car.

A lot of pin-vise drilling to get the holes ready. Finally the pieces were glued in place using Locktite super glue. I am not crazy about the pewter castings for the grab irons. I will have to tweek them to get them straight. Not sure how well they will hold up either. It takes very little pressure to bend them. May have to replace them with brass rod.

I will hit the end with some clear acrylic to blend in where the super glue bled out. Now onto the sides.
It’s nice to see you using a pencil for reference marks instead of a crayon for once.
Looking great, Boomer. Nice Ozark bling!
I like those easy-cutters too, perfect for thin stock.