Large Scale Central

Ontario Northland F3A/VIA Rail F40PH Questions

Hello to everyone once again,
Haven’t been here in a very long time.
I just wanted to ask a few questions to see if anyone might have some answers.
Our program has several different sizes of locomotives and cars in our G scale kids model and train safety program.
Some of our trains are 1/32 scale MTH equipment.
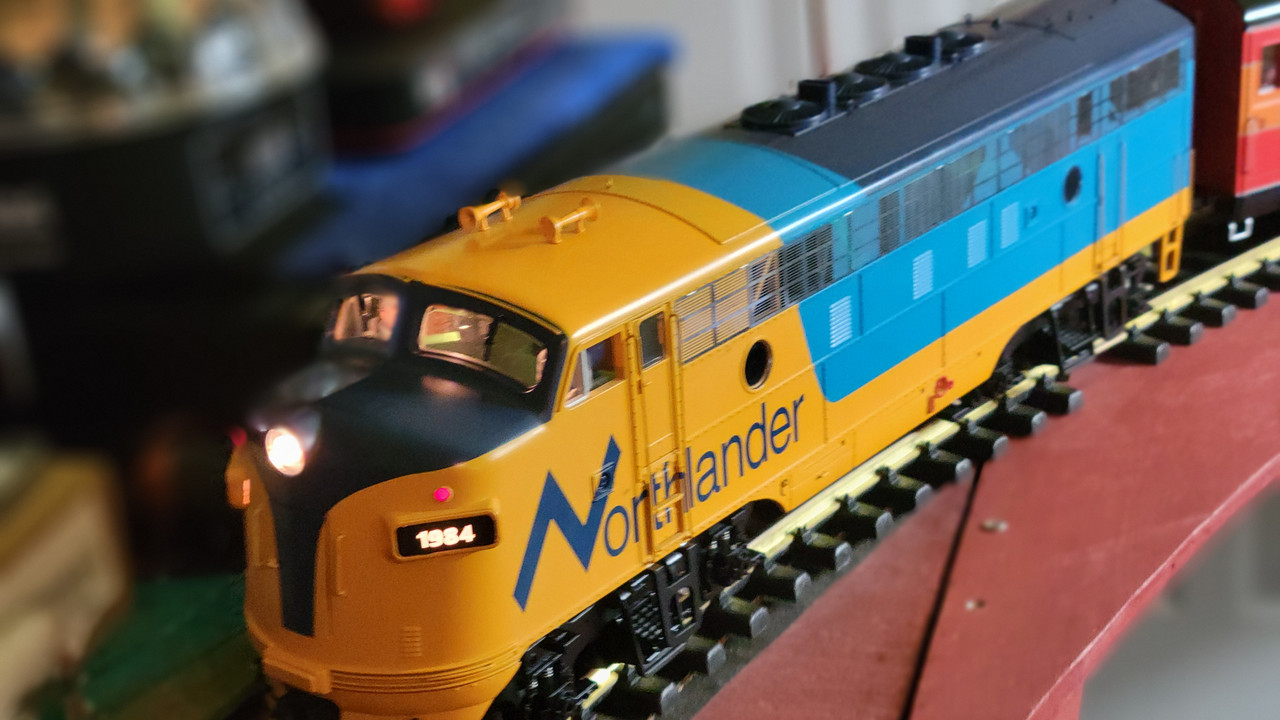
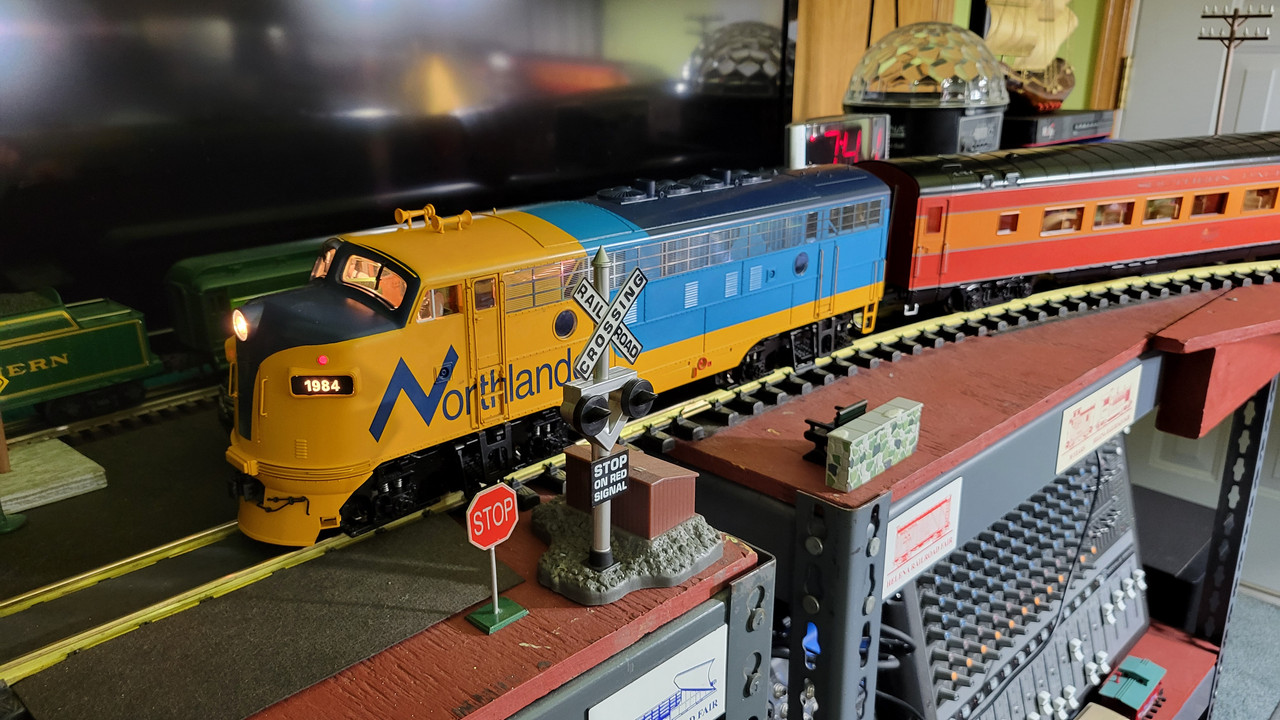
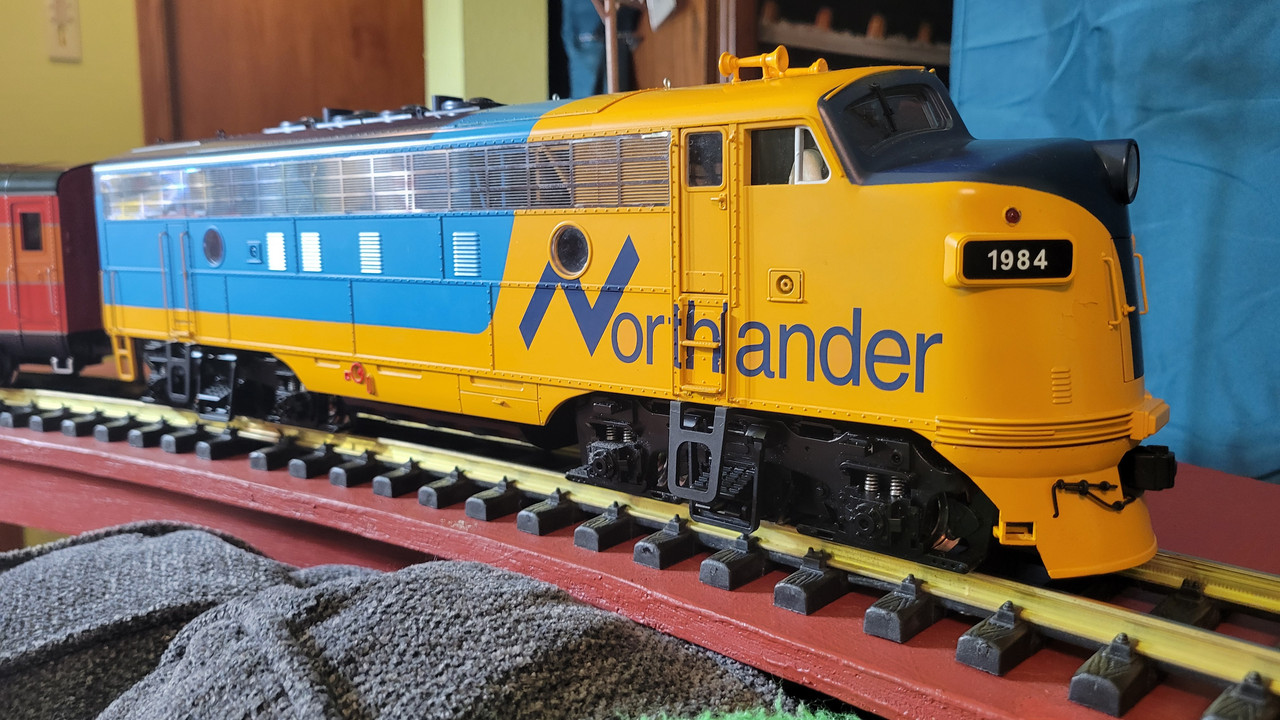
One locomotive that was partially donated to the program back in February was an MTH Ontario Northland F3A. (Norhlande)
This locomotive was in a state of disrepair but the paint was excellent and it was actually a very nice looking locomotive.
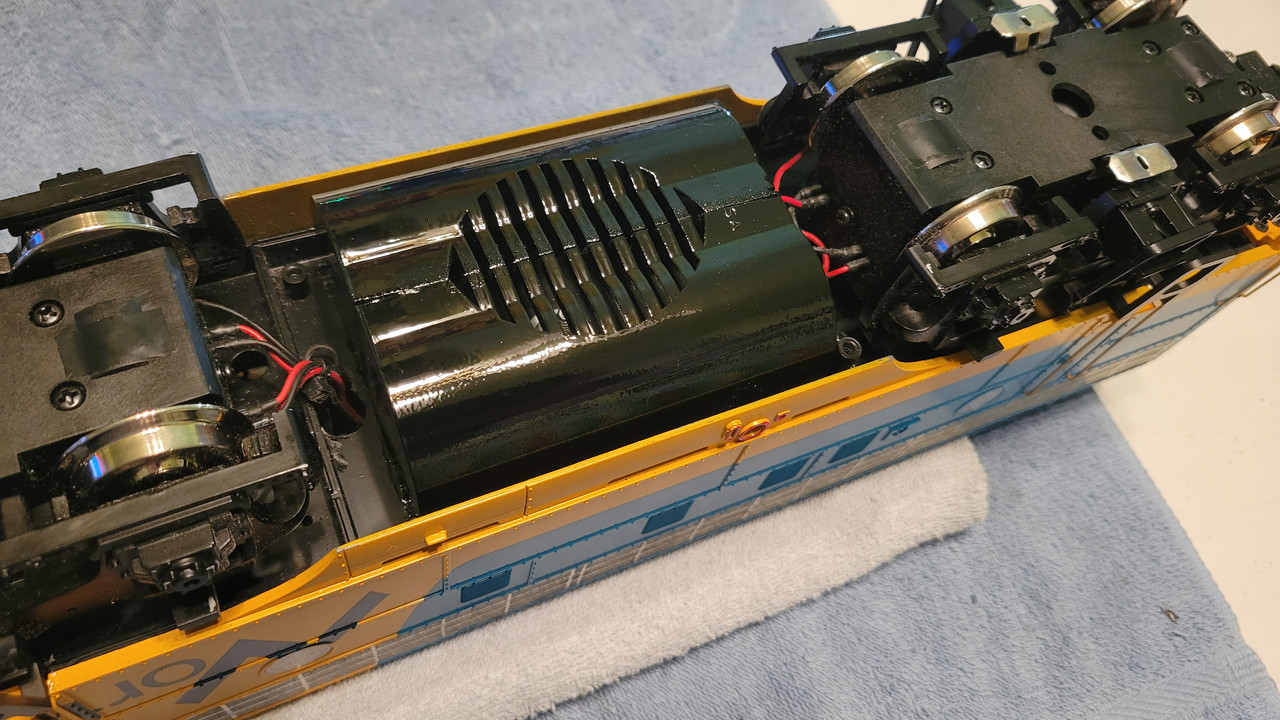
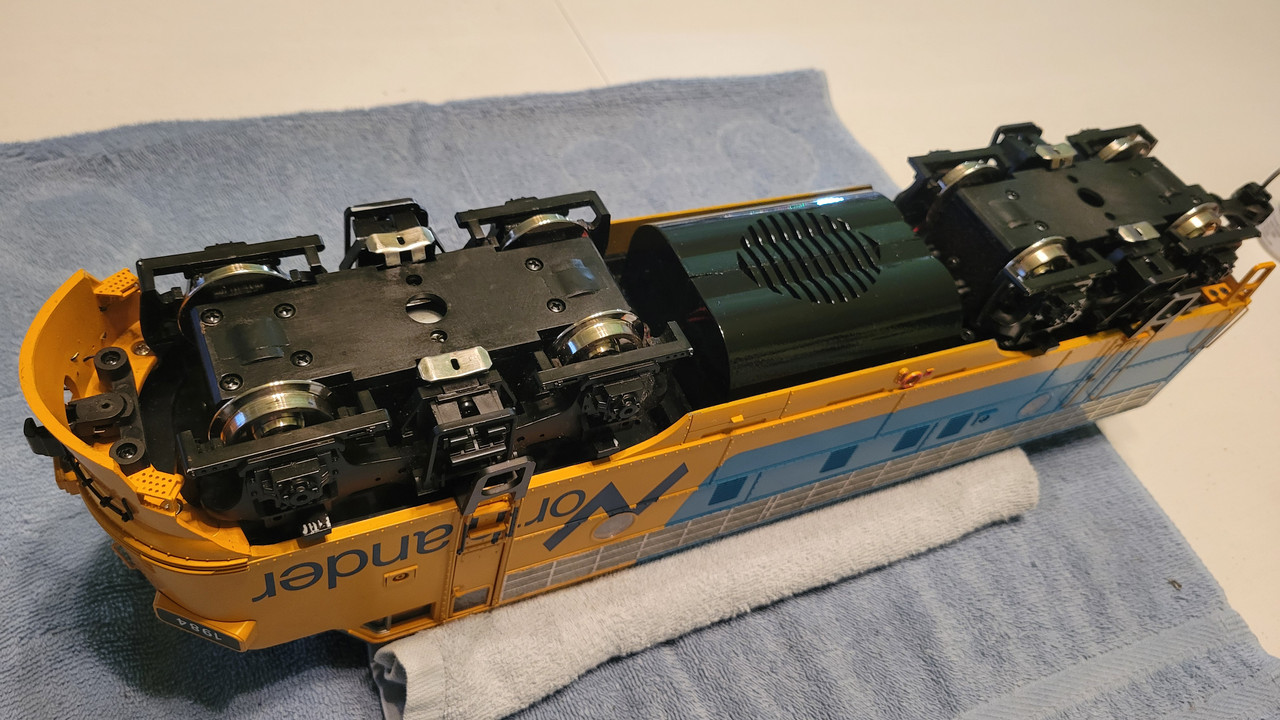
The previous owner did not have the body attached to the frame, no headlights, no windshield wipers and had no fuel tank.
It did however have very professionally installed new USA motor blocks in it. (X2)
It ran beautifully but had no way to power the 6 volt lighting board.
Ray supplied the board necessary to reduce track voltage to 6 volts to power all the lights which worked perfect.
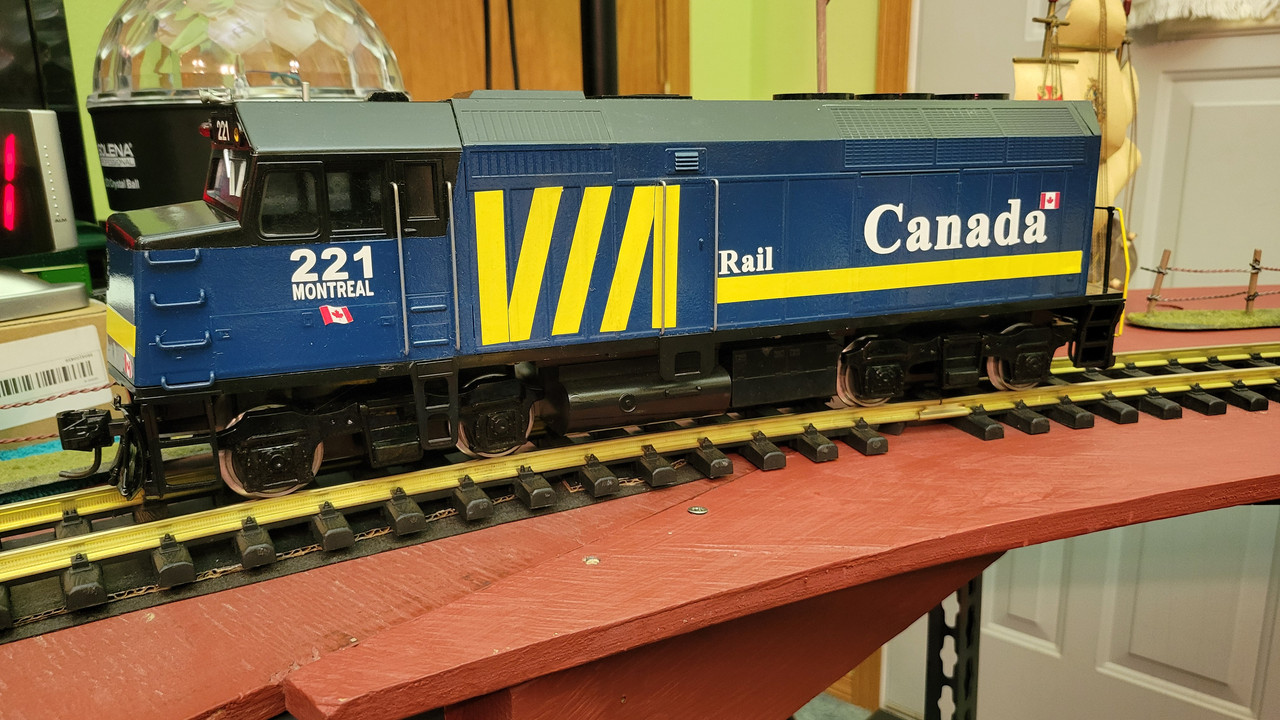
There was no lights in the rear, so we never installed them. The only real problem I faced was the lack of a mounting box for the rear coupler and the amount of space required to fill in to mount the Kadee was a huge challenge. We had to use wood and plastic combined and about 5 hours of work to get the height correct.
The other issue was the lack of all 4 access ladders/steps on the sides.
Adding access ladders to the sides was a challenge because USA Trains trucks are 1/29th scale and MTH had 1/32nd causing the trucks to hit the ladders. We had to install LGB ladders or steps that were slightly extended out to the side to allow proper truck manuverability.
Even with all these modifications, the locomotive still looked pretty descent and ran very well.
We also had to add weight which was fairly simple.
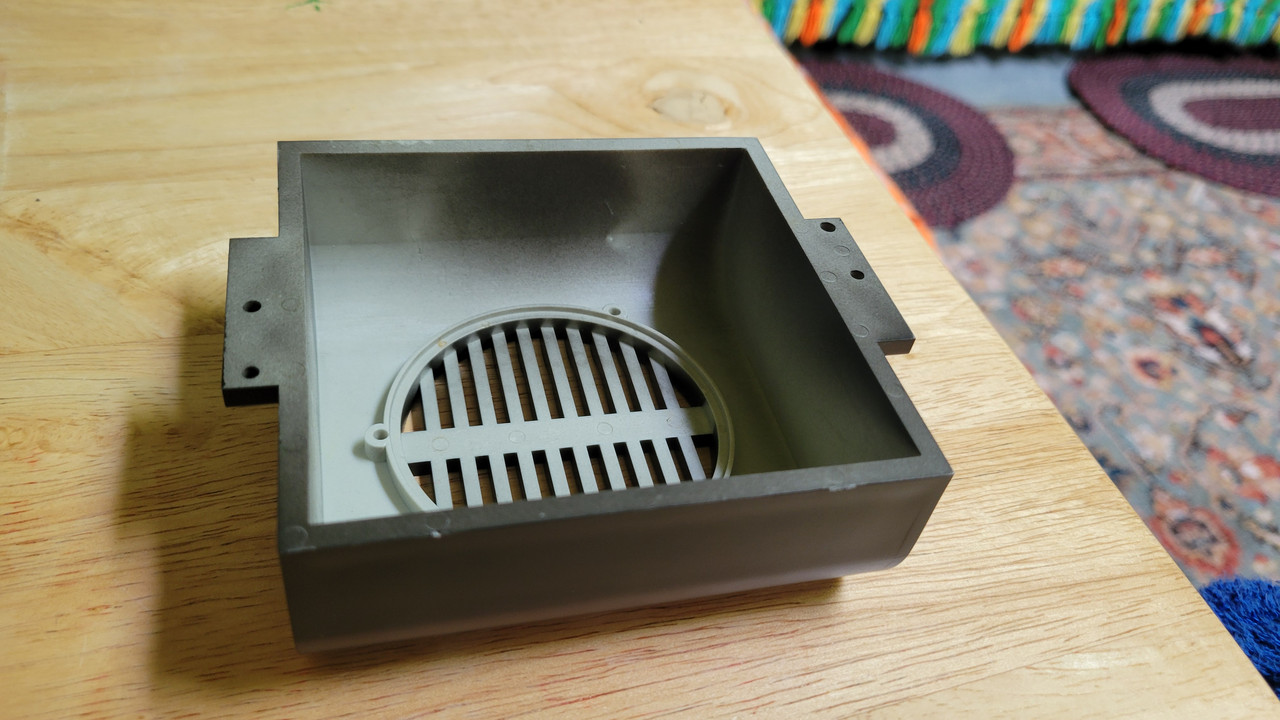
I thought I had everything ready to go and that’s when the biggest issue of all arose, no fuel tank.
With MTH kind of in limbo and parts, especially this type of part, not available, I had no way to find a correct fuel tank. I tried Ebay, forums, online shops and even looked for extra shells which I found for a couple other missing parts (like the windshield wipers) but no frame or fuel tank anywhere.
I thought I’d use a toy New Ray, GP35 fuel tank that was the correct width but it was way to long and cutting it down to correct length would leave noticeable modification marks or cuts on the side, so I left it on the original model.
I then thought Piko might have an option but they don’t manufacture a 1/32nd diesel that has a tank that size.
I then tried USA Trains and found a fuel tank that was 1/29th scale and the correct length but it was to wide by approximately 1/2 inch.
I bought it anyway because according to Butch, fuel tanks are not commonly stocked and hard to get your hands on. The only thing I didn’t think about is how I was to get an exact cut without damaging it because I don’t have equipment to do this.
I called TAP Plastics in Stockton, CA to try to have them do it but they were afraid to try it.
They said that their cutting machines operate at high speed which would melt the plastic and cause damage to the tank and speaker grates.
I finally decided to bring the fuel tank issue to you guys to see if someone had an original F3A, or F7A or possibly B fuel tank for trade or sale.
If not, maybe someone has more experience and is braver than us and can cut the roughly 1/2 inch lengthwise out of the center of the USA tank and glue it back together making it narrower.
This locomotive doesn’t have passenger cars yet but will be ready to go if we can solve this problem.
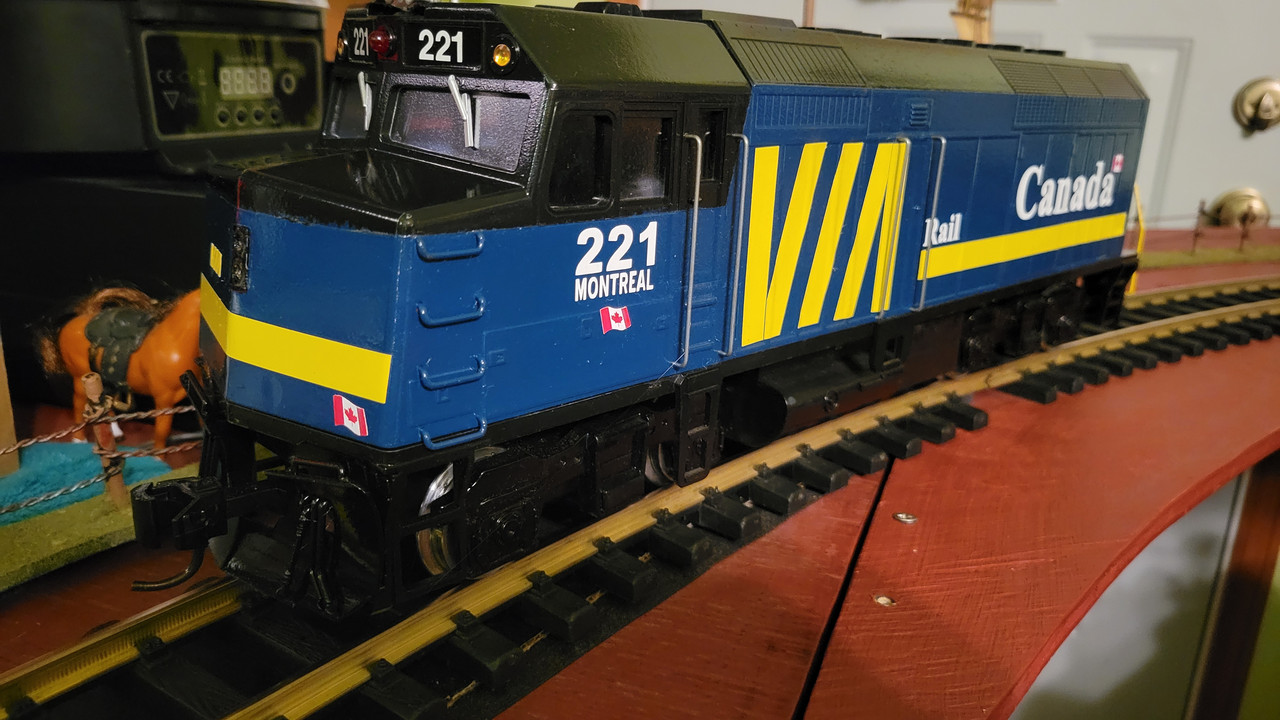
One other question, I have a Great Trains, F40-PH in VIA Rail Canada colors that we built. Del at G scale graphics helped supply the graphics and we added rear platform handrails, hoses, lift bars, a new detailed snow plow, L.E.D. lighting, (supplied by Ray) antenna, Kadee couplers and a complete overhaul.
We ordered 4 mm headlight lenses from American Scale Models to complete this model but haven’t received them yet. When we do, I would like to know what is best glue to hold them firmly in place without leaving residue on the lenses?
Appreciate this site and hope that wasn’t too much to ask but if I get the photos to post here, you can see what I am referring to. If not PM me and we’ll get them to you that way. You can also email my program at [email protected] anytime.
Thanks for your time and input.

Ken

Imagination Station Kids On Track Model Railroad And Train Safety Program

Hello Ken, and thanks very much for engaging with us.

I read through your list, and am a little bewildered by what it is you’re asking, but that’s probably because I’m old and tired.

So, I’ll suggest, at least for myself, that you could stratify a bit.

I.e., of the many things you’ve described, what’s the main issue you’re facing? Let’s tackle that first, and then move onto the next.

I’m not trying to criticize your post, I only want to see how I can understand where I might help. And if I can’t, there will be others here who can.

To elaborate on the post. We are in need of a fuel tank for an MTH F3A, or someone with the experience, equipment and know how to modify/cut to size the USA Trains tank. I wanted the application to be known because this allows folks to know how and why this needs doing. There are also questions I needed answers to complete the project effectively.
The effort put into refurbishment is sometimes extensive and when completion is near and parts aren’t available, it requires a little more work to get there.
Finding folks who have knowledge or parts in this situation has been challenging but I hope we will find a solution here.

Ken,
Nice to see you posting again. As for the F3 fuel tank when I built my F-40 in a slightly larger scale than 1/29th I used a USA trains GP9 fuel tank. Now I went wider and added fill pieces however what you need is a carpenter or someone experienced with a 12" chop saw and a fine 80 tooth blade (should be an easy find).
I just cut a piece of something (wood ,pvc) to lay flush with the mount tab on the tank so the whole end of the tank would sit tight against the fence then I cut it in half. In your case you would want to cut it in half and since the blade is 1/8" thick you will then want to cut/shave 3/16" off each side of the cut tank sides bringing you to your 1/2" reduction. Or mark your center point and then make reference marks 1/4" off each side and cut on those marks to the inside of the tank. As for gluing them back together I prefer using 3m Plastic and Emblem adhesive (E6000 is pretty much the same stuff just not as strong) it is a contact adhesive but when dry can be sanded smooth.

Hope that makes sense.

Rooster,
I’ll take a further look into this but I don’t really know anyone in carpentry, however, this is a great idea and I’ll look around and maybe there is someone with those skills and equipment. I don’t think it would end well trying it myself.
Really appreciate the advice and photos.
Ken

I cut plastic parts, like your fuel tank, with a Micromark mini table saw with an 80 tooth blade [which is a lot less than 1/8" wide.] I don’t think you need a carpenter!

Peter,
That wasn’t my thought of process please re read Ken’s post thoroughly! Then re read mine!

Now you have him buying a Micromark mini table saw with an 80t blade that cuts a lot less than 1/8" wide so my guess is the blade is about 3mm wide but to be sure he should also purchase a micrometer ? I was just trying to show or tell the man how I did mine > Have you quartered up a USA trains fuel cell before ?

Sometimes this is why I keep my beak shut on how I approach modeling things and how I personally do them.

BTW…Ken’
This is my ghetto wiring for F40 cab roof lights it’s all quick soldered in place because of the PVC shell. The tee and hard runs to the resistor and LEDS are paper clips that are cheap and can certainly be bent neater but I wanted to get it done so I could play with it.

:rooster:

i’m with rooster on this.
Ken’s posts do not sound, like he is a craftsman, more like a social worker.
unlikely, that he will buy a cow, when he needs a quart of milk.

Korm,
Your comments about the social worker are kind of interesting, in as I have the 6 years of related education and years of experience and a current foster home as well. But what’s more interesting is my 49 years of working on and building, running and repairing trains in all scales, especially G scale.
I think we all run across projects we need a little guidance on, or may not be as qualified or good at it as others. We all can learn something new everyday, or improve on our current knowledge
I really enjoy the hobby and try to share it with the public/families as much as I can with our program.
Many of the trains we receive need refurbishing and require modifications in electrical, paint, body and sometimes power trucks.
By the way, Rooster, I like the simplicity and I think I’ll give that a try on my next L.E.D. installation next week. Great idea! Actually!
Just curious what the rating on your resistor is?
Interestingly enough, after Ray built the boards, I was only able to attach the 2 rear headlight L.E.D.'s to that circuit. I wanted the front red L.E.D. to light up when those 2 rear lights came on in reverse but every time I hooked up the red L.E.D. it killed the 2 rear headlights until I unhooked it no matter the polarity. I pre-tested the red L.E.D. and it works good but when I hook it up with correct matching polarity, it comes on and kills the 2 rear headlights. The front headlight circuit does the same thing with it hooked up to it, even though that’s not where it will be hooked to but the front headlights are on a separate circuit altogether and don’t share wiring or boards of any kind. Any ideas on why this happens?
Peter,
Your idea is a good one but a little out of my price range right now. I wa looking at bandsaws the other day online but that’ll really have to wait a while also. Not sure which one would work better?

Ken

Bandsaws are good for cutting curved lines. Table saws cut straight, and don’t cut curves.
Bandsaws can be guided to cut straight, I believe.

I’d be happy to do it for you, but I confess I am not a carpenter.

Sent you a message Peter.

Half afraid to answer this but my standard LED resistor is 480ohm which is very universal and suits my needs.

As for the other issue I cannot really answer only guess. I don’t know what the board is and I’m just a stupid mechanic not an electrical engineer or carpenter.
I would guess there is a rectifier in that board ( I have no experience with MTH) or perhaps not enough voltage or current on the circuit when extra lights are added? Then again my terminology could be all wrong as well.

However this is only a guess…I do know how to read an electrical schematic

And a mail package with the tank, which arrived this afternoon. So I got out the mini table saw and chopped it up.

First cut.

Second cut:

Checking the distance between the halves - 11/16ths!

Cutting through the ends to match the long cuts:

And we have 2 halves!

. . which look to be 3 1/16ths width over the sides.

Looks perfect. Hope the tape helped a little.
First time I’ve seen that done.
If you have PayPal, I’ll cover shipping back. It’s approximately 6 or 7 bucks or thereabouts.
Nice!!

Hey, I haven’t finished posting pics! I was diverted by dark chocolate ginger biscuits from Fortnum & Mason, supplied by my son’s partner. (Decadent!)

The halves were sanded on a ceramic tile (glass or flat hard wood works too,) to clean up the edges.

Here’s the finished cut pics.

A little black paint is needed. And some glue.

Came out real nice. I don’t think I could have gotten it as straight with only my dremel tool. Really nice job!
Thanks!

Micro-Mark just started selling carbide disks for this saw, which means it can cut brass or steel. I’ve used it for cutting brass sheet, etc. I also have a 180 tooth blade for thin metal, and a regular 30 tooth rip blade for wood.

I’ve had it for years. Highly recommended.

Nice work and no chop saw or carpentry needed! I do think you should probably stop using your Sears made ruler as it is probably a priceless relic these days!

I hadn’t even noticed. It’s been sitting on my workbench for 20? 30? 40? years. Very useful but worthless.