Large Scale Central

No-posthole table top

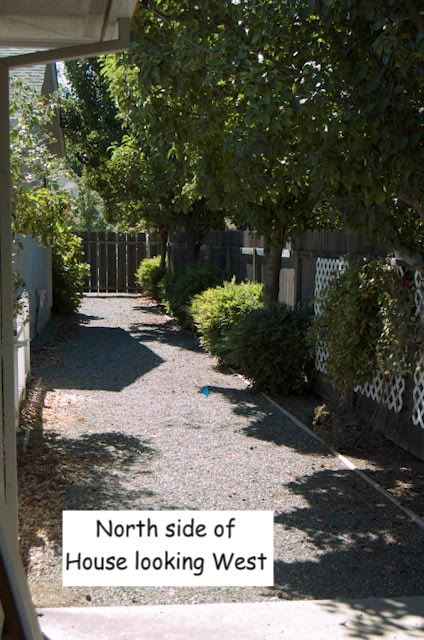
For those who have wanted to do a table top/elevated railroad ala Richard Smith, but did not (or could not) dig a bunch of postholes, here is how I did it. Ours is a 1/3 acre city lot in the shape of a right triangle with the house and separate garage on the street side and a shop in the back behind the house. There is, now was, a gravel driveway to that shop. In most cases it has been easier to pack wood from the garage rather than back up full size p/u 100 feet in a narrow 8 foot D/W. Time to make better use of that stretch of land. This is what it looked like before construction.

? There is a waste line from the shop out to the street so piers were my only choice. Nothing to dig up and back fill will simplify removal since it doubtful the next owner will share my interests in playing with trains. I did dig a small cavity to keep the pier from moving too much.

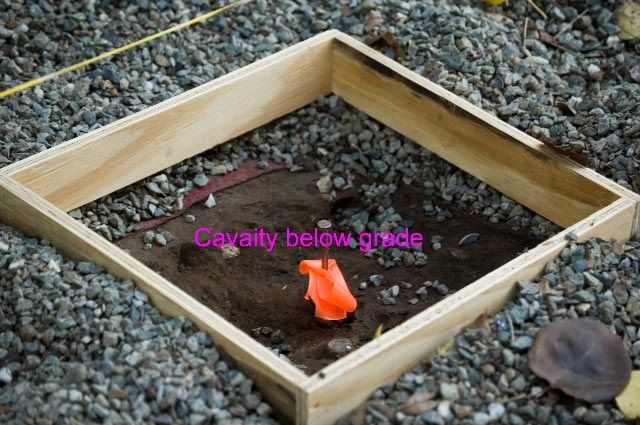
Add some mud and plant a pier.

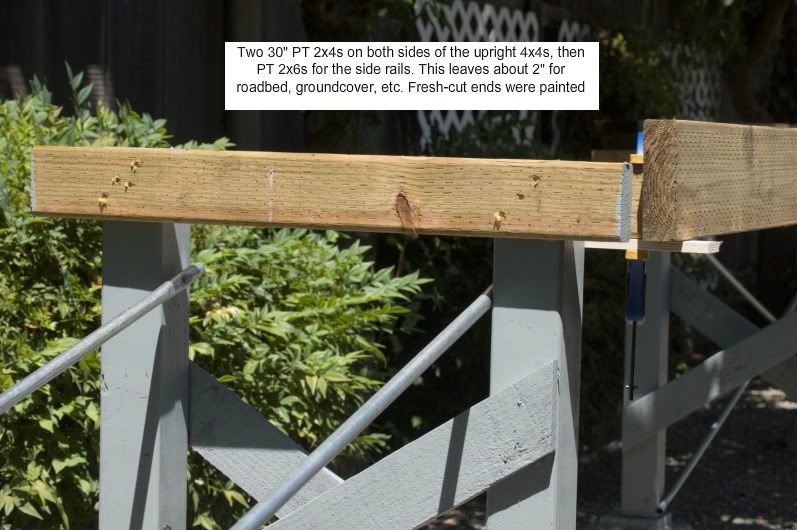
I wanted a 30 inch wide top so posts were pulled in 3 inches to allow for “toe kick”. And I spaced the pairs of posts 93 inches, less than 8 feet, to accommodate any variances in dimensional lumber.

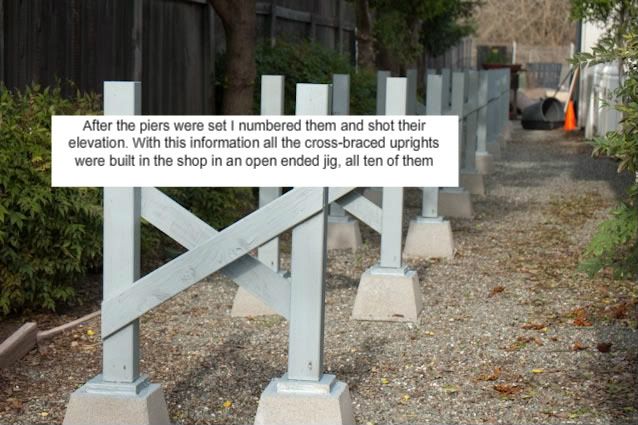
I remember Richard Smith telling me the 2x4 side rail sagged a little so I went with 2x6 PT

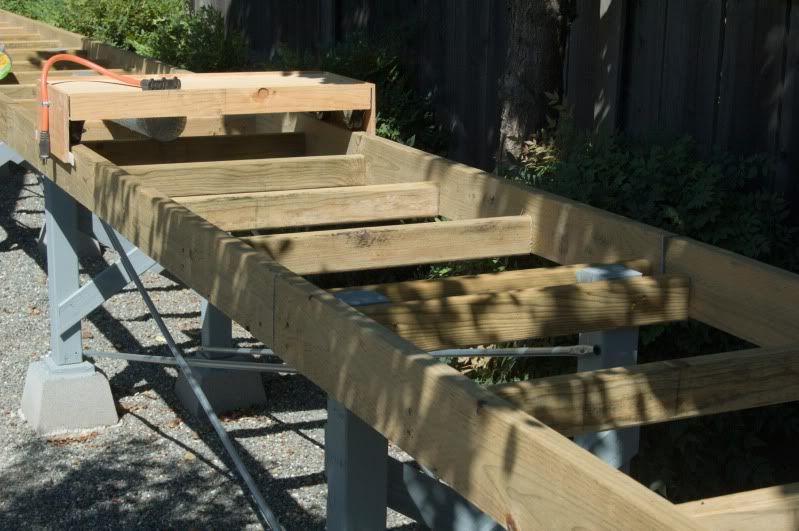
After adding these cross pieces I laid in 30 inch hardware cloth and topped it off with some weed barrier. Love my air gun stapler.

Like my tool tray on wheels? Now I need a plan for my railroad. Bill

Bill,
That looks swell and nicely constructed. I’ll be most interested in how it works out. Please keep us informed.

Are you building the RR as a point to point or will it eventually be looped around?

Bill,
You Devil, You never said a word today about finally getting started on this project.

Looking very well engineered and constructed, as I would expect from you.
Are you going to have room for a return loop at the ends or is it going to be strictly point to point
as the existing line is?

Is that 1/2 inch conduit you are using for X bracing?

Nice talking to you today.
Rick

Well my really long range plans are to put a loop or wye at the street end and then tie the back end to the existing layout that already has a loop in it. This entails extending the T/T another 8 feet over the concrete slab alongside the shop. This extension will have a model of a well known feed store here in town. That model in ½ “ scale will be 50” long and will store rolling stock, thank you Richard. Then from that storage yard I will do a single ”utility” roadbed from that 40” height around the back of the shop and down to grade level to the existing layout. When I finished that first layout 2 years ago my back and knees conspired and said, “Work 3-4 feet above grade or find yourself 6 feet below grade”.
But before I do any of the above I want to complete this T/T with “dioramas”, 30 inches does not give you a lot of room, of easily recognized architectural activity here in Butte County That invited a RR siding. I lack Rick Marty’s creative composition of fishing camps. I gotta have a photo or spec sheet to work from. So I will be bugging the local historians for pictures. It was not too long ago that Chico had RR tracks going down Main St. Our daughter remembers trying to avoid them with her bike when she went to Chico State. Now I feel old.
Rick, it is getting together like today that gets me charged up and back to work on the railroad, or in this case posting what I have done lately. Yep, that’s ½ EMT. I do lots of things with it, like a shepherd hooks for our birdfeeders. It is cheap and lightweight.

“Now I need a plan for my railroad.”

Errrr…Isnt that kinda putting the cart before the horse? Having built a few layouts now with benchwork dont ya kinda need to know where the track goes before building the benchwork so you can adjust the width for track, sidings, builings, etc. Found the best results came from the trackwork dictating the benchwork, not the other way around…just curious how this will come out.

Bill,

If Rick is helping you with the ideas for your trackplan, this should be a very nice layout!!

BTW, my first summer after high school graduation (1961), I worked for the Bureau of Reclamation in Red Bluff. My cousin and I spent a lot of time in Chico. Great little town!

Hey Bill,

Great looking bench work!! I like your idea for the footings and anwsers my questions. I need to build a storage/loading yard for my railroad for guest’s and my rolling stock.

BTW I like your tool cart.

Chuck

Victor,
I may have lied a little because I do have a very provisional plan. I want to model local architectural activity meaning part of the front of a well known building here in town, perhaps 2-3 other buildings populated w/ figures, accessories, etc. with all the track on the front edge of the table. Something visitors will recognize and relate with visual dialog/meaning. With 70 feet of table and separating these dioramas with savannah landforms and/or water features I hope to create four or five town/countryscapes that hopefully invite a siding or station. Given the table’s 30 inch depth there is not a lot of room for elaborate track planning, especially since I don’t know what and where the reason for a siding will be located.

I made that comment at the end or my posting to show how little I know about what I am doing. I have never done anything like this before but with Rick Marty propping me up on one side and Richard Smith on the other I think I can pull it off
Thanks everyone for your encouragement and watch out for a lot of dumb questions on modeling buildings.

Bill

Thought you had to have some kind of plan to work to. Look forward to progress pics.

Victor Smith said:
"Now I need a plan for my railroad."

Errrr…Isnt that kinda putting the cart before the horse? Having built a few layouts now with benchwork dont ya kinda need to know where the track goes before building the benchwork so you can adjust the width for track, sidings, builings, etc. Found the best results came from the trackwork dictating the benchwork, not the other way around…just curious how this will come out.


That’s only one way to do it. You can plan your railroad, then build the bench work and follow your plan, or build the benchwork, and then see what fits. I’m following the second way. So far, so good. That’s what the 1:1 guys do, when you think about it, see what fits into what is already there.

How many times have we had to change the plan after the bench work gets built, because we don’t like what was first planned, or it doesn’t really fit, or…

This way, we just skip all that planning that really doesn’t do much good, anyway.

I like it.

Victor Smith said:
Thought you had to have some kind of plan to work to. Look forward to progress pics.
Vic, Ordinarily that'd be the way to go whether indoors on benchwork or outdoors in the yard. Benchwork outdoors however has its own unique set of problems, namely reach and access. Things such as duckunders, or unreachable track etc., rather degrade the convenience you put benchwork up for in the first place.

Indoors the access problem is obvious where you are enclosed with walls and restricted by doorways, windows and other impediments. Outdoors the railroad is usually at or near ground level. If you swing a large loop or extend a siding outwards you merely need to provide a walkway or stepping stone(s) for access to operate or maintain it. A well thought out plan is quite helpful.

A railroad on outdoor benchwork on the other hand can be quite difficult to plan in its entirety ahead of time. First you need to define the space available and then plan a very general concept that allows for proper access so the railroad can be practically built and then enjoyed when it is finished. The trick is in combining the two and still have them suitable for outdoors. I’ve found that a very loose, general plan that will fit the benchwork my space allows for without any set configuration works best. That way I can know the basic direction I want to go while taking advantage of any ideas that come to mind as the RR progresses. Sounds lackadaisical I know but it works well for me in this context.

Guess its a difference of philosophies then. While I’m a completely loose cannon kitbashing I have to admit when it comes to track planning and benchwork I am methodical to the point of mania :lol:

All my layouts were planned to the quarter inch with exact track counts and wiring diagrams layed out. I turn back into a complete insanoid once its down and I’m doing scenery and buildings but for some reason I get real serious about bench and track.

Steve Featherkile said:
How many times have we had to change the plan after the bench work gets built, because we don't like what was first planned, or it doesn't really fit, or.... This way, we just skip all that planning that really doesn't do much good, anyway.
Two years ago (or was it three?), I drew up a new station for my Thomas show layout: two mains, both with passing sidings, requiring two new, polygonal baseboards and considerable modification to adjoining corner modules (in fact, it would have been easier to build new there, too). It would have made the layout three or four feet longer to get in decent siding length, which could be a problem at some shows we attend. I got as far as cutting out many pieces of plywood for the new boards, but then it all got put aside as real life intervened.

Took a look at my wood bin this summer with all those pieces in it, but I couldn’t remember how I’d planned to fit it all together – I’d lost the carefully drawn-out plans somewhere in one of our discard-or-else purges :P. The baseboard design violated the KISS principle, and I wasn’t even happy with the track layout – some nasty R1 S-bends to get into the sidings.

Last weekend I had the layout up for a show at the Smiths Falls rail museum, down the road from us, and in an idle moment the light dawned as I looked at the other side of the oval, where I had only been planning a filler piece to match the length of the new station. I saw I could use ONE new rectangular board for the station and some simple, rectangular additions to widen the adjoining corners to allow for four tracks. No S-bends, and no increase in layout length; it will be a foot wider, but since I’ve always asked for 14’x12’ space at shows when the current layout is actually 13’x11’, the extra width is already allowed for. I drew up a new plan – not too detailed :wink: – to make sure the brainstorm could work, and it panned out (not a certainty with my brainstorms).

So today I got outdoors on the only dry (but 30C and muggy) day forecast for this holiday weekend :(, dragged out the table saw and chopsaw to “adjust” some of those bits of plywood I had cut years back, and started to assemble the station board. So far, it’s going together OK (also not a certainty with my projects), and I have six weeks before Railfair … ah well, that kind of pressure is better than the daily SNAFU at work.

Oh yes, to get back on topic, I also avoided postholes on my raised backyard layout; it’s almost impossible to dig any kind of hole in our soil without heavy machinery, and the thought of having to remove the layout was at the back of my mind. So it’s deck blocks on patio pavers, a la IPP&W; you can’t go far wrong if you follow Fred&Co’s proven techniques …