Large Scale Central

Making simple switches

DISCLAIMER: The following advice comes from someone who has only ever built one switch just to prove I could.

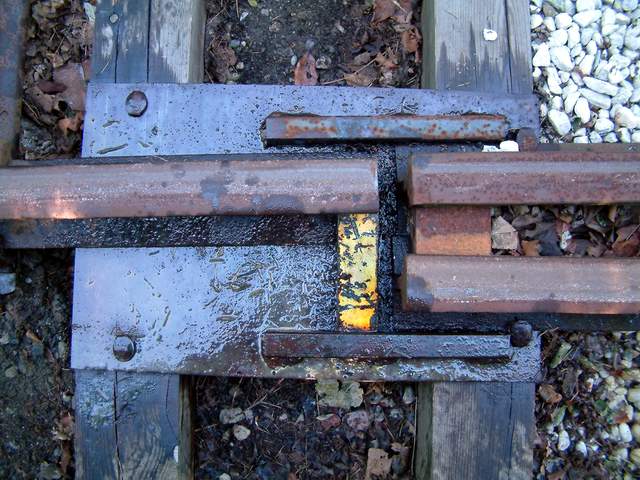
The simplest form of switch that was common in the early days of railroading and I’m guessing was probably very common on logging lines was the Stub Switch. It is simpler to build because there are no points to grind. The only part that is not regular rail is the frog, Here is a close-up of the business end of a Stub Switch:

(http://photo.cvsry.com/StubStop2.jpg)

(http://photo.cvsry.com/StubStop1.jpg)

You can make your own frogs by grinding rail and soldering, but several manufacturers sell them. If I was going to build more than one or two I would buy pre-made frogs. Bart casts his own frogs from resin.

I can’t find the bookmark for the page of instructions I used to make the frog. I’ll keep looking; if I find it I’ll post it.

And here is a template for building Stub Switches: http://www.prototrains.com/stub/stub.html

For control, Phil makes some really nice Harp Switch Stands in brass

http://www.philsnarrowgauge.com/Parts.html

Model Railroader, April 2001 has an article on building a 3 way stub switch.

Google led me to Bruce’s 2009 post over on MLS with several inks…

One Way To Build A Switch

Hand Laid Gauge 1 Switches

Stub Switch Turnout Template

BUILDING TURNOUTS

Maybe a larger scale might be easier? http://www.calvertcentral.com/CC_Stub.html

If you’re planning on making your own frogs, you might want to take a look at this article: https://smallmodelrailroads.wordpress.com/2012/11/04/hand-laying-track/

He builds a jig to help solder. I doubt you could solder large rail, but a torch could do it. Probably not a good idea to use wood for the jig, but I do like some of his ideas.

Wow you guys are fast. Lots of good stuff far. I’m going to look at everything and study. Looks like I will go with the most simple, a stub switch. Guess Ill be doing some practice.
Thanks for the info and Bruce thanks for the article via e-mail.

Bookmarked

Buy frogs and points for your first turnouts. Much easier when your learning. Then you can build frogs and points later. It’s actually not that hard to make frogs and points.

I started a few switches for my layout but never finished them when I found some LGB ones cheap. The toughest part I found was grinding the points and getting the frog to line up right. I built the switches then figured I woudl worry about insulating them later on but if you are running battery or live steam you don’t need to worry abut that.
Buying your frogs might be a easier way to start.

Excellent question Shawn. I’ve been thinking about this too. I really like the Sunset Valley switches, but I have been wondering about building my own. Bookmarked!

I agree with Craig and others. You might think about buying the frogs to start with. If nothing else just to see exactly what one should look like. :wink: If you’re going with a regular switch, then get the points to.

I got mine from Clem: http://www.warriorrunlocoworks.com/llagas.php

If you are going to make your own frogs, I’d recommend a good grinding wheel and a small torch to solder with.

For my frogs, I’ve used various epoxy resins (or similar) with good results. I just did one this summer where I used plumber’s epoxy putty. I get the rails of the frog “close enough” to form the point, but it needn’t be remotely perfect. Then I press the putty into the frog and let it harden. I used a small stick of wood (a popsicle stick works well) to roughly shape the flangeways while the putty was still pliable. Once dry, a little bit of work with some 60-grit sandpaper shaped things nicely. The advantage of the putty as opposed to the resins I’ve used in the past is that there’s no need to dam up the frog so the resin doesn’t leak out from around it.

Time will tell how the putty holds up in this application, but I’ve used it for other things outside with good results.I do recommend buying points if you can. Grinding them is a pain, and if you’re using aluminum, it clogs up your grinding wheel something awful. Llagas Creek makes nickel silver castings. Sunset Valley may sell points as well. Don’t know about code 332 points.

Later,

K

Switchcrafters makes Frogs in CODES 215, 250, and 332, and in FROG SIZES #4, #5, #6, #8, & #10.

(http://www.switchcrafters.com/images/catalog/FrogPoints.jpg)

Those are pretty nifty. I don’t recall seeing them before. The rail parts are pretty simple to bend, These points look like they eliminate some, but not all grinding.

It took me the longest time to figure out just what was being offered (the brass colored part), as I am a very simple man. It can’t be all that difficult to grind (or file) off the end of those two rails, and you really don’t need to be exactly exact to make things work, either.

Its not hard to grind that point on the frog…but it tends to loosen over time causeing more maintainence. that the reason I started using cast resin frogs. If something happens to one, I have them secured to the ties with 4 miniature wood screws. so its just a few minutes to drop a new one in place, and its easier to make adjustments on a resin frog than a metal one…

I build my own stub switches. Wrote about doing it here…

http://www.freerails.com/view_topic.php?id=4163&forum_id=50&page=2

The idea of casting your own frogs sounds very intriguing. As I cast some parts already, this is something very do able. What type of resin do you use?

Thanks.

Chester

I cast them in place on the switch, as the rails themselves make up the various parts of the frog. I’ve used polyurethane resin (the stuff used for auto repair), Bondo (also used for auto repair), Alumilite, 2-part epoxy (the 5-minute glue variety), and plumber’s putty (epoxy putty) over the years.

Of those, the 2-part epoxy is the least suitable, as it has too many air holes in it from mixing. It works, but it’s not the smoothest finish. The polyurethane and Alumilite work well, but you’ve got to make some kind of dam under and around the frog so that the stuff can’t leak through. I usually do this by putting tape under the area where I’ll be laying the frog (sticky side up) before putting the rails down. The tape will stick to the rails sealing the bottom. Then some modeling clay at the ends keeps the resin from running out the end. With this, you have to pour the entire thing to the top of the rails then grind out the flangeways.

That grinding is what led me to experiment with Bondo and plumber’s putty. Because it’s much thicker consistency, you don’t need to dam things up, and you can “sculpt” the flangeways at least to some rough extent when making the frog. The plumber’s putty is probably my favorite in terms of ease of use. It comes in a roll (like a Stuckey’s pecan log), and you just slice off what you think you might need. You then knead that in your hand until mixed, then press it in place. It’s got the consistency of modeling clay, so it’s pretty workable.

I’m out of town at the moment, so I can’t get to the photos I took during my most recent switch project.

Later,

K