Large Scale Central

Making My Own Air Switches

I have long desired to make my pike the easiest that I can to run trains on, with the least maintenance, and striving to keep it more enjoyable, and least work and worry.

From the dream stage to the finally buying the track I set upon some goals. 1st, DCC operation, It really caught my attention and allows me to do some stuff the way I want. Wireless throttles of course! I run the Digitrax System. 2nd, All Stainless steel track with as wide as I can radii. And switches (Aristo). And 3rd, Air controlled Switches with remote DCC control from walk around (or sit around) throttles.

Before I bought my first switch I settled on control using the E-ZAir System. I purchased an 8 switch package containing motors, 12V Clippard Solenoids, Tubing, Fittings and all.

9 years later and I’m finally reached the point that I feel that I’m ready to install them. During that time period Loy’s Toys, my DCC mentor is out of business. And E-ZAir has shut down. And I have learned a whole lot more then when I started this journey.

A couple of companies have stepped into the Air Switch market to pick up the slack, and all of them have the same basic idea and products, with the same limitations as I see them. Its these limitations that have made me jump into making my own (and what I think is better ) air switch motors.

Here is the problem with there motors on my lay out. Clearance. And the fact that they only have the ability as purchased to push the points one direction.

Note the position of the motor, it’s mounting legs, and that it would have to be charged (air pressure to the cylinder) all the time to keep the thru (mainline) running.

Here is why you can’t mount these type of motors on the other side of the switch.

I have 8 switches that fall in this interference category of no room to place them without issues. And I will need about 20 more motors before I’m done.

The most obvious solution would be to have the existing motors turned 90 Deg. on axis and use a bell crank to activate the points. My thoughts are why pay a premium price for a product and then have to extensively modify it, so that it can be usable? I think that I can build a better mouse trap for my needs and push or pull the points from either side of the switch.

I studied their design, scratched out a couple of drawings and thought that I would have ago of it. Started by finding the Clippard (industry leader) cylinder that would fit my needs. Ordered up a few to test out my design.

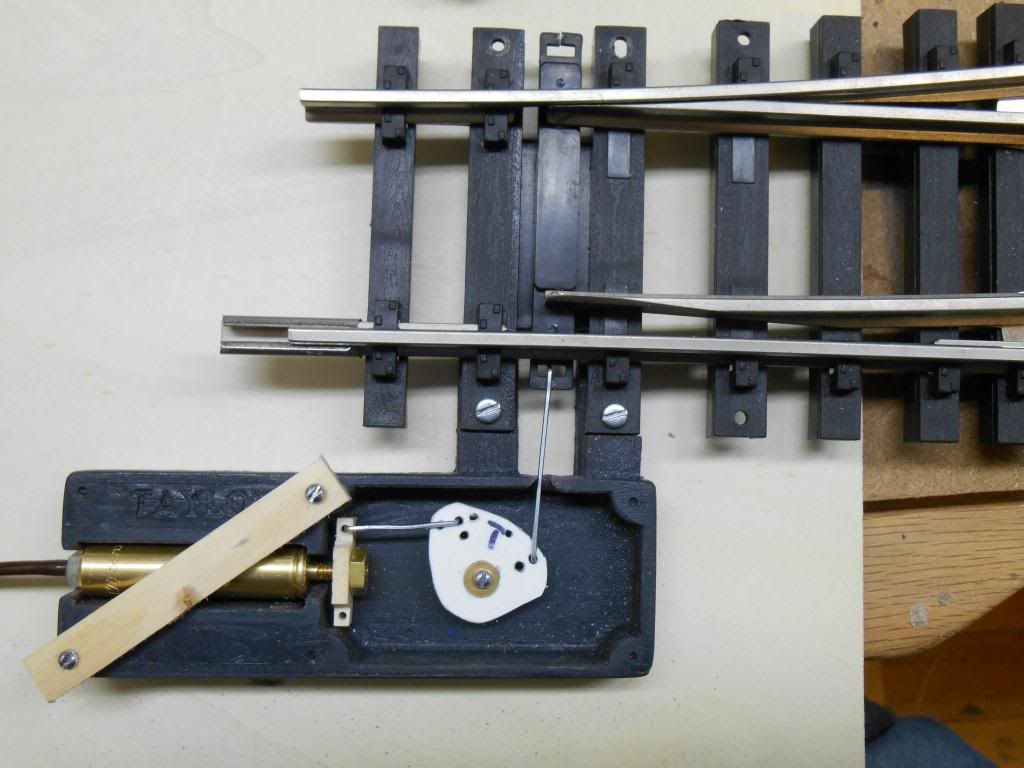
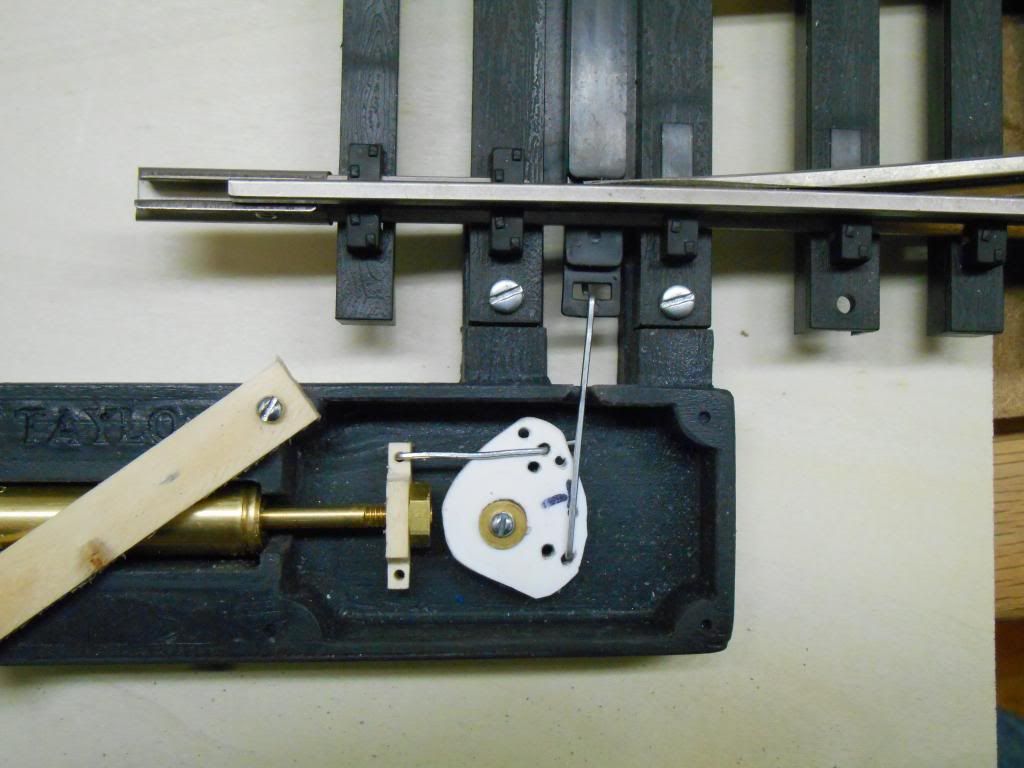
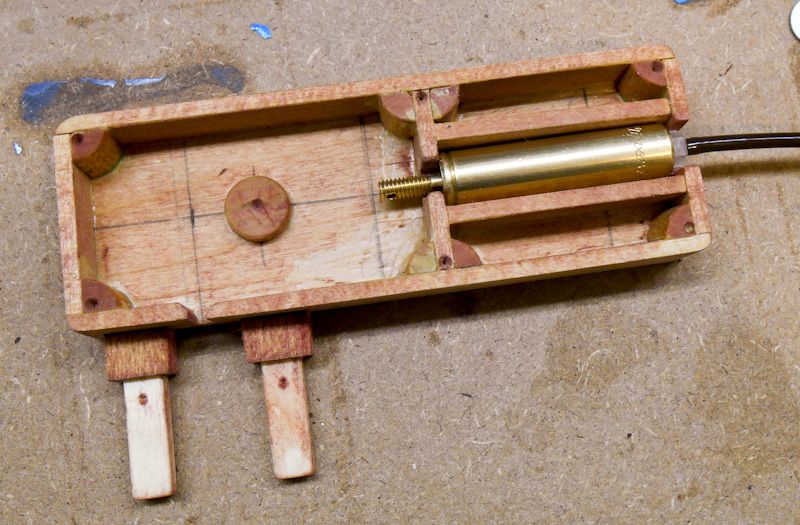
Cobbled up a proof of concept test unit.

Works from both sides, Pushing the points and Pulling the points.

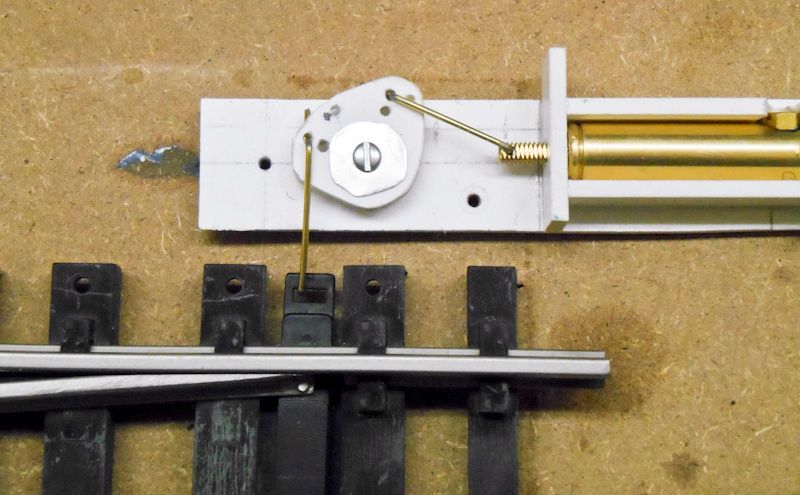
Using a series of different holes in the bell crank I played with the ability to flip the crank R to L and control the stroke of the rod to move the points.

I then built me a prototype to make a mold from so I can cast 20 more.

The Mold:

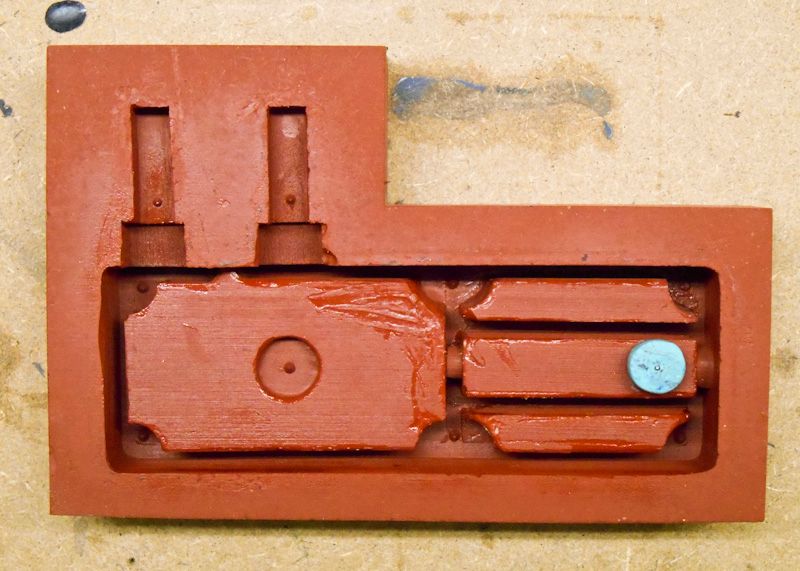
And the Switch Motor casing.

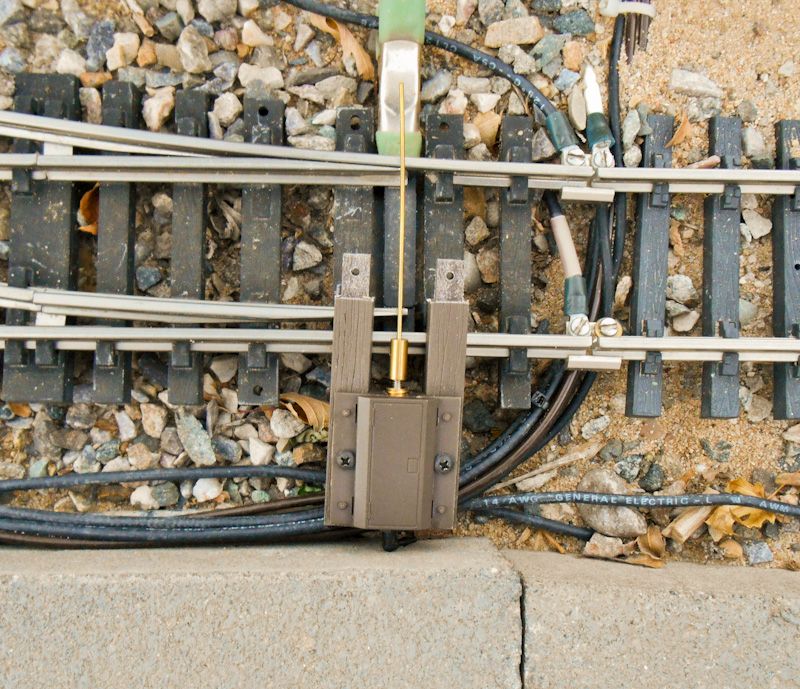
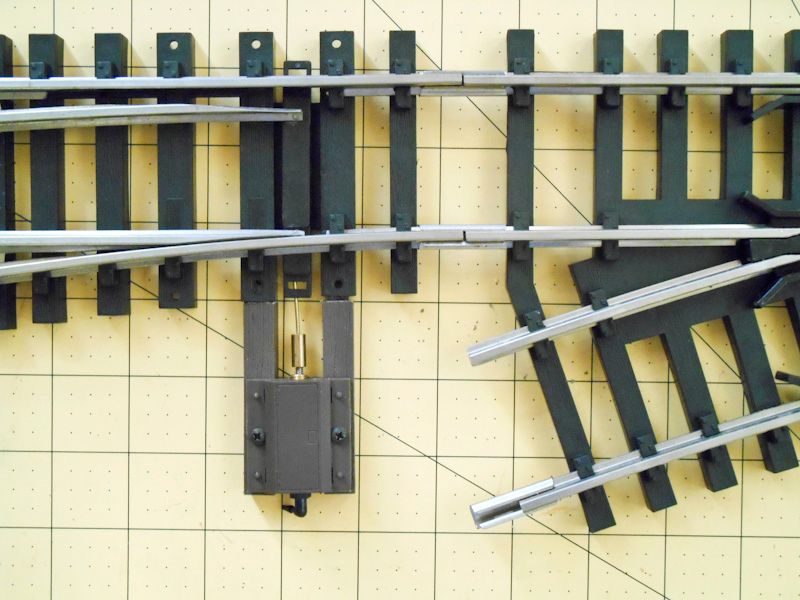
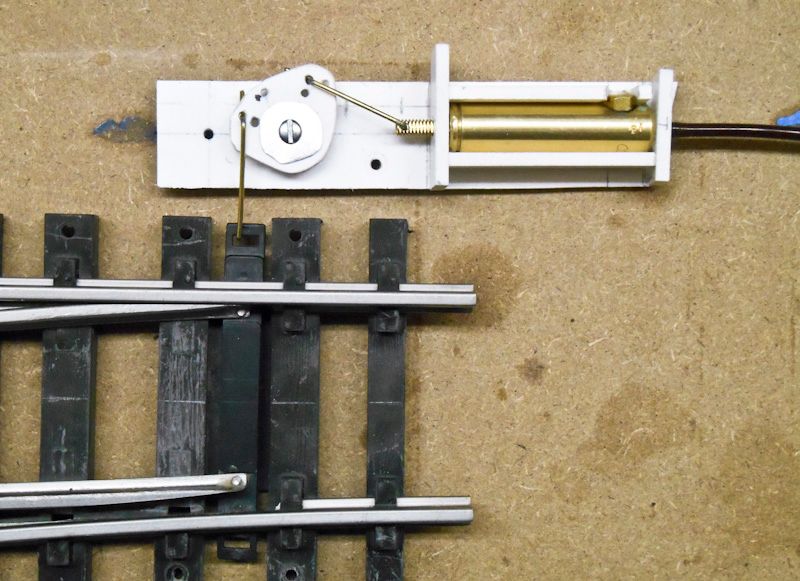
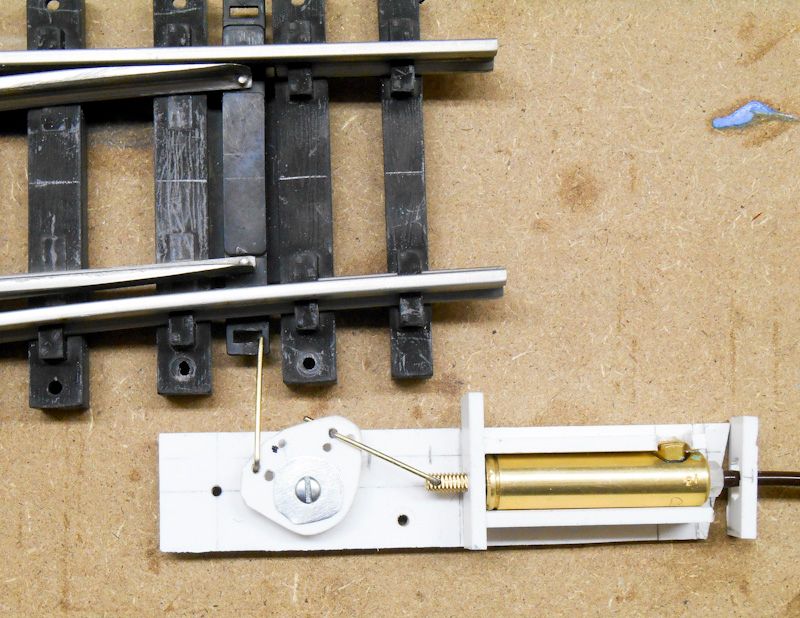
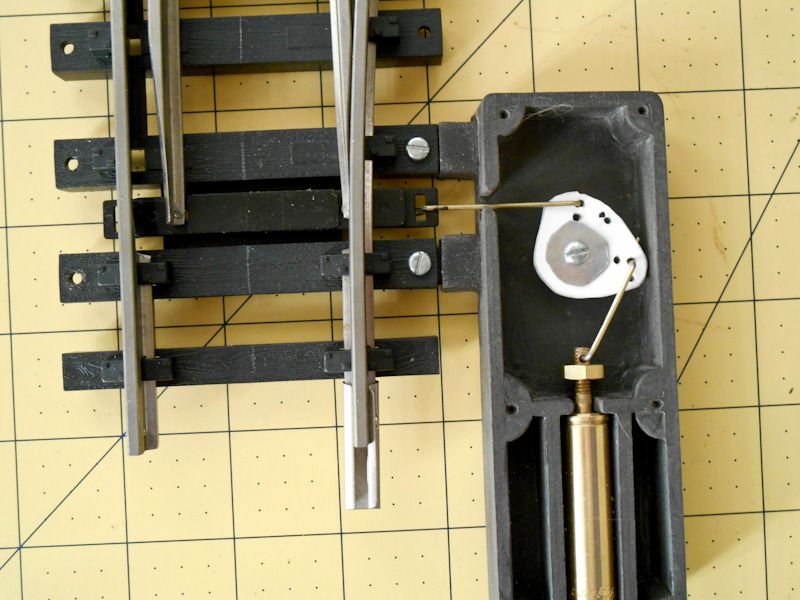
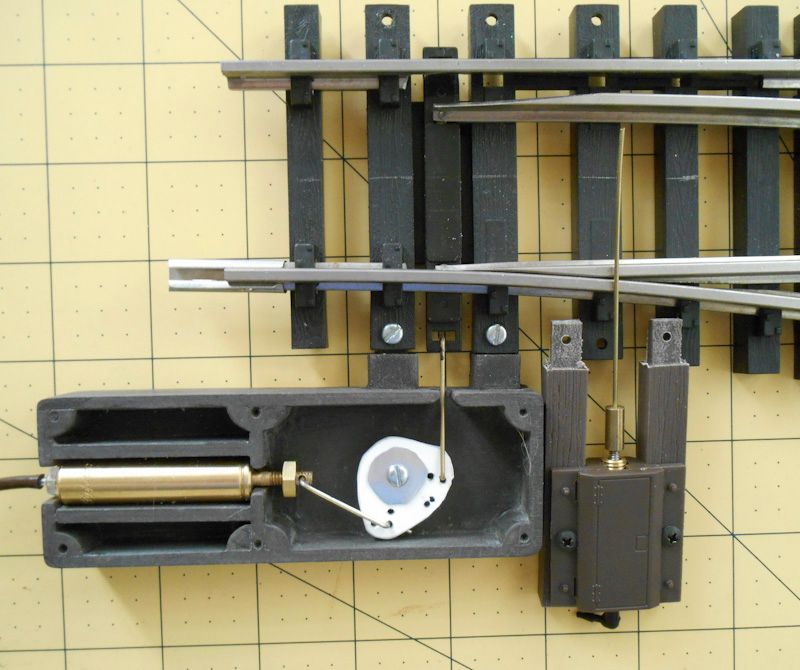
Test fitted in the Push the points mode.

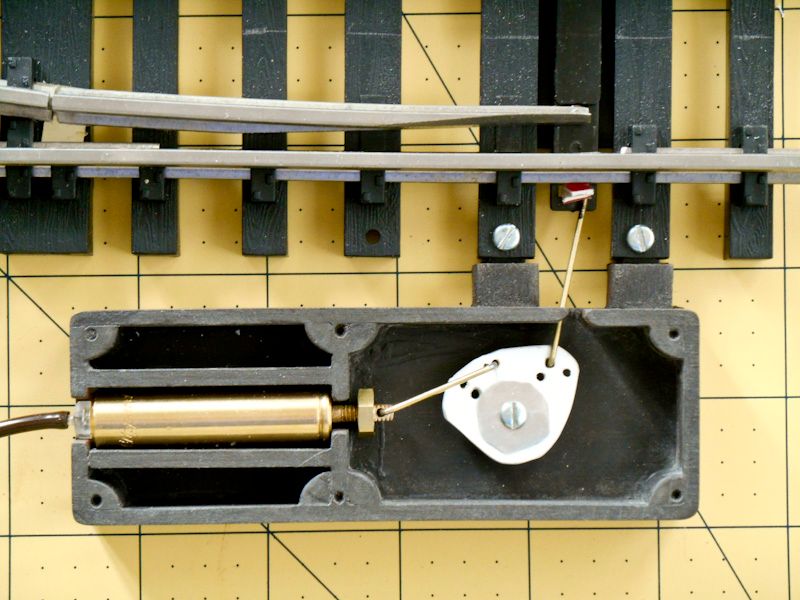
And in the Pull the points mode.

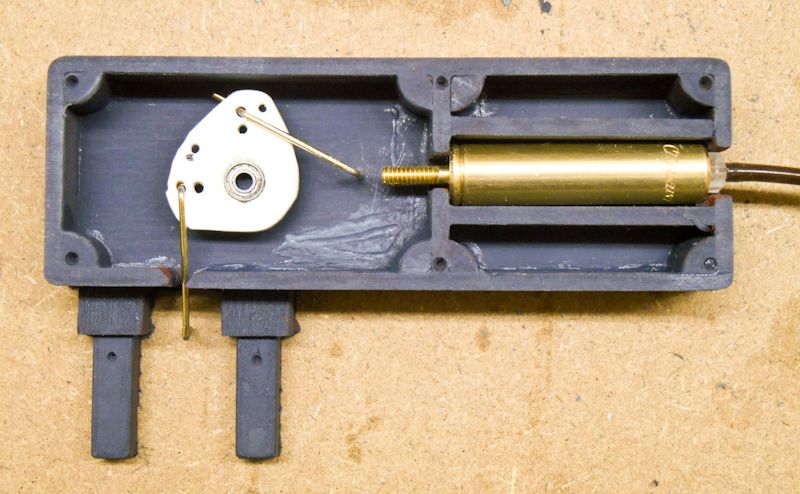
The motor works like a charm. Here is my test set up.

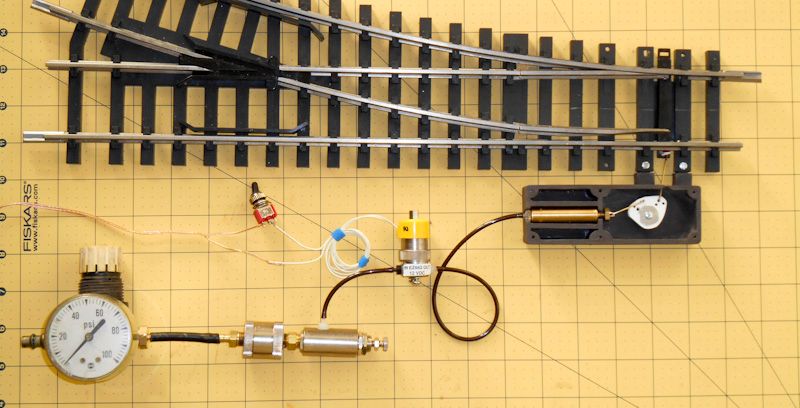
Starting from the bottom left to right, High pressure air regulator from compressor, to a filter, to a regulator to 35psi, out to the solenoid, which is controlled by 12Vdc, letting the air flow to the cylinder, pushing the plunger, turning the bell crank and pulling the points to the other position. Tah Dahaaa!

And the bell crank in the other position for pushing the points.

I have more work to do to the system, Designing and molding a good weather resistant cover, Prototyping a bell crank, for molding in metal. And coming up with a piece to strengthen the Aristo craft Point bar’s weak connecting point.

I’m wide open for comments, and flaws that you might be able to see that I missed, and any input that you might have for me before I get to far along.

Once I get these working well, then I’ll be begging Greg E. and all, for the help to wire up their controller to the DCC system, and manual switch control.

Great work Dave. Looks like that will definitely do the job. My only concern would be clearance. I have a few line-side items that never gave me any issues until the day I let my live steam Shay loose on the tracks. The counterweight found all kinds of things to bang into!

Jon, the whole unit is maybe 1/4" below the railhead, but I do need to put a cover on it.

Thanks for reminding me of the clearance issues.

Two suggestions…if I may…

First; why not move the fulcrum of the bell crank slightly, and or move the “Air motor” slightly, in order to allow a straighter throw to the bell crank ?

Second; as the weakest part of the Aristo switch is the throw bar, you might be advised to replace it with a better one. After a few years, or less, the throw bar will break at one of the two screw holes, and before that, the loop/slot will break on the end. We replaced ours with a brass one, but of course we don’t use track power, so you, with track power will have to use something else. Even the LGB throw bars eventually have this same weakness, but they do last a bit longer.

just another thought… we use small flat angle brackets for bell cranks…we just drill a hole in the corner, for the screw, and two small holes where needed for the actuating rods…you may have to look a bit for the small bracket that you need…

You can see the bell cranks on the OVGRS web page…

Nice job you are doing…

Fr.Fred

Fr. Fred Thanks for the input, thats why I asked. An added set of eyes to spot the design flaws and a different analytical point of view is always a better design waiting to happen.

I am wide open for engineering recommendations to make this thing better for the long haul.

“First; why not move the fulcrum of the bell crank slightly, and or move the “Air motor” slightly, in order to allow a straighter throw to the bell crank ?”

Ok, moving the fulcrum (we will call it Left or Right) off axis of the motor ( air cylinder) to give the power stroke on a straighter line to the Bell Crank. I explored just that in the first rough draft. Leaving the motor on center axis, and then having two fulcrum points, one for the push and one for the pull actions. I thought that it would make the case be too wide, as one of the design objectives was to try to make it as narrow as I could get away with. Q. How does the angle on the push rod, Effect the force applied to the Bell crank, and does it effect or apply overt pressure on the fulcrum point.

I shortened the distance between the fulcrum point and the motor by about 1 inch from the original design, as I thought that the overall length of the casing was longer then it could be if I shortened that distance. It changed the offset angle from centerline substantially. I reasoned that at such short throw length that it would not make a major difference. Was I wrong there, in my reasoning?

I also explored the motor placement off axis to the L and R to compensate for the flipping of the bell crank for the push or pull stroke. I quickly tossed that ideal out, as adding double complexity, and it would leave an extra hole in the case for weather proofing. Was this a bad choice for a technical reason that I overlooked?

“Second; as the weakest part of the Aristo switch is the throw bar, you might be advised to replace it with a better one. After a few years, or less, the throw bar will break at one of the two screw holes, and before that, the loop/slot will break on the end. We replaced ours with a brass one, but of course we don’t use track power, so you, with track power will have to use something else. Even the LGB throw bars eventually have this same weakness, but they do last a bit longer.”

This weak point is a given… Short of casting a whole new, Stronger, piece what are the options? I tore a switch apart, and honestly I think that with some careful engineering I can cast a better quality point bar. We will see, as I have several switches with a broken end. Have explored putting a brass strip across the bottom and up the end for the rod point.

As you will notice, by all the holes all over the bell crank, I explored many stroke combinations. I will cast in metal a custom crank once I settle in on the final layout. I want the metal for durability, and I can make it as small as possible to fit in the case.

EDIT: I hope that I don’t sound argumentative in my response. Quite the contrary. I was only trying to explain my reasoning for the approach that i used. I consider this a work in progress, and making changes to design for a better product, and knowledge is the goal. BTW I’m a photographer not an engineer.

Hmmm. I used to sell EZ Air…Jim Rich, who designed it, was local to me.
I am really surprised at the amount of work you have gone to, seemingly to gain the throw on the other side.
Replace the throwbar.
Llagas makes throwbar kits…PC board, painted, with brass pins.

The air motors are supposed to stay retracted when air is gone. That’s why we set them up for default (no air) to the normal direction.

Throwbars are easy. Figure out with air motor installed, connected to throwbar, pull throwbar just a bit to make sure the points will have spring tension when closed…drill enough through the point hole to mark.
Drill, pin, solder, trim excess.

Remount everything, apply low pressure air, push the throwbar back a bit so there will be good pressure on points, drill mark, finish.

Dave: Looks OK. Did you make the changes we discussed over the phone? Larry B.

et all: On advice of my consulting engineer friend Larry, Fr Fred, TOC, and others I have Indeed come up on a solution to the “Off axis” push on the bell crank.

So that I can use the motor for both a Push and a Pull switch I have come upon this fix.

And a short video that I can’t seem to be able to get to load up on the new system. (a little help if one could)

http://s1234.photobucket.com/user/dave2-8-0/media/DSCN0129_zpsf238f894.mp4.html

I also made a new holder that overcame a couple of design flaws in the original.

Comments welcome.

Dave, do you know the original manufactures of the air cylinder and what the actuator rid travel is ? I have been looking for some for my indoor layout thanks troy

Troy, Nope, Not a clue as who made the original EZ-air cylinders, I have searched all the major manufactures for matching size and travel of 1/2", they have nothing that matches. With the orig. manufactors out of business and no contact points there is no real place to start looking except the web.

I settled on Clippard product, cause there are the industry leader, and make great product, and they will sell you 1 or a thousand.

If you should stumble on a matching cylinder replacement, Please let the world, well at least me, know.

Dave the original manufacture was Del-Air products air motor had a 1/2" travel they went out and EZ-air came about.

I found this clippard ssr-08-1/2

http://www.piisa.com.mx/ingles/12_BORE_STAINLESS_STEEL_CYLINDER12_STROKESINGLE_ACTING_379.htm?sessionid=76302503072656691

Richard

Richard, I settled on the Clippard 3PS-1/2.

http://www.clippard.com/part/3PS-1%2F2

$8.40 each, less in quantity of 12 or more.

Been in production since 1949, I think that it will be around for a while longer, and the price is right.

The original EZ-air were a short stubby design. I have not been able to find any manufacture thats makes the stubby size. My EZ’s have no markings at all on the cylinder. I’m beginning to think that there may have been a special run, or came from a “surplus” source overseas somewhere.