Booomer,
what you write sounds easy - but how much time did you spend on that pair up til now?
Booomer,
what you write sounds easy - but how much time did you spend on that pair up til now?
A fair question Korm. Best estimate is 1 hour 28 minutes.
I spent about 20 minutes at the band-saw. It should have taken five minutes but I was not sure which parts would work best so I had to cut up multiple figures. I also lost a few parts to being thrown around the shop at the end of the cut by the saw. This necessitated multiple trips back to the house to get more victims…I mean figures. I should have brought the entire box out the first time but as I have gotten older I have turned into my grandfather. He never brought what he needed with him, instead he sent one of us kids after it. I guess I need to bring the grandson out here and get his lessons as a Jedi Knight started. “Use the force Alan,get the materials you can.” (The force of your feet walking up to the house (https://www.largescalecentral.com/externals/tinymce/plugins/emoticons/img/smiley-wink.gif))
Five more minutes doing a little cutting and trimming with the exacto-knife to get everything lined up. Finally three minutes applying glue.
The next step took about an hour. Once the glue was dry I used the knife to scrape the molding flash off as well as some trimming to smooth off parts I did not need like the rolled up sleeves. The last part was sanding the joints down and generally cleaning the figure up. Remember these figures are low dollar. You get what you pay for and these came in at $ .25 each. The Tamiya figures I use in 1/20.3 are about $4 each and on the rare occasion I chop up a Scale Humans or Model Humans figure I am at $10 to $20 each.
Now the astute reader will notice that so far there is no skill involved. It is all just rough work that requires a little patience and attention to detail. I do this while watching TV at what I consider to be a hobby pace. I think if I really tired I could get this far in about thirty minutes… give or take a finger.
Now I am starting the part where I am working putty. This does not require any talent just a little practice and a few cheating techniques. The biggest one is the fact that I am using plastic figures as the basic shape. I am not a sculptor. If I tried to make everything from a block of clay it would embarrass most first graders. We have all seen these kinds of projects from our school days.

Of course there is always that one smart-ass in the class that screws up the grading curve for everyone…

Little Brian Smucketelly…you rat fink, kiss up…its your fault I was stuck in the first grade all those years…ewww one of these days pal you are going to wear that flower pot for a hat… but I digress
I recommend Milliput two part epoxy modeling putty. It stays soft for about three hours and can be softened to the point of being sticky using plain old isopropyl alcohol. No need to rush to finish or break out the MEK or lacquer thinner. I put it on by getting a little alcohol on the figure and then mashing a small ball of the putty against it To much alcohol and it will slide off but just wait a minute and the excess will evaporate and then the putty will stick. Mash it around an arm to make long sleeves or a coat. Then dip your finger in the alcohol and smooth the putty to shape. This is the part where practice helps but not in great sculpting but speed. I probably did a couple dozen figures before I got faster at it.
I do one arm, leg or part of the torso at a time. If you have to much wet putty on the figure you end up sticking your fingers in it and messing it up. Better to work on five or six figures at once just doing a section on each at a time. It also gives you a place to use up extra putty since once it is mixed it cannot be stored. Once you get to this point there is nothing to do but set it aside and let it cure. I like to wait about twenty four hours. It is common to have to do multiple rounds of applying putty as you can see in this build.
Once it is hard I can cut it with an exacto knife or sand it with a variety of abrasives to get the shape and details I want. I use folded sand paper in both 180, 220 and 300 grits, I also have finger nail boards in regular and coarse. Just some patience and willingness to do another round of putty if needed is all that is required. Still no sculpting talent involved which means if I can do it anybody can. Try something simple like giving a short sleeved figure long sleeves or adding a bulky winter coat. Change an arm or leg positions and fill in the gaps. Once you get a feel for these two tricks you can do anything.
Don’t get discouraged. Remember only God and Ray Dunakin can make a man out of clay…us mortals have to start with whatever figures we can find.
When I am making figures I do a little work each day because I have to wait for stuff to dry (cure). This is why I say have multiple figures going at once. I spend about ten minutes on each at a time and then set it aside. About an hour of putty work is all I really want to do in one sitting. This is great because I can switch to installing electronics, assembling a structure or smoking BBQ (come on…you knew BBQ was coming into this sooner or later).
I am using the techniques described above so no need to repeat them here. Instead I will just discuss the why.
When last we saw our heroes they had were about to get their first round of putty. I started with the gaps in the arms and then filled in the sleeves. I also decided that sweetie-pie needed a coat since Aaron is wearing one. (Note here: it is way easier to add clothing rather than to remove it from a figure.) When I first started adding clothes especially coats I went from the torso out. This often lead to a lumpy misshapen garment and bulky sleeves. I have since realized that doing the cuffs and waist line first, gives me a more definitive starting point. I wrap a snake of putty around the wrist and work it up the arm letting it thin out. Sometimes this is enough and I can use the existing body, other times I come back later and fill in over the torso working my way up to the neck. The lapels or collar are added in the next putty session.
You can see in the first pic there is only the sleeves and waist are done. The lapels and closure came next.

First round of sanding and second round of putty work done.

Here is your next cheat for kit-bashing figures. I get those nice sharp edges on the sleeve cuffs, lapels and waist by carefully cutting the putty with a knife after it is dry. When I am working the wet putty I let it mash out over the wrist and hand. Once dry it has the consistency of hard soap and cuts easily.
This should finish the putty unless I find a problem in the final sanding. Then all that is left is Aaron’s glasses and hair. I have an idea so I am going to try something new with both.
it is sure fun to watch your work.
I have several LGB figures that are modern and I want to take them back in time. What putty would you recommend for this bash?
thanks for the good explanations.
but this:
“Remember only God and Ray Dunakin can make a man out of clay…”
made me spill my coffee.
hmmm…
after re-reading and braining a bit, i noticed, that i should be able to do that too.
in the end the only real difference between our methods are the materials used.
considering the time of the year, i dare to put a link:
https://www.largescalecentral.com/forums/topic/26257/instant-santa
Doug I have never owned or tried to do any kit-bashses with the LGB figures. If they are the same plastic as Prieser then the Testor’s glue should work great.
There is another line called Elastolin. I think they are hard vinyl and therefore would not take solvent based glue very well. I have seen people use superglue or epoxy cement on these.
Korm
If you can do those Santa figures with play-doh you can absolutely do what I am doing. (https://www.largescalecentral.com/externals/tinymce/plugins/emoticons/img/smiley-laughing.gif)
Progress continues. The figures are now sanded. Aaron’s hair is done with art sand. I glued it on using thick paint.

Then our lucky couple gets primed. I am using flat gray Walmart cheapy primer.

I found a few places that needed work and after a couple minutes of sanding they are ready for paint.
Aaron requested plaid clothing if possible so I gave him a blue / green based shirt and sweatie-pie a red / gray one. I also painted their flesh. I used chestnut ink on her which turned out way to dark. Not sure if I can salvage that or have to start over with a base coat. I really don’t want to do that as these figures are already lacking good detail. More paint will just fill in what there is.
Also now that I see it Aaron’s hair is looking a little “Greg Brady”. To late to change that. Hopefully I can fix it in editing.

Time to back up and look at the prototype again. Aaron is fair skinned with a pumpkin head, curly reddish brown hair and what looks like hazel or greenish brown eyes. Oh and lets not forget that pre-pubescent beard he is sporting. He does have a nice smile though.

Sweetie-pie is a little more Malibu Barbie with black hair and “Revlon Model” eyebrows. Her eyes look brown or very dark green. She has a nice smile too.

Break out the paint brushes.
…three hours and a lot of frustration later (two new curse words were invented and I guarantee I do not have a nice smile at this point) Aaron is done except for glasses. I think he looks pretty good. The beard was the worst part as I kept getting it to heavy. On the upside the “Greg Brady” look does not seem to be a problem. Sweetie-pie still needs a little wash but I need it to be very light. Just enough to bring out the shape of her face without darkening the flesh tone. Not sure weather to use dark gray or rust red like I did on Aaron.

Hope to finish this project tonight.
Got Peach or rose for her cheeks?
Oh yeah Bravo! Great job well done.
Actually that is a good idea John. A little blush might be just the thing.
If the figures don’t fit on his private car, they can always be used on his wedding cake…(https://www.largescalecentral.com/externals/tinymce/plugins/emoticons/img/smiley-cool.gif)(https://www.largescalecentral.com/externals/tinymce/plugins/emoticons/img/smiley-wink.gif)
You’ve out done yourself again Boomer (https://www.largescalecentral.com/externals/tinymce/plugins/emoticons/img/smiley-cool.gif)
Those are really good. I couldn’t do that. Sweet.
Painting done. Onto Aaron’s glasses.
I have tried a few different methods for doing eye glasses and none are great. To look right they need to be transparent. For this latest effort I cut a strip out of some acetate packing material. From that I trimmed out two lens shapes and used an exacto-knife to shape them to match each other. Last I glued them onto Aaron’s face by filling his eye sockets with white glue. Hopefully it will dry clear.

If this works all I will have to do is glue and paint the nose bridge and the temples.

Final results tomorrow.
They look awesome Boomer!! Very impressed! Can’t wait to see them finished!
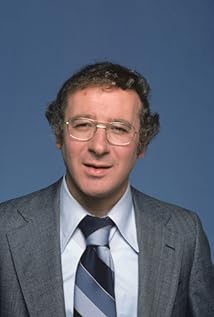
Well here you are Aaron.

Worked really well. I think it is a pretty good rendering of Aaron. Mrs Boomer thinks it looks more like Steve Landesberg from the “Barney Miller” TV show.
.JPG)
Done. In the mail to Aaron next week.
Excellent! You didn’t have to have the lens of his glasses that clean, sometimes they get dirty. Happy New Year to all! Especially Aaron and his “sweetie pie”.