At least you smoothed out the curve, Ralph.
Jake Smith said:Yep, that was a great improvement. It is 1 foot sectional track, the curves R1. Borrowed a rail bender. It was a PIA, but worth it ;) Ralph
At least you smoothed out the curve, Ralph.
Jake Smith said:Exactly. That was my original point. When Ralph first built this loop he was working with what he could get and no-one criticized. But I'm sure I'm not the only one that cringed at the look. Eventually the use of a bender came along and the railroad has looked great since.
At least you smoothed out the curve, Ralph.
I cringed when you posted the photo 
At the time, I really didn’t care. I was just happy to have some track down to run a train on 
And that ultra inexpensive Aristo sectional track made it possible 
Ralph
Ralph Berg said:Why?
I cringed when you posted the photo :D
I have had that one saved for awhile!
Hi all, A couple of shots of one area on the Shasta Pacific. This is on the raised railroad after I had made the decision to rise up from the soil. This is the start of the table top Shasta Pacific in the Fall of 2005 just after a visit to Richard Smith’s Port Orford Coast Railroad.
(http://freightsheds.largescalecentral.com/users/rick_marty/_forumfiles/RRupdatefile/view1.jpg)
A view looking into the same area in the Summer of 2010. A lot of progress in only 5 years when looking back at the old photo’s. Out there working a day at a time it sometimes seems like I’m getting nowhere at all.
(http://freightsheds.largescalecentral.com/users/rick_marty/_forumfiles/RRupdatefile/view2.jpg)
Always more progress every week even if it is only a new switch throw bar. Later Rick
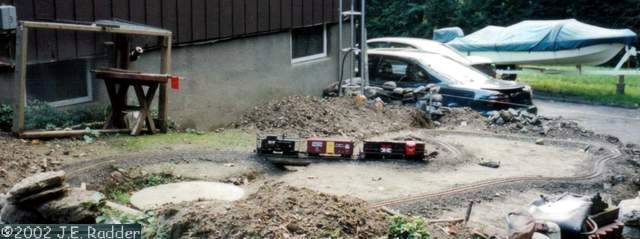
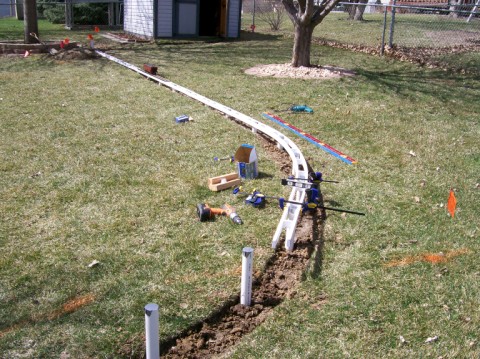
All these photos of before and afters had me thinking about how far my RR has progressed. Phase one was to move outside from under the Christmas tree in 2006. Phase 2 was to increase the main BUT I didn’t really consider the issue of grades and their effect on the engines seriously enough so then another Phase once again extended the main to lessen that grade from a 5% to a more manageble 2.5%. With track more or less down the digging commenced and as bridges were built they replaced brick and flower pot supports. The humble beginings.
(http://freightsheds.largescalecentral.com/users/capecodtodd/_forumfiles/aBeforeshot.jpg)
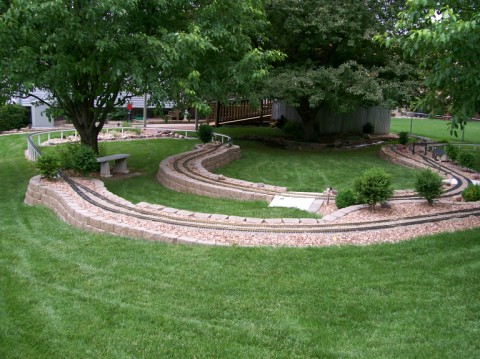
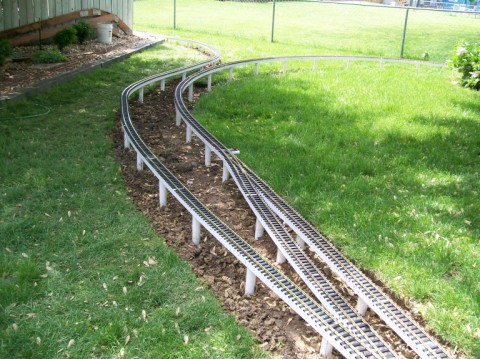
And how it looks today.
(http://freightsheds.largescalecentral.com/users/capecodtodd/_forumfiles/aAftershot.jpg)
Progress! I do like the simplicty the first photo shows but onward and upward I say. Rick Marty I like how you designed that one building to wrap around the corner. Looks good. Keep up the good work everyone. Todd
I guess I have a good idea once in a while. This has turned into a great thread. Thanks for all the pictures. I have one Before that has no After as the area has yet to see track again…
(http://photo.cvsry.com/NSS_Do-It_1_640.JPG)
Like Todd, I had just moved outside from under the Christmas tree.
All of my “before” pics were lost in the great photo hack of a few years ago.
No “now” pics, as I really have nothing yet to report.
Steve, I coud loan you some of my pictures if you would like.
Head Outhouse Cleaner
Steve Featherkile said:
All of my "before" pics were lost in the great photo hack of a few years ago.No “now” pics, as I really have nothing yet to report.
Wow, Hunting for a picture or two wasn’t any fun at all. I really need to organize my photos. Probably a thousand or more folders, many labeled with only a date  This is one of the earliest photos. This outer loop is still not finished. The switch on the left was for a passing siding.
(http://freightsheds.largescalecentral.com/users/cabby/_forumfiles/earlyRR1.JPG)
At this point, the unfinished passing siding in the photo above evolved in to an inner loop.
(http://freightsheds.largescalecentral.com/users/cabby/_forumfiles/earlyRR3.JPG)
Here is an ugly photo from today. The outer loop has been moved out a bit. The inner loop has a smaller loop that passes the depot and connects back.
(http://freightsheds.largescalecentral.com/users/cabby/_forumfiles/now2M.jpg)
The yard is now off the “wye”, out of the picture. Bigger & better
(http://freightsheds.largescalecentral.com/users/cabby/_forumfiles/now.JPG)
Before
(http://www.trainboard.com/railimages/data/500/Eastcurvewoking1.jpg)
After
(http://www.trainboard.com/railimages/data/500/Wahsatchsiding_E1.jpg)
Before
(http://www.trainboard.com/railimages/data/500/Echoswitch1_Medium_Web_view.jpg)
After
OK, which version? Mark I
(http://www.the-ashpit.com/mik/garden4.jpg)
Mark II
(http://www.the-ashpit.com/mik/ebay2%20007.jpg)
Mark III
(http://www.the-ashpit.com/mik/PC220003.JPG)
Mark IV March 2010
(http://www.the-ashpit.com/mik/P3100001.JPG)
July 2011
(http://i1082.photobucket.com/albums/j371/AlleghenyValley/AV2011/P1010008.jpg)
The before shot (2007):
(http://freightsheds.largescalecentral.com/users/threers/_forumfiles/Before.jpg)
The now (after) shot (2012):
(http://freightsheds.largescalecentral.com/users/threers/_forumfiles/After.jpg)
(this is after two expansions/re-tracking of the two ends in the upper and lower (what used to be) flower beds.
And then we can go back to 1989 when I built my first layout…
(http://rgsgardenrailroad.com/train05.jpg)
(http://rgsgardenrailroad.com/train04.jpg)
(http://rgsgardenrailroad.com/train06.jpg)
(http://rgsgardenrailroad.com/train10.jpg)
(http://rgsgardenrailroad.com/train28.jpg)
(http://rgsgardenrailroad.com/Trn12.jpg)
(http://rgsgardenrailroad.com/Train37.jpg)
And for Shawn, some snow shots…
(http://rgsgardenrailroad.com/Plow5.jpg)
(http://rgsgardenrailroad.com/Plow12.jpg)
(http://rgsgardenrailroad.com/Plow09.jpg)
(http://rgsgardenrailroad.com/Plow05.jpg)
Ken, in your third photo on the first page, or the one right above this post, who makes that sanding facility? or is it scratch built?
Thanks,
Terry
That’s scratch built…
(http://i253.photobucket.com/albums/hh58/rgseng/K-27/K27013.jpg)
and it’s been around a very long time and rebuilt a few times. It has a wood shell with Precision Products “Board and Batten” siding on it. The sand tower on top was made from .010" styrene wrapped around a toilet paper tube. (or maybe it was 35mm film canisters, been awhile, can’t remember… )
Found a few of my work in progress.
(http://freightsheds.largescalecentral.com/users/phillipsmk/_forumfiles/SMRR_B1.jpg)
(http://freightsheds.largescalecentral.com/users/phillipsmk/_forumfiles/SMRR_A1.jpg)
(http://freightsheds.largescalecentral.com/users/phillipsmk/_forumfiles/SMRR_B3.jpg)
(http://freightsheds.largescalecentral.com/users/phillipsmk/_forumfiles/SMRR_A4.jpg)
This is a really enjoyable thread. Thanks to all the posters.
Nor sure why im getting double posts on my thread. strange