Large Scale Central

Locomotive Carrier recommendation, please

When I built a carrier for my K-27 I used 2 cross pieces since that sucker is big, awkward and heavy.

It’s built from 3/4" plywood. The rest of the carriers, which haul the Annies and a Connie are all 1/2 plywood.

I didn’t build them for looks, I just needed a quick and dirty way to haul them around with out having to handle them all the time. Since they’re all RC and batteries, with connections between the tender and engine, this seemed the simplist, easiest and cheapest solution.

Pete -

I know you’ve seen my loco carriers many times before, but I thought the other guys on this thread would like to have a look at 'em, too.

Loco carriers??

No, I’m not talking about crazy mailmen…

You asked about transporting model engines. Here are some photos of a couple of things I built that allow me to do just that.

3

4

5

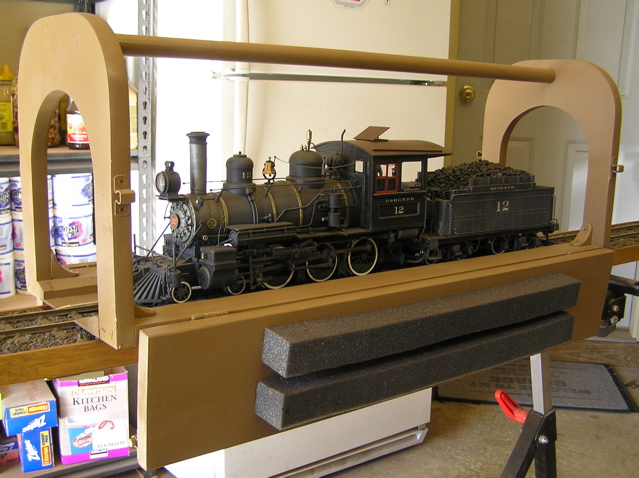
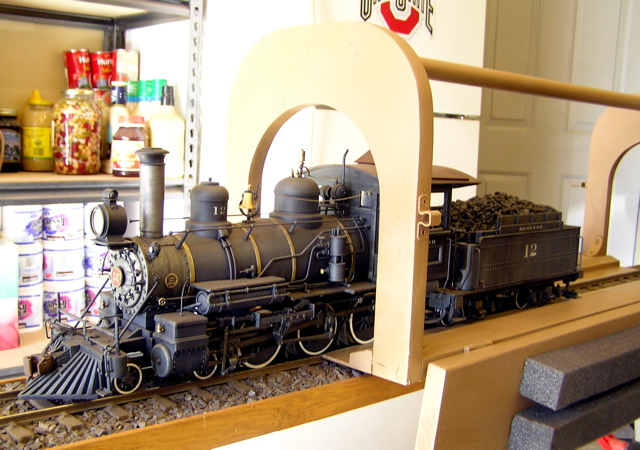
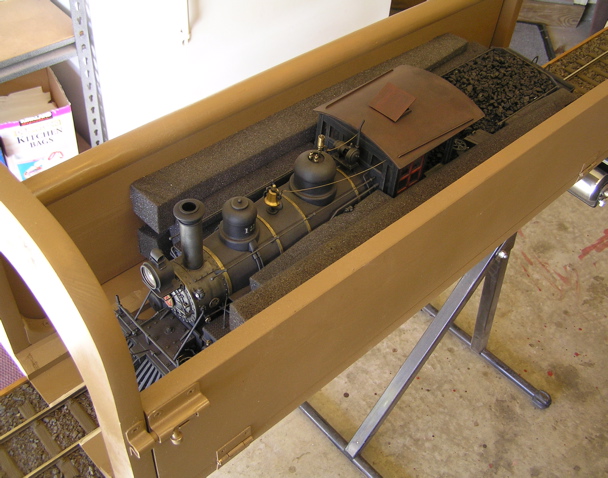
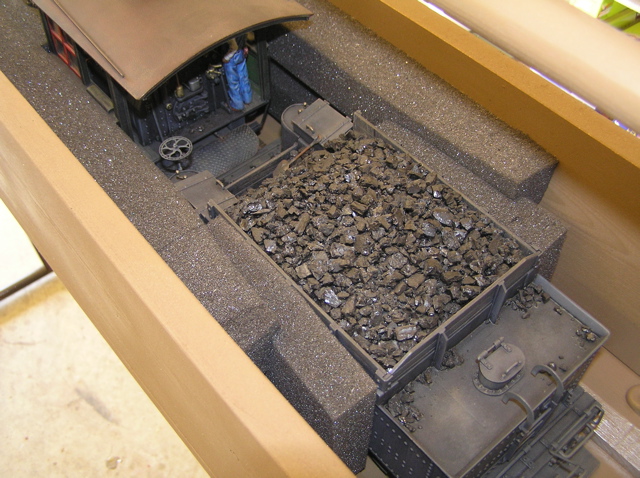
Pieces of foam rubber keep the locos snug and in place when the sides are raised and secured with barrel bolts.
6

7

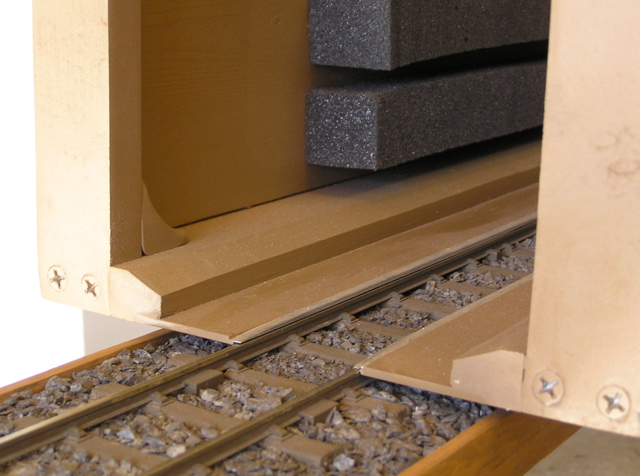
The base is built up with two aluminum contractor’s rules (big 2"-wide yardsticks) from Home Depot. The inside dimension between the two base plates is exactly 45mm. I used a router table with a fence to make shallow rabbet cuts along the inside bottom edges, about as wide as the top of a rail. This allows me to set the carrier down on a straight section and drive the loco on and off under its own power. By the way, the aluminum cuts easily and does not dull or harm the router bits.

I filed the tops down on each end to create little ramps. (More detail on how I did that later.) The loco gets its power through the aluminum base plates that are in direct contact and aligned with the track on the layout. Since I’ve gone to battery-power exclusively, it doesn’t really matter any more, but now it works for just about any engine.
9

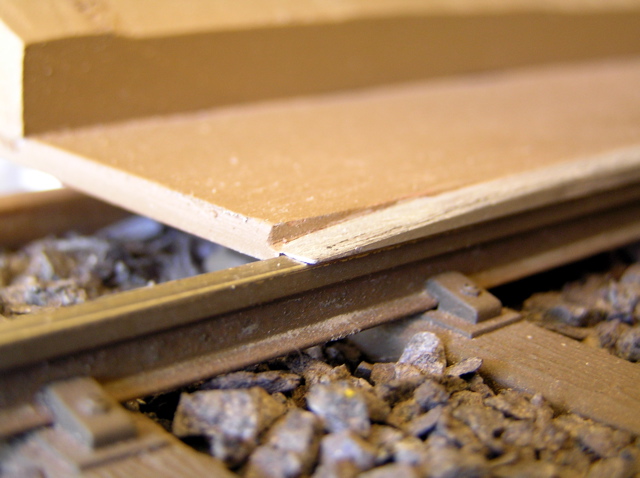
Here are some close-ups of the edge of the base plates. The carrier is aligned with the track by the rabbeted notches on the underside of the plates.

10

I cut another rabbet in the long wooden rail to which the metal base plate is attached. It’s about a half-inch wide and exactly as deep as the thickness of the metal stock. The plates are glued ‘n’ screwed into the rabbet from the underside. I countersunk the holes – set about an inch and a half apart along the rail – and used short flathead woodscrews so that the bottom of the carrier is completely flat. I had to bevel the inside top edges of the wood in order to clear the cylinders, valve gear and other overhanging parts of the loco as it runs on and off the carrier.

If you can find aluminum bar stock wider than two inches to use, then that last step probably won’t be necessary. BTW, I wouldn’t try using anything less than two inches wide, either – at least not for 1:20.3 scale steam locos.

After I cut the rabbet on the underside of the plate, I filed a ramp on the top side about a half-inch long to smooth the transition between track and carrier.

As you can see, it’s about the same width as the rabbet notch underneath. (When I painted it with a rattle-can, I masked off the top, side and bottom of the plate to assure good electrical contact.)

13

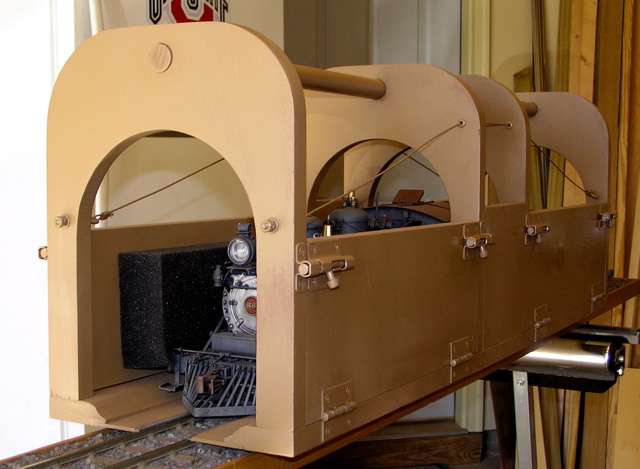
Since brass and steel Accucraft models are much heavier, I built this heavy-duty version to carry my C-21. I used the same techniques, just adding a center support and two sets of side panels instead of one.

14

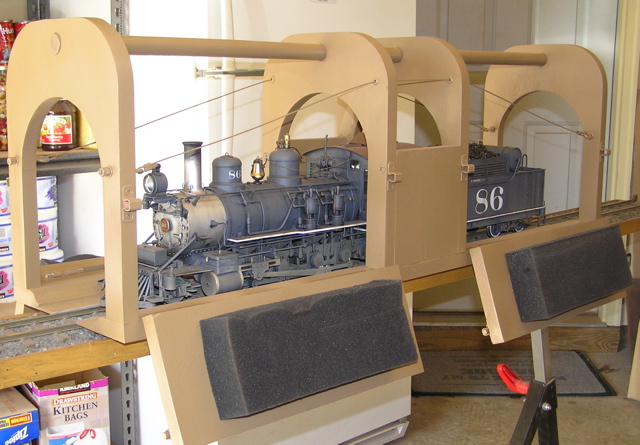
The wire cables on the Accucraft carrier were added to prevent the carrier from buckling under the greater weight. However, I find that I can’t tighten them fully without bowing the whole thing up at the ends (making it impossible for the loco to drive onto the carrier from the tracks) so I’ve got them set just this side of “taut” in order to pick up any unexpected strain. I suppose I could have gotten away without them, but they seemed like good insurance at the time.


Again, you can see here how I put all the parts together.

I haven’t drawn up any plans for this – I tend to do things “by guess and by golly” – so don’t ask me to send you any, but don’t hesitate to ask me any questions you may have.

I do hope this inspires you to try to build carriers of your own. Good luck

Ken,

Given that they are RC do you drive them in and out, requiring no handling.? Seem that this is what is happening.

Edited after looking at Jack’s carrier and answering my own question. This is a slick idea and I am going to build one as my first loco project is coming to a close and this is a good way to move/store/protect it.

Devon Sinsley said:

Ken,

Given that they are RC do you drive them in and out, requiring no handling.? Seem that this is what is happening.

I have two built to Chuck’s design, and I drive mine in and out by R/C. I’ll let Ken answer for himself, but my guess is that he does, also.

Steve Featherkile said:

Devon Sinsley said:

Ken,

Given that they are RC do you drive them in and out, requiring no handling.? Seem that this is what is happening.

I have two built to Chuck’s design, and I drive mine in and out by R/C. I’ll let Ken answer for himself, but my guess is that he does, also.

Thanks Steve,

after i posted I kept reading and see that at least Jack’s design is drive on drive off which is what I will build. I might have to visit Chuck and see his in person but seems pretty straight forward. The only issue I will have separate battery cars but once it is drive on the battery car can be removed so its a non issue.

Jack, I especially like your flip up sides that secure the loco, that is a great feature.

Regards, Greg

Devon Sinsley said:

Steve Featherkile said:

Devon Sinsley said:

Ken,

Given that they are RC do you drive them in and out, requiring no handling.? Seem that this is what is happening.

I have two built to Chuck’s design, and I drive mine in and out by R/C. I’ll let Ken answer for himself, but my guess is that he does, also.

Thanks Steve,

after i posted I kept reading and see that at least Jack’s design is drive on drive off which is what I will build. I might have to visit Chuck and see his in person but seems pretty straight forward. The only issue I will have separate battery cars but once it is drive on the battery car can be removed so its a non issue.

Isn’t your battery car going to be the tender?

Steve Featherkile said:

Isn’t your battery car going to be the tender?

I don’t think so. For one I am not sure there will be room after controls, sound card, and speaker are in there; also my thoughts were to use a trailing box car or caboose as the battery car that way when the battery dies I can switch out the car for a new one and still run the loco. I could have a couple of these cars that way one is always charging.

I got that idea somewhere from someone not sure where, but it seemed reasonable. Haven’t really crossed that bridge yet. I honestly don’t really know what I want or what is practical. I was told I might have room issues. There is zero room in the loco itself for anything but wire. All of the RC equipment and sound will have to be back in the tender. So the idea then was to move the battery back to a specific car/s for that purpose.

Having never seen the sound card or controls I am wanting to use I don’t know how big they are. I figured I would get the loco done, buy the equipment I want to run it and see where I can stuff it after the fact. Its the wing it method.

Devon Sinsley said:

Ken,

Given that they are RC do you drive them in and out, requiring no handling.? Seem that this is what is happening.

Yes, the end gate folds down and has grooves in to too, plus it has a bevel in it and acts as a ramp. When I go up to Fred’s to run or to Bob’s they have a dead end piece of track that the carrier can butt up against. I drive them in head first, since the charging jack is on the rear of the tender. Lower the gate and plug in the charger. (or a battery car, if the batteries die while I’m running)

Devon Sinsley said:

Steve Featherkile said:

Isn’t your battery car going to be the tender?

I don’t think so. For one I am not sure there will be room after controls, sound card, and speaker are in there; also my thoughts were to use a trailing box car or caboose as the battery car that way when the battery dies I can switch out the car for a new one and still run the loco. I could have a couple of these cars that way one is always charging.

I got that idea somewhere from someone not sure where, but it seemed reasonable. Haven’t really crossed that bridge yet. I honestly don’t really know what I want or what is practical. I was told I might have room issues. There is zero room in the loco itself for anything but wire. All of the RC equipment and sound will have to be back in the tender. So the idea then was to move the battery back to a specific car/s for that purpose.

Having never seen the sound card or controls I am wanting to use I don’t know how big they are. I figured I would get the loco done, buy the equipment I want to run it and see where I can stuff it after the fact. Its the wing it method.

I think you will be pleasantly surprised at how much stuff that you can cram into a tender. Check with Kevin Strong or Ken Brunt, among others, for their recommendations.

Jack, now that is the design I was trying to work out in my head. You did a great job there. I never would have though of fold down sides. Now I have a dozen more projects on my build list. At least a dozen, the smaller locos I can handle.

Thanks.

C’mon. I have put all that stuff in a Shay! If you use Lithium-Ion batteries, there will be plenty of room in a tender for speaker and the RC stuff. I make it so my batteries are removable just in case I want to run longer than a zillion hours at a time. So far, I haven’t needed it.

Ken (or others),

Does adding a dummy coupler to the none opening end add any additional protection to prevent a locomotive slipping out backwards? Or would it just cause more problems?

My carrying case that I use is big and heavy, but I can hold 1 locomotive, a caboose, and a battery car. It’s not drive-on/drive-off either. It’s basically a 3/4" plywood suitcase with foam padding. When I was in high school, I used to take the bus from home to TOC’s house, and would walk on with the case. Not light by any means, but it protects everything. Sorry I don’t have a picture.

Bruce Chandler said:

C’mon. I have put all that stuff in a Shay! If you use Lithium-Ion batteries, there will be plenty of room in a tender for speaker and the RC stuff. I make it so my batteries are removable just in case I want to run longer than a zillion hours at a time. So far, I haven’t needed it.

Bruce that is just the sort of answers I need. Having never done this before it is purely ignorance. I am learning and having no reference to go from, having never seen the components I just simply don’t know. I am learning fast.

Devon Sinsley said:

Bruce Chandler said:

C’mon. I have put all that stuff in a Shay! If you use Lithium-Ion batteries, there will be plenty of room in a tender for speaker and the RC stuff. I make it so my batteries are removable just in case I want to run longer than a zillion hours at a time. So far, I haven’t needed it.

Bruce that is just the sort of answers I need. Having never done this before it is purely ignorance. I am learning and having no reference to go from, having never seen the components I just simply don’t know. I am learning fast.

First, I build a speaker enclosure out of styrene. The speaker faces down on the floor of the tender and probably takes the most room.

The batteries are the next biggest component. But, I build my tenders with removable coal loads. So, this gives me access to everything in the tender, including the battery. You want to make it so the battery is not held in place by anything else. A 14.8 V Li-Ion battery back is the size of 4 AA batteries; typically a square, but I also have them as a long rectangle.

I don’t recall what you’re using for the ESC, or the sound, but typically they’re about the same size as each other j- about 1 x 2 inches or so. I use double sided tape to hold them in place, but they’re really not going anywhere.

Hehe…though we should probably be discussing this in another topic…

Devon, you can make the coal load lift off to get inside.

I second Bruce’s decision to make the batteries easily removable, not just for the reason gave, but so you don’t need an external charging jack, and also it’s easier to get the batteries to the charger.

There is indeed extra cost per loco because you will most likely want to dedicate the sound system to the loco, but this way each loco can have exactly the sounds you want, and also if you are using “autochuff” (which I recommend) then that can be set to match that particular loco.

It’s all doable…

Greg

Devon has asked this question on his build thread. Perhaps we could move over there. :slight_smile:

Yes, you are right, we are derailing this topic and discussion… bad Greg bad Greg :wink:

Guys,

I didn’t mean to hi jack the thread. I apologize for that. I have started this discussion on my build log where it is more appropriate.

http://largescalecentral.com/forums/topic/22482/my-first-build/view/page/7

thanks for the help. Now back on topic

Devon,

I built a carrier for my Bachmann Connie from 3/4" oak I had laying around the shop. I have been “mocked” that my carrier is built like a brick **** house, but it works for me. My “box” splits in half. I lift the top off and half of the sides lift off at the same time. Both ends are fastened to the top. The top and half sides are lined with foam, so there is no movement of the engine whatsoever. I have milled slots in the base that the engine and tender sit on and I have slots milled into the BOTTOM of the base. Therefore the engine is automatically aligned to the rails. Dan Patterson made a nice tapered oak ramp for my carrier and I just turn on the engine and drive right onto the mainline. The Phoenix sound, Airwire decoder and batteries are all inside the Connie tender.