Excellent loads, John! All printed, right?
How did you do the wood grain on the pumpkin crate, wire brush, or…?
The crossing and platform look great.
Excellent loads, John! All printed, right?
How did you do the wood grain on the pumpkin crate, wire brush, or…?
The crossing and platform look great.
Thanks so much, Cliff!
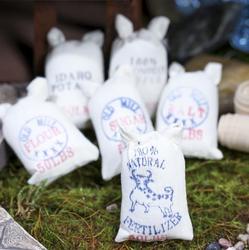
The pallets and crate are styrene. I used my xacto knife for the grain on the crate boards and a coarse sand paper on the pallets. The pumpkins are store-bought, but the flour load is printed.
They all look great and very realistic, except I question the stones/bricks in the middle. The wight would topple over a fork lift, surely?
Those are bags of flour, so I’d think the pallet wouldnt weigh as much as brick. I’ve gotta decal them still…
Oops - sorry. 
John, you got me thinking about whether there’s a way to model flour or other bagged product using actual bags. The only thought that comes to mind is getting cheap off-brand lantern mantles and filling them with plaster. But, I don’t see any that are all white, and still cheap. You can get empty fabric tea bags but they’re all too big.
I’m interested because of wanting to model (someday) sacks of coal and ore, because that was often how it got shipped in the Comstock area.
[edit] Hmm, tubular finger bandages might work. OK, I’ll stop!
Cliff and All;
Fabric/Craft shops used to feature small Feed/Flour/Fertilizer sacks for dollhouse and miniature diorama enthusiasts. Oddly, those were about right for our scales. I still have many of them, but no photos - yet. The next time SWMBO drags you into that kind of shop, take a look around - You just may find some. OBTW, the 1/2-inch dollhouse items work well for many of our scales.
Regards, David Meashey
i would be thankfull for a pick of these things, i never heard of.
but not far away, i have used gauze bandages with (for me) satisfying results.
dipp a piece of gauze into coffee (no milk, no sugar), let dry, glue to form with standard UHU (one or two layers), fill with cotton, bird shot, stained cat litter, seeds of the right size, what ever, glue closed if needed.
here an example (the sack full of onions in the foreground (in 1:1 pepperseed, stained with furniture-polish)
While not exactly part of the LHRR proper, here’s a video of what my modules for the NHGRS look like so far! Amherst Station will be against the platform, when it’s done. Or maybe not. I might bring it to the show in January even if I don’t finish it.
Here’s what it looks like right now. The windows are doors are done, too. Just not installed.
And here’s the video of the modules.
https://youtube.com/shorts/h0U-ME6xLQM?feature=share
Great modules, John. The platform is excellent.
Almost makes me want to make a module and bring it to just one meet up there (it’s like 10 hours each way!) just to be able to make an indoor piece of layout!
But naah, that wouldn’t work. I’d keep adding modules and… So nope I didn’t suggest that.

hahaha Thanks, Cliff! I’m really happy with the platform. Staining and laying individual boards seems to have worked out.
I’m actually designing the indoor portion of my railroad to fit these modules into it. That way, they get used all the time instead of just once or twice a year.
Are you going to build the steaming tender restaurant that is in Palmer ?
That would be quite thr project!
Maybe Ill do that one someday. For now, mt biggest project with be Northampton’s Union Station. I believe it’ll end up being 7’ by 3’.
Korm,
Those are very convincing burlap sacks. I may give that a go tomorrow…
David, the only ones I’ve seen (and Hollywood posted a pic of them) are 1:12 / 1-inch scale; a bit big. But maybe you’ve run across 1:24.
John, Korm, FWIW, I was vaguely thinking about a couple layers of these finger bandages on a bit of foam, cut and tied at the end and given a couple layers of some kind of clear coat.
No idea if it works though. If not, I’ll put them by the table saw. 
[edit] You can get it in rolls as well, but then ya gotta sew it. Which would look better on the closed end, but more work.
good luck! let the coffee dry, before glueing.
Smart. That’s the first I’ve heard of that approach, but makes total sense.
interesting. thank you for showing. but scary as well. first word, that came to mind, when i saw the pics, was “procto…”
near my saws i got a roll of duct tape…
the important question for our use would be, if they are made of cotton, or from sintetic.
sintetic can’t be tinted, only painted.
as well, i would not use a clear coat. then the sacks get stiff.
stiff plastic sacks one can buy by the hundreds for the 1:35 military stuff. but they never look real enough for me.
they just do not sit naturally upon each other, like real sacks with floating contents.
somewhere in my cave, in a black hole, i still must have some test pieces i made, with different sacks.
foam, or even cotton lets them look like modern bed-cushions, just chubby.
(but cotton made believable cotton bales)
fine birdshot seems a fine solution. or coarse pool-filter sand. both, if filling the sack about 80 to 85% made nice, heavy and real looking sacks. (and they stay, where you put them, if not too near of a black hole) ((don’t use fine sand or flower (EDIT: flour) with gauze. they seep through))
you, of all the guys, would be the last one i would expect to be afraid of some extra effort for realism.

