Large Scale Central

Laser Cutter Install Log

Todd Brody said:

On the Epilog, for speed, on a scale of 1-100, I would run 0.21 acrylic at ~8…, and that may not even get it. Also, we cut all acrylic, regardless of thickness, at full power and a frequency of 5,000 Hz (fastest). The Epilog is a 50-watt machine. So yes, acrylic is slow.

I don’t know how the 1-100 relate to mm/sec, but perhaps you could find it on-line at the Epilog site or elsewhere, if you so desired.

To do 3/8" I run at 4, twice and sometimes that doesn’t get it.

If you leave the paper on the acrylic, you get better edges.

OK, that sounds analogous. You’re at 8mm/sec (I’m assuming) @ 50W, I ran 3mm/sec @ ~33W. You have a better tube, so that’s an adjustment factor. So maybe my findings are not so out of line as I first suspected.

Thanks Todd, much obliged.

On the acrylic it looked like it was cutting at a bevel, suggesting that the laser was not aligned 100% vertical. But on the while plastic I don’t see that.

Nice. Now you are going to be the favorite kid in the neighborhood, because the other kids will want to play with your new “toy” too.

If the bevel is consistanly to one side, it is alignment. But if you cut a circle and it bevels in toward the bottom, this suggests that more power and a faster speed or better focus may be in order.

The laser is typically focused to the top surface and as it cuts, the top cuts first then continues to melt away as the laser cuts deeper. That’s why you want to cut as fast as you can.

Todd, yes, but on the acrylic sample

The left edge looks like it has an inward bevel to it. Opposite what you are saying about slow cutting speed. That suggests the beam isn’t totally vertical and needs aligned.

Agreed, assuming it is not an optical illusion caused by the angle of the shot obscuring the other side.

#1 it does not matter what speed an epilog can cut it at, unless you are comparing for a decision at what to buy.

But that is behind you.

you can experiment,cut faster to see just where it does not cut through, at that temp you know your limits.

100% power, and controlling speed is not always the best, many times turning down the heat and slowing down produces best results.

In case you are not aware of what causes the angle cut like your circles, it is your beam is not in the center of the lenses.

Oh by the way, your name plate piece is looking good.

Congratulations on your new toy/tool, your fun has just started.

Dennis

The angles are an optical illusion, the cuts seem pretty square. Except for that left edge David, that’s an uneven break in the scrap.

I spent quite a while yesterday doing alignments, and things seem good enough to get moving. There is a very slight vee-ing due to speed & thickness as Todd mentioned, but not much.

Dennis, I was looking for any frame of reference for cutting speeds to be expected. My documentation has squat on that, and 3mm/sec seems slow. But whatever, I’m not going to worry about it for now.

I’d like to bump up the power, but that will need to wait for further information on what the tube will tolerate and still last the published 3 years. Vendor claims it’s warrantied for that long, 1000-3000 hours of op time, running at 58 watts – or about 97% power. I don’t believe that, from what I’ve read & heard on these tubes. So I’m trying to pin the vendor down better on specifics.

More later… Thanks guys,

Cliff

I couldn’t wait to get off work and finish the logo design, and try another cut. Here it be,

I noticed that the ammeter needed calibration, and that worked in my favor. So I was able to run the .16 material at 5 mm/sec & 70% power (running at 21mA), so that was a relief.

I also learned to let the fan run for a minute or two before opening the lid. I kinda stunk up the basement yesterday, what with constantly opening the thing and examining the test cuts (all those circles), but it’s fine today after cutting this.

Notice the little notches on the underside of the white. I believe these are when the laser passes over the metal honeycomb support, because there’s a flash when that happens. Maybe I should make a bed of nails like some guys do, for less support structure interference?

Also, the black plex made a very bright constant flash. It had paper on it, maybe that was it. But it was too bright to stare at for sure. Since no goggles came with the cutter, I need to get a pair rated for this wavelength (10,600 nm).

https://www.amazon.com/gp/product/B00VA7JQ0C/ref=ox_sc_act_title_2?ie=UTF8&psc=1&smid=A2X31NC277FGOB

I really like this machine! Here’s a few more observations.

  • After installing the software and hooking up my computer via USB, it and the cutter were talking. No port setup hassle!
  • The control panel and software are a lot easier to understand than I expected.
  • There’s a switch on the front to enable the lid switch. So when running, it will turn off if someone gets curious and lifts the lid.
  • There is a water flow sensor, so if you forgot to turn on the chiller or pump, it will beep and prevent the laser from coming on.
  • Plugs in the back provide power to air pump and chiller, so they come on when enabling the laser.
  • There are about 7 access panels, all removable, with decent latches. They rattled, but little bits of weatherstrip fixed that.
  • The whole thing is on heavy duty lockable casters, and that’s made setup and debug easier.
  • This was the only unit in the 60W range I found that has the electric up/down, and it’s made setup for different conditions very easy.

That’s it for now, thanks for viewing,

Cliff

You may not get those marks if you use acrylic with the paper still on it. I don’t get them on the Epilog, even without paper, but then I always do clear acrylic. You are correct that when the beam strikes metal, there is “flash” but I don’t really see it except where the beam passes the acrylic and hits the metal directly.

Maybe your focus is set a bit deep?

What kind of support bed do you have Todd? Same honeycomb thing? I don’t know about the focal depth, except that I’m using the little gauge they sent (about 5/8" tall). I did tried many different distances yesterday (in those circle cutting attempts), but none worked much better than that distance, at least for the .21" stock. But maybe different thicknesses of material require different focal distances? I only used the same gauge on the various materials so far.

It is typical to focus to the top surface, unless cutting thick material in which case you may want to focus a bit deeper. The Epilog has a removal gauge and you should “just be able” to slide a sheet of paper between the gauge and working surface for proper focus…, assuming the tech everything set correctly.

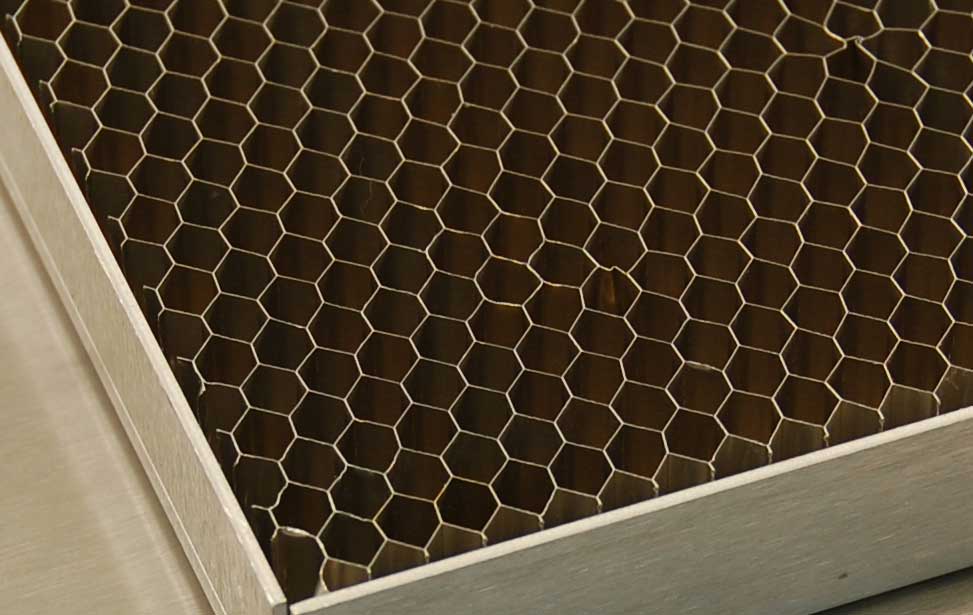
The Epilogs have both the honeycomb and perforated metal, but I always use the honeycomb.

From Epilog:

"The Vector Cutting Table is used to lift the material being cut above the work surface. This allows the laser beam to pass cleanly through the material you are cutting and dramatically reduces underside reflections. The air space below the vector grid is connected to the exhaust, so smoke is removed not only from the top side of the material, but also from the underside.

Our Integrated Vector Cutting Table is included standard in the Legend Series and is a robust 1" (25.4 mm) thick. Simply remove the Task Plate and place the Vector Cutting Table in the system to dramatically reduce underside reflections from burning the back side of the material being cut."

BTW, the biggest bug-a-boo with these tables is that they tend to sag in the center. This then makes the beam go out of focus and it may not cut all the way through the piece.

If it doesn’t, and the piece has moved at all either because of the sag, or because of human intervention, it has just become scrap because you really can’t complete a cut that has not gone all the way through.

Also, depending on in order in which things cut (and you have almost no say in this matter), cut lines can make a piece sag before the remainder of that piece is cut out leading to pieces that are under or oversized, or lines that don’t line up.

I made a shim out of brass to compensate, but that only does so much.
That’s very helpful, thanks Todd!

Forgive me for sending you backwards, I can’t find the post where you tell what the software is you are using?

I saw you said that it worked but what is it?

I just loaded three different ones trying to get a grip on 3 d stuff. I got a used laser as a trial and need all the cords and software to even try it.

I tried some other one and the more current version cancelled itself out? So it wouldn’t even run.

I’m now trying Corell as I found that listed on Dave’s site.

The Moshidraw that came with the machine was blank? I believe the previous owner had troubles and may have deleted it somehow, if that’s possible.

I went online to recover it and every site warned that it contained a virus or something?

I hate this stuff. It’s like going back to school all over again. Maybe I can just scan and import images when I figure this all out?

Urrggg,. Good luck and keep at it! (I just about gave up!)

Joe, that’s a drag, sorry to hear about all those issues.

There’s 3 parts to the software, in my case.

  1. The thing to draw with. For me, it’s AutoCAD, because it’s what I’m familiar with. I’ve heard good things about Corel, but haven’t used it.

  2. The thing that preps the image for cutting. Mine is RDWorks, which came with the system (on a CD). I think Moshidraw is similar, but I’ve heard complaints. You can do basic drawing work, photo prep, cutting speed & power, etc.

  3. The thing on the cutter. I don’t know what mine’s called, but it’s permanently installed in the board, on the machine. Is this what you said got wiped from yours? It can take prepped files from a stick or usb cable directly from RDWorks (and I suppose MD).

That’s about all I know Joe, maybe others can give more info.

Cliff

Joe - can you send some photos of the laser cutter - especially any controls and connections. That would help us to figure out what you have.

thanks

dave

Cliff,

I would propose that a pair of goggles/glasses for oxy/acetylene cutting would be a good and inexpensive option. There would be available at any local welding supply house, or mail order.

Bob C.

This shows the interface for the Epilogs. Very easy to use and maybe could be adapted to yours. This runs through CorelDraw.

Bob “IA3R#7” Cope said:

Cliff,

I would propose that a pair of goggles/glasses for oxy/acetylene cutting would be a good and inexpensive option. There would be available at any local welding supply house, or mail order.

Bob C.

I don’t know. Laser goggles are made to block the wavelength of light that the laser uses. Welding goggles just block some of all light, so the bright arc of welding doesn’t blind the user. Its not quite the same thing.

David Bodnar said:

Joe - can you send some photos of the laser cutter - especially any controls and connections. That would help us to figure out what you have.

thanks

dave

Sure. I forgot about this post. I will get back to you.

I put the pics in an album. I didn’t mean to jack this post!

http://largescalecentral.com/albums/editphotos/12512